5 Reasons For Samsung Refrigerator Ice Maker Not Working (How To Fix)
Samsung refrigerators have earned a reputation for excellence in the appliances industry, with their annual releases of refrigerator models impressing homeowners. The brand’s commitment to sleek designs, technological advancements, and ergonomic features has paid off, making their products increasingly reliable. However, even with these impressive features, Samsung refrigerator ice makers can sometimes malfunction.
This article will explore some common reasons why your Samsung refrigerator ice maker may not be working as intended.
Reasons for a Samsung ice maker not working
Before resorting to professional help, it’s often a good idea to troubleshoot the issue on your own. One of the simplest and most effective ways to do so is by understanding the common reasons that might be causing your Samsung ice maker to malfunction. By knowing what to look out for, you can potentially identify and resolve the problem without having to call in a technician. So, let’s take a closer look at some of the possible explanations behind your appliance’s lack of functionality.
Incorrect Freezer Temperature
When it comes to maintaining a functional Samsung ice maker, it’s crucial to strike the right balance between heat and cold. The ideal temperature for ice production typically falls within the range of -20°F to 0°F. However, it’s essential to note that this standard may vary depending on the specific model of your Samsung appliance.
To ensure optimal performance, it’s recommended to follow the manufacturer’s guidelines as outlined in the user manual or, at the very least, take a moment to check the temperature of your freezer before making any adjustments.
Ice make might be paused or turned off
Before troubleshooting your Samsung refrigerator’s issues with not working as expected, it’s crucial to verify whether it’s in a paused or turned off state. This is because these states can easily lead to malfunctioning. Additionally, if you have an external ice maker on your Samsung fridge, be sure to check the on/off button specifically designed for ice production. A key indicator of proper functioning is when the ‘on’ light illuminates.
If this isn’t happening, it’s likely that no ice will be produced.
Ice stuck in the mold
If you’re experiencing issues with your Samsung refrigerator’s ice maker, it’s possible that a stuck ice chunk in the mold is preventing new ice production. This clog can occur when ice chunks form inside the ice maker, rendering it ineffective. To avoid this issue, regular maintenance is crucial. Make sure to check and clean your ice maker periodically to ensure smooth operation.
Water Filter
When an ice maker fails to produce ice due to inadequate water supply, it’s often a sign that the water filter needs attention. A clogged or ineffective filter can significantly impede water flow, hindering the production of fresh ice. To troubleshoot this issue, ensure the filter is free from contaminants and debris, which may be restricting water flow. As part of regular maintenance, consider replacing your water filter every six months to guarantee optimal performance.
Does not have adequate water pressure
For a refrigerator’s ice maker to function effectively and produce ice, it is crucial that the unit has sufficient water pressure. Without proper pressure, the machine may not be able to supply the necessary amount of water to create ice cubes, resulting in subpar performance.
Samsung refrigerator troubleshooting ice maker not working

When your Samsung refrigerator’s ice maker suddenly stops working, troubleshooting is the initial step towards resolving the issue. A homeowner can easily tackle this task by following a series of straightforward steps. To get started, here are the simple procedures for diagnosing and potentially fixing non-functional ice makers in your Samsung refrigerator.
Make sure that it is turned on
Before jumping to conclusions about potential damage, it’s crucial to verify the most basic setting – whether your refrigerator is actually turned on. This might seem obvious, but it’s surprisingly easy to overlook this fundamental detail, especially for homeowners with external ice makers who may inadvertently turn off their appliance when not in use. A simple check can save you from mistakenly diagnosing a problem that doesn’t exist.
Adjust the water pressure
In situations where the water pressure falls below 20psi, expert intervention becomes necessary. It’s crucial to seek the assistance of a qualified plumber to adjust the pressure and prevent potential harm. Attempting to tackle such issues solo can lead to further damage to the ice maker or even pose an electrocution risk. Therefore, it’s always best to prioritize safety by calling in professionals who can provide expert solutions.
Reset or Test the Ice maker
Correcting minor issues with your refrigerator’s ice maker can be as simple as pressing its reset button, just like other appliances require. This straightforward solution often resolves any minor faults the machine may have accumulated over time. In fact, 24 hours after performing this test, the ice maker should be functioning properly and at the ideal freezing temperature to produce ice cubes.
But if it fails to cool or operate as expected within that timeframe, it’s likely indicative of a more significant issue that requires professional attention.
Samsung refrigerator ice maker not dumping ice
If you’ve ever found yourself standing in front of a seemingly non-functional ice maker, wondering what’s gone wrong, you’re not alone. When your ice maker fails to dispense ice, there are several potential causes that could be at play. Here, we’ll explore the most common reasons behind this issue and provide practical solutions to get your ice flowing once more.
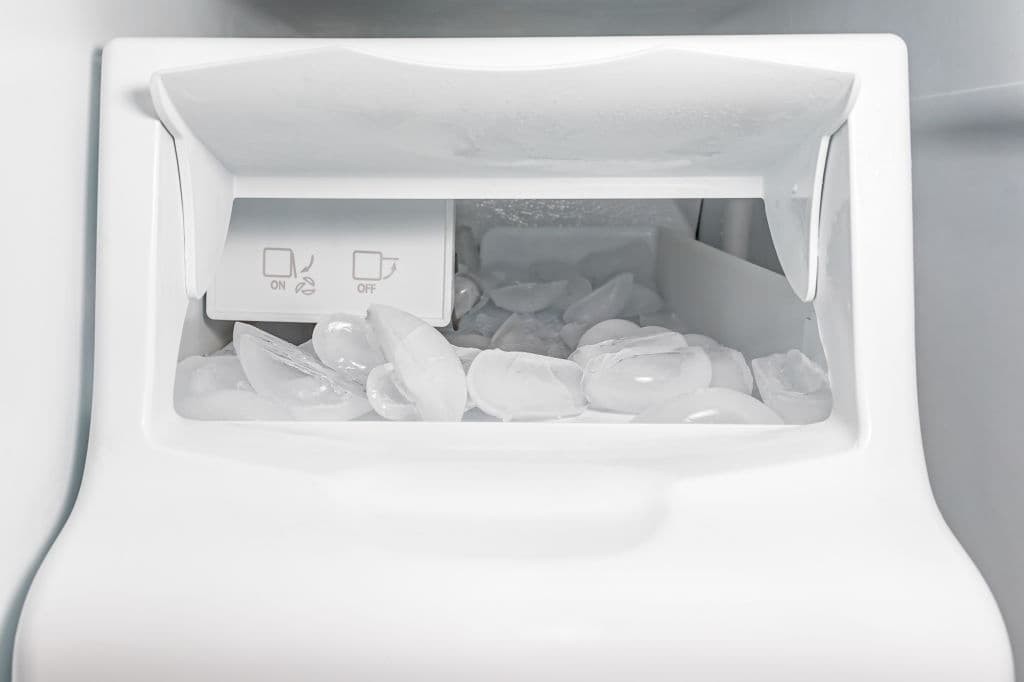
Check the ice in the ice bucket
When tackling your ice maker’s issues, it’s essential to start by removing the ice bucket. However, this process can be model-specific, so proceed with caution to avoid damaging the machine. The presence of clumpy ice in the bucket may be the root cause of the dumping problem. By understanding these nuances, you’ll be better equipped to diagnose and potentially resolve the issue.
Check the child lock feature
When enabled, this feature prevents your ice maker from producing unnecessary amounts of ice by locking the dispenser and displaying a message indicating that even if the ice bucket isn’t clogged, the machine won’t dispense ice. It’s essential to note that not all Samsung refrigerators come equipped with this feature, which is why it’s crucial to research the specific model you’re interested in purchasing before making a decision.
Samsung refrigerator ice maker won’t turn on
When your ice maker refuses to turn on, start by addressing the most straightforward issues. Verify that it’s properly plugged in and the correct ‘on’ button is activated. Next, ensure a stable power flow, as any fluctuations can prevent it from functioning. If these initial checks don’t resolve the issue, it’s time to delve into more comprehensive troubleshooting. This may involve researching online or consulting your user manual.
However, be mindful of handling your ice maker with care to avoid inadvertently creating another problem. If your attempts at self-troubleshooting prove unsuccessful, seek professional assistance without delay. If the issue arises within the warranty period, consider contacting the manufacturer for a complimentary service repair.
Samsung refrigerator ice maker fan noise
When an ice maker produces unusual noises, a single culprit is often to blame: an excessive buildup on the fan. This can be confirmed by opening your refrigerator door and noticing a sudden cessation of the noise. In such instances, it’s generally recommended to defrost the ice maker immediately. Although this process may take some time, it will ultimately restore the device’s functionality.
However, if the issue persists after defrosting, it may indicate a more complex problem that requires professional assistance.
Samsung ice maker not working but water does
A faulty water inlet might be the root cause of the issue. Insufficient water pressure can prevent water from flowing into the machine, resulting in ice not being formed despite having water present. To resolve this problem promptly, ensure that the valve is set to meet the standard 20psi water pressure requirement.
Samsung refrigerator ice maker not making enough ice
In terms of ice production, a Samsung refrigerator equipped with an automatic ice maker has been designed to generate up to 120 cubes daily, aligning with the manufacturer’s standard specifications. However, if your ice maker is consistently failing to produce sufficient quantities, there are several steps you can take to troubleshoot and resolve the issue.
Empty the ice tray and keep it turned on for 24 hours
A crucial indicator of an ice maker’s performance is its ability to produce at least 50% of the desired cube ice within a 24-hour period. If this threshold is not met, it’s likely that the machine requires professional attention and maintenance to restore its functionality.
Set your freezer display into a lower setting
To consistently make a decent amount of ice, it’s essential to maintain a temperature of at least 5°F or lower. This will enable you to produce around 60-90 ice cubes daily. If you’re not achieving this level of performance, there may be other factors at play that need to be addressed.
Make sure that the water valve is completely open
Before attempting to locate the water valve, it’s advisable to consult your refrigerator’s user manual to gain a deeper understanding of its internal components. However, for many users, the water valve is typically situated along the refrigerator’s water supply line, making it easily accessible for maintenance and troubleshooting purposes.
Change the cartridge filter
While navigating the process of replacing a cartridge can be straightforward when following the manufacturer’s manual, some individuals may still feel uncertain about tackling this task on their own. For those who prefer to err on the side of caution or lack the necessary expertise, seeking the assistance of a professional is always an available and recommended option.
Turn on the power freezer function
While not a universal feature across all Samsung refrigerator models, certain units do boast this functionality. Interestingly, the standard time for producing a single tray of ice is approximately 90 minutes. However, by flipping the power freezer switch, users can significantly boost their ice production, achieving an impressive rate of just 55 minutes per tray – effectively doubling the typical output.
Samsung refrigerator ice maker not working after changing water filter
If changing the water filter doesn’t resolve issues with your ice maker, it’s possible that air remains in the system after the waterline was removed. This can cause the fill tub to freeze due to water flowing through it. To address this, you may need to physically remove any blockages or simply let time do the trick.
A hair dryer aimed at the frozen area can help loosen the ice, while leaving your refrigerator defrost mode for an extended period – 24 hours or more – allows the ice to melt naturally, allowing water to flow freely and restore ice maker function.
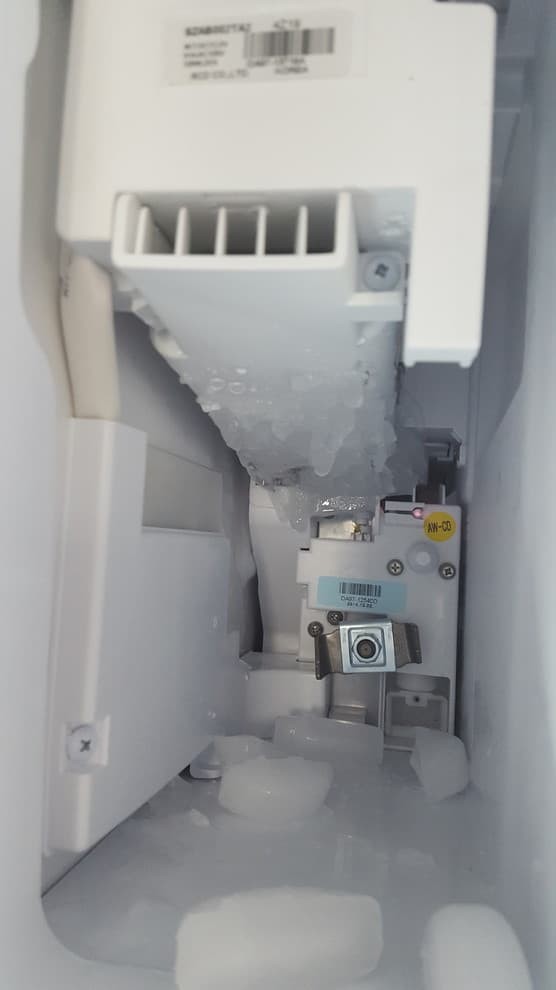
Samsung refrigerator ice maker frozen
To effectively troubleshoot a potentially frozen ice maker, it’s essential to follow these steps with precision. Before diving into each tip, consult your refrigerator’s user manual to ensure accurate and efficient diagnosis.
Inspect ice bucket gasket
To ensure your ice maker runs efficiently, it’s crucial to check the ice bucket gasket regularly. If the gasket becomes loose or worn out, warm air will inevitably seep in, leading to condensation that can freeze over time. As a result, if the gasket is no longer tight and clean, it may be necessary to replace your ice maker altogether, as this can significantly impact its ability to function properly.
Check the ice chute flap
To maintain a consistent temperature, it’s crucial to ensure the warm air stays out and cold air flows freely through the ice chute. This is achieved when the flap rests flush with the chute. If this configuration isn’t maintained, issues can arise with the flap of the ice chute. When this happens, your ice maker may become frozen, rendering it unable to produce ice. In cases where the issue persists despite initial checks, there must be an underlying factor keeping the flap slightly ajar.
To rectify this, carefully remove any debris that might be obstructing the flap’s ability to flush against the chute, thereby maintaining the desired temperature and ice production.
Check the compartment
Before troubleshooting any issues with your ice maker, ensure that your compartment is in good condition. A small crack or opening can allow warm air to enter and prevent the ice maker from functioning properly. To address this issue, thoroughly inspect your compartment for any cracks or gaps. If you find a crack, apply a silicone-based compound to seal it, as this will help maintain the optimal temperature required for your ice maker to operate efficiently.
Inspect defrost components
When issues arise with the defrost sensor, it’s crucial to address them promptly to prevent your ice maker from freezing up entirely. A faulty defrost component can indeed cause problems for your appliance. In cases where the sensor is defective, a replacement may be necessary to ensure proper functioning. Conversely, if the issue is minor and the sensor remains functional, it may be worth seeking expert assistance to troubleshoot and resolve the problem effectively.
Inspect the ice maker
If troubleshooting doesn’t yield results, it’s possible that tiny cracks within the ice maker itself are to blame. Before jumping to conclusions, take the time to thoroughly inspect the component and its features. One way to detect cracks is by shining a flashlight under the ice maker – if the light reflects back into the unit, it could be an indication of a crack. This simple test can help you pinpoint the root cause of your freezing issue with confidence.
Samsung ice maker reset not working
If your Samsung ice maker suddenly stops working, a common first step is to attempt a reset. However, if the reset function doesn’t work, you may need to investigate further. When restarting your ice maker, it’s essential to follow a structured approach to ensure the reset function is effective. Here’s a step-by-step guide to help you successfully restart your Samsung ice maker. To begin, open your freezer and locate the ice maker on the ceiling of the fridge.
Next, focus on the ice maker itself and find the reset button, which can be found under the appliance towards the front in the middle. Press the reset function button firmly until you hear the motor running or feel vibrations indicating that something is moving inside. A crucial note to keep in mind: refrain from restarting your ice maker more than once within a 24-hour period, as this may cause it to malfunction or sustain damage.
If the steps above don’t result in successful resetting, there may be an underlying issue with water supply, electronic malfunctions, or mechanical malfunctions. At this point, you can either consult the user manual for guidance or seek the assistance of professionals if you’re unsure about proceeding. While professionals might identify additional problems, they can also provide immediate solutions. Therefore, it’s often best to seek their help when feeling uncertain.
Samsung refrigerator ice maker making noise
In many cases, machines like ice makers produce natural sounds that signal they’re functioning properly. However, it’s crucial to distinguish these normal sounds from potentially ominous indications of a damaged machine. To ensure optimal performance and extend the lifespan of your appliances, it’s essential to recognize the various sounds and their underlying causes.
Humming sound
When your ice makers emit a low-pitched humming noise, this is typically indicative of normal operation. However, if the sound is significantly louder than usual, it may signal a potential issue within the machine. This could be due to excessively high water pressure that requires adjustment or, alternatively, a malfunctioning compressor.
Beeping and chiming sound
If the unmistakable sounds of a continuous beeping and chiming sequence pierce your ears, it’s crucial to remain calm and follow the next steps. This unusual auditory experience warrants a prompt response, as it may signal an urgent issue that requires attention.
Make sure that it is really making such noise
If you’re stumped by an unexplained noise, take a step back and start with a simple test: unplug your refrigerator and observe whether the sound persists. If it does, this suggests that other appliances in your home are the culprits behind the disturbance. In this case, there’s no need to stress about any underlying issues. However, if the noise ceases or significantly diminishes after unplugging the fridge, it may be a sign of a malfunction within the appliance itself.
Adjust the temperature
When you notice a combination of beeping and blinking on your refrigerator’s display, it may be signaling an issue with its internal temperature. A high temperature can cause the appliance to malfunction, so it’s essential to investigate further. Refer to your user manual or search online for guidance on how to adjust the temperature and resolve the problem.
Check the doors
Before jumping to conclusions about your Samsung refrigerator’s potential malfunction, take a step back and perform a simple yet crucial check: ensure all doors are securely closed. Just like modern cars, many Samsung refrigerators emit a distinct beep when a door is left ajar, serving as a gentle reminder to close the gap. By verifying this fundamental aspect first, you’ll be better equipped to troubleshoot any actual issues that may arise.
Rattling sound
Compressor is turning off
When you turn off the compressor’s motor, it produces a distinct rattling noise. While this sound typically lasts no more than 10 seconds in a standard scenario, prolonged or excessive rattling may indicate an underlying issue that requires attention.
Scraping or grinding sounds
When you hear a sound during ice production in your refrigerator, it’s normal to expect some noise. But if you’re experiencing a loud grinding sound, it may be indicative of an issue with the condenser or evaporator fan blades being obstructed. It’s essential to investigate further to ensure proper functioning and optimal performance.
How to remove ice maker from Samsung refrigerator

When faced with the necessity to disconnect the ice maker from the primary refrigerator unit, a series of carefully followed steps can guide you through this process. The removal process, although potentially daunting, becomes more manageable by breaking it down into these straightforward and logical actions.
Defrost the unit
To safely remove your ice maker from your refrigerator, it’s crucial to defrost the unit first. While the specific steps may vary depending on your fridge model, here’s a general guide to follow:
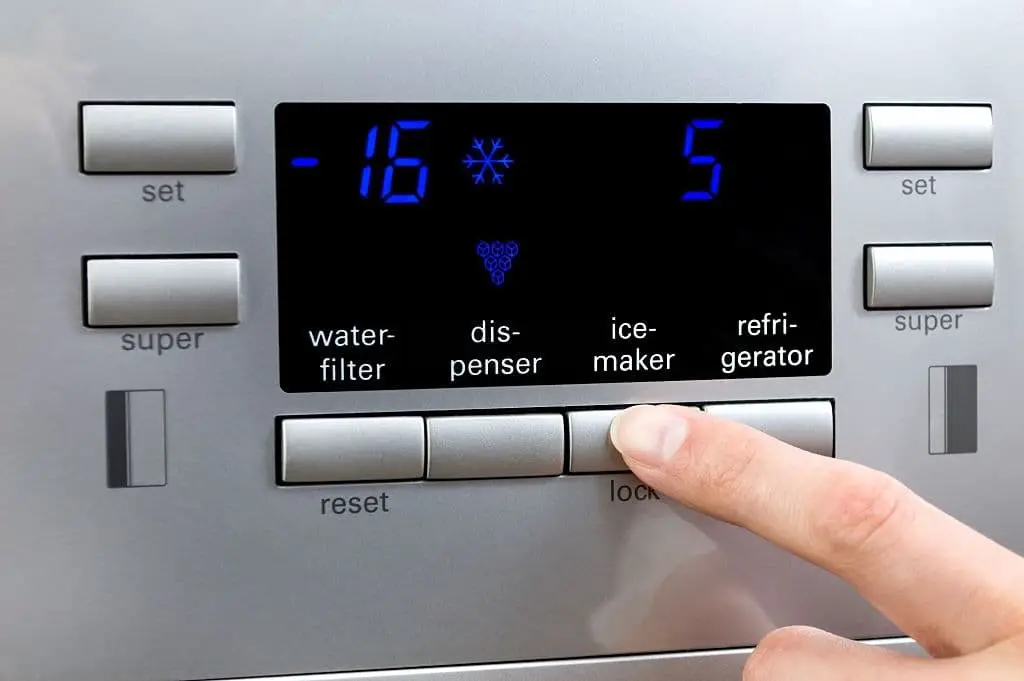
Step 1: Engage the defrost mode by simultaneously pressing and holding the Energy Saver and Refrigerator buttons for about eight seconds. You’ll know it’s working when you hear a chime sound.
Step 2: Put your fridge in defrost mode by repeatedly pressing the Refrigerator button until ‘Fd’ appears on the display. Then, wait patiently for five minutes to allow the defrost cycle to complete. A beep will signal that the process is finished.
Step 3: Exit the forced defrost mode by pressing and holding both the Energy Saver and Refrigerator buttons simultaneously until ‘Fd’ pops up again on the display.
Shut down the refrigerator
When it comes to shutting down a Samsung refrigerator, caution is key. While turning off the appliance may seem straightforward, attempting to do so while the ice maker is still running can be hazardous and potentially damaging to the machine. To avoid any issues, follow these steps: First, locate the correct button combination for your specific model of Samsung refrigerator, as the process may differ slightly depending on the model you have.
Refer to the manual provided with your purchase if you’re unsure, as this will ensure a safe and successful shutdown.
Removal of the ice bucket
As the final stage of the process nears, carefully grasp the ice bucket and gently lift it upwards. With a smooth motion, guide the bucket out of its resting place, marking the completion of the entire procedure.
FAQs
In addition to our previous discussion on troubleshooting Samsung refrigerator ice maker issues, it’s crucial to cover other essential FAQs that can aid in successful self-repairs. As sophisticated features like ice makers often require meticulous maintenance and troubleshooting, having this knowledge at your disposal will ensure a seamless DIY experience in the future.
Where is the test button on my Samsung ice maker?
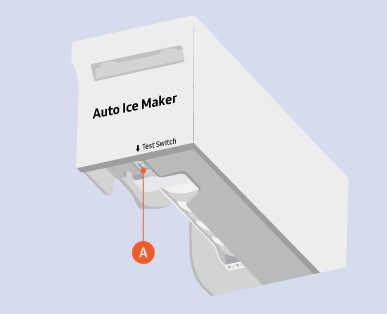

To initiate a test for your Samsung ice maker, it’s essential to first locate the test button. The location of this button may differ depending on the refrigerator model. For instance, if your ice maker is situated at the top of a freezer, you’ll find the test button on the front bottom part of the appliance.
If, however, the ice maker is located on the back of the door in the freezer, the position of the test button varies depending on whether you have an older or newer model – it’s either towards the left side at the bottom for newer models or directly in front for older ones. In contrast, when your ice maker is situated at the bottom of a freezer, the test button can be found on the front part of the appliance. Understanding where to find this button ensures a successful test operation.
Can the water filter cause the ice maker not to work?
When it comes to maintaining the functionality of an ice maker, one crucial aspect is often overlooked: the water filter. If left unchanged for extended periods, this filter can accumulate dirt and debris, compromising water flow and ultimately affecting the ice maker’s performance. To ensure optimal functioning, it’s recommended to replace your water filter every six months, thereby preventing any potential hindrances that might arise from a clogged or dirty filter.
Is there a recall on Samsung ice makers?
While Samsung ice makers may be prone to a shorter lifespan and various issues after purchase, leading to a negative recall experience for some consumers, the company still manages to produce models that excel in efficiency and functionality. Although they do receive negative feedback from time to time, their overall recall reputation is not as tarnished as other brands. It’s a mixed bag when it comes to Samsung refrigerators.
Conclusion
While Samsung refrigerators are renowned for their sleek designs, cutting-edge technology, and exceptional functionality, it’s crucial to acknowledge that no brand is immune to imperfections. The ice maker feature, in particular, is a valuable asset that many users rely on. However, even top-tier refrigerator brands with built-in or external ice makers can still experience issues.
This highlights the significance of regular maintenance and tune-up checks in ensuring the optimal performance and longevity of these high-end appliances. By knowing what to look for and where to look, homeowners can better troubleshoot and resolve problems effectively.
Related Posts
If you’re experiencing issues with your Amana dryer not heating, it can be frustrating and inconvenient. However, before calling a professional or replacing the appliance entirely, there are several quick troubleshooting steps you can take to identify the problem. Here are six potential reasons why your Amana dryer may not be heating: [insert possible causes].
By understanding these common issues, you’ll be better equipped to diagnose the root cause and potentially resolve the issue without having to resort to costly repairs or replacements.