Step-By-Step Clay Tutorials For Beginners
Welcome to our beginner’s guide to working with clay! In this tutorial, we’ll provide everything you need to know to start sculpting beautiful clay creations. Clay is an incredibly versatile material that allows you to make functional or decorative objects like pots, sculptures, jewelry, and more.
Some of the key benefits of working with clay include:
- It’s very forgiving and easy to work with, making it ideal for beginners.
- You can create one-of-a-kind pieces that express your creativity.
- It engages your mind and hands, providing relaxation and stress relief.
- Finished clay pieces make meaningful gifts for loved ones.
In the sections ahead, we’ll cover choosing and preparing your clay, essential handbuilding techniques like pinch pots and coils, sculpting and decorating, drying and firing finished pieces. With the help of this guide and a little practice, you’ll be impressing yourself and others with your clay skills in no time! Let’s get started.
Gathering Materials
When getting started with polymer clay, there are some basic supplies you’ll need to gather before beginning your first project. Here are the essentials:
Clay
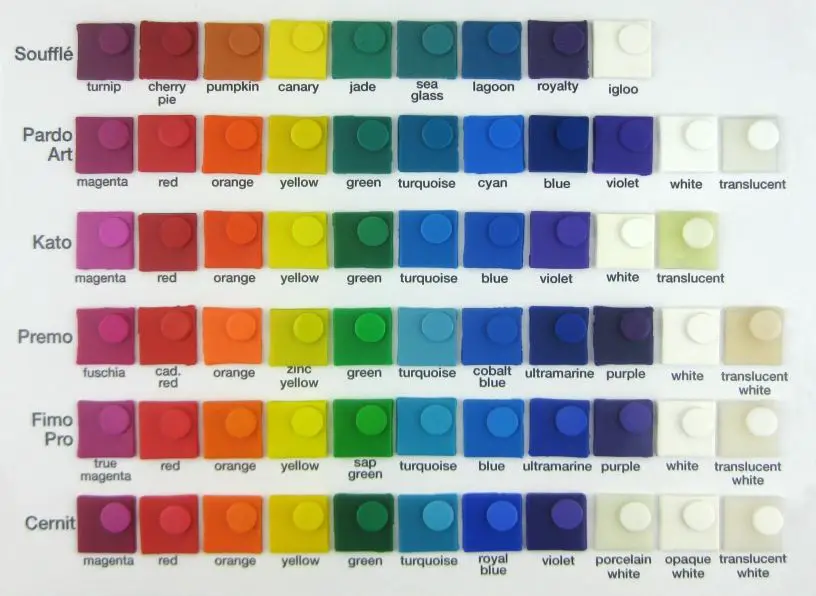
For beginners, I recommend using a mainstream brand of polymer clay like Sculpey or Fimo. These clays are affordable, easy to condition, and come in a wide range of colors. Sculpey Original and Fimo Soft are great starter clays. Avoid novelty clays with inclusions or texture when you’re just learning.
Tools
A basic starter tool kit should include:
- A tissue blade or craft knife for cutting clay
- An acrylic roller for conditioning and flattening clay
- Shape cutters
- A baking surface like aluminum foil or a ceramic tile
You can find affordable starter tool sets on Amazon or in craft stores that contain these essentials. As you progress, you may want specialty tools like clay sculpting tools, texture sheets, molds, etc.
Beyond the basics, you’ll also need an oven for baking the clay, as well as materials for finishing like glazes, liquid polymer clay, etc. Check out complete beginner supply lists for more details on everything you’ll need.
Preparing Your Workspace
Having a properly prepared workspace is crucial for clay work. Protecting surfaces, having proper lighting, and following ergonomic principles will make your clay work much easier and more enjoyable.
It’s important to protect surfaces from water and clay residue. Covering tables or floors with plastic, canvas tarps, or vinyl tablecloths is an easy way to safeguard your studio (source). Avoid wood surfaces if possible, as clay can permeate and damage the wood. Any tools, buckets or bins containing wet clay should be kept on protected areas.
Proper lighting is essential for clay work. Both ambient and task lighting should be bright and adjustable. North-facing windows provide excellent natural light. Supplement with full spectrum and LED bulbs for task lighting over your work table. Avoid working in shadows or with too little light (source).
Following ergonomic principles can prevent strain when working with clay. Sit or stand with proper posture and keep your work at an appropriate height to avoid neck, shoulder or back issues. Take breaks to stretch. Having a adjustable height chair or stool allows you to alternate between sitting and standing.
Clay Storage and Care
Proper storage is essential for keeping your clay in good condition. Clay needs to be kept moist and sealed in an airtight container or bag to avoid drying out. According to Pottery Crafters, it’s best to store clay in both a sealed plastic bag and a lidded plastic container or bin. This double protection will help maintain the moisture content. You’ll want to avoid storing clay in paper or cardboard, as this allows air circulation that can dry out the clay.
Try to store clay in a cool, dark place around 60-70°F. Temperature fluctuations can impact moisture levels. A basement or interior closet works well. Avoid areas with direct sunlight or heat exposure. According to Bailey Pottery, the fridge can also be an effective clay storage spot, as the cool environment helps keep moisture locked in.
To keep clay workable and soft, it’s crucial to retain the moisture and avoid contamination. Only take out the clay you plan to immediately use. Knead some water into clay if it starts to stiffen. When sealing bags and containers, press out excess air to reduce drying. Be careful not to introduce any foreign material or liquids which could alter the clay body chemistry and properties.
Clay Conditioning
Properly conditioning your clay is an important step before starting any clay project. Kneading and wedging the clay helps make it smooth, pliable, and free of air bubbles. The ideal consistency is when the clay is soft but not sticky.
To condition clay by hand, start by tearing off a section about 1/4 block in size. Begin kneading it by pressing down and forward, then folding the clay over itself. Repeat this kneading motion until the clay feels smooth and uniform. Avoid overworking the clay, as it can become too warm and soft.
Another technique is clay wedging. Form the clay into a ball and press down on it while turning and squeezing it on a clean work surface. Continue wedging until smooth and pliable. Don’t wedge clay for more than a few minutes at a time to avoid overheating.
Conditioning machines like pasta rollers can also be used to evenly knead clay. Pass the clay through the widest setting several times, folding and rotating it 90 degrees between each pass. Gradually reduce the roller spacing for smoother clay.
Properly conditioned clay should be soft, smooth, and have a consistent texture without cracks or air pockets. Take care not to overwork it. Let the clay rest if it becomes too warm. With practice, you’ll learn how much kneading is needed for your particular clay type and project.1
Basic Handbuilding Techniques
There are three main handbuilding techniques used in working with clay: pinching, coiling, and slab building. Mastering these basic techniques allows you to create a wide variety of forms without the use of a pottery wheel.
Pinching
Pinching is likely the easiest and most instinctual handbuilding technique. It involves taking a ball of clay and using your fingers and thumbs to pinch and pull the clay into the desired shape. Pinch pots are formed by pinching in the sides and base of a solid clay ball. This technique can create shapes like bowls, cups, vases, and more. According to The Crucible’s handbuilding guide, pinching is great for making small fired vessels or sculptures
https://www.thecrucible.org/guides/ceramics/handbuilding/.
Coiling
The coiling technique involves rolling out “snakes” or coils of clay and stacking them on top of each other to build up the walls of a vessel. The coils can be smoothed together using water and your fingers. A base is first made by pinching or using a slab, then coils are attached to the base and gradually built upwards. Coiling allows you to make larger and taller pieces than pinching alone. It can be used to create vases, bowls, pots, and more.
Slab Building
Slab building involves rolling out flat, even pieces or “slabs” of clay and then assembling them to create a form. The slabs can be cut into shapes and joined using the slip and score technique. Walls are often built by stacking rectangular slabs, while shapes can be cut out for details. Slab building is ideal for making flat surfaces and geometric shapes. It can be used to create plates, boxes, trays, tiles, and more sculptural forms.
Sculpting Simple Forms
When starting out in clay sculpting, one of the best ways to learn is by practicing making basic shapes. This will help you get familiar with how clay moves and responds to being pushed, pulled, smoothed, and blended. Some simple forms to try sculpting as a beginner include:
– Spheres or balls. This teaches you how to roll clay into even, smooth forms. Start with a ball of clay and roll it between your palms, applying even pressure to make the shape spherical.
– Cylinders or tubes. These allow you to practice extending and smoothing the clay. Roll a ball into a log shape, then use your fingers and tools to smooth the surface and even out the thickness.
– Cubes or blocks. Try flattening the clay into a slab, then cutting straight edges to form a cube shape. Pay attention to smoothing the seams where the clay comes together.
– Pyramids or cones. Cut triangles from a flattened slab of clay, then join them into pointy 3D forms.
As you work on these basic shapes, focus on becoming familiar with the clay’s texture and how it responds to smoothing. Try blending seams together or softening edges using water or tools. Practicing sculpting simple forms teaches essential techniques while allowing you to develop coordination and muscle memory for working with clay.
Texturing and Decorating
One of the best parts of working with clay is adding unique textures, patterns, and colors to bring your creations to life. There are endless options when it comes to decorating clay to make it more visually interesting. Here are some key techniques to try as a beginner:
Impressing designs into the clay is a simple way to add texture. You can press items like leaves, seashells, or lace into the surface to leave behind their patterns. Rolled up balls of clay can create dotted textures, and wooden tools like clay shapers are useful for carving lines or shapes. Be creative with household objects – even fork tines or bubble wrap can texture clay in interesting ways.
Adding color is easy with clay. There are specially formulated polymer clay paints, as well as acrylic paints, that will adhere to baked polymer clay. You can brush or sponge the paint on before baking for vibrant results. Another option is rubbing alcohol inks, which produce a marbled, swirled effect. Metallic rub-ons are great for accenting details with a shiny, chrome look. Play around with mixing colors and layering them to bring depth to a piece. (Skillshare)
The options for texturing clay are endless – experiment and discover which techniques you enjoy the most! Pay attention to how long the clay has been conditioned for best results imprinting designs. Adding color opens up many possibilities for customizing clay creations.
Drying and Firing
Proper drying is a critical first step before firing clay in a kiln. Air drying clay works well for small pieces. Allow 1-2 weeks for clay to thoroughly dry before firing. For larger pieces, slow drying over 2-4 weeks prevents cracking (The Pottery Wheel, https://thepotterywheel.com/stages-of-firing-clay/). When drying flat pieces like slabs, use cardboard or plywood lined with newsprint. Avoid particle board or drywall which can stick. Maintain even thickness when rolling slabs. Wrap clay in plastic when not working to prevent premature drying.
The bisque firing provides an initial hardening of the clay before glazing. Low temperatures around 1800°F are used. Bisque firing prepares the clay body by removing water, organic matter, and chemicals. This induces physical and chemical changes that make the clay permanent and ready to accept glazes. Make sure clay is fully dry before bisque firing to prevent cracking. Longer firing times ensure clay bisque reaches optimal hardness throughout (Soul Ceramics, https://www.soulceramics.com/pages/how-to-dry-pottery).
Conclusion
In this step-by-step beginner’s guide, we covered all the basics you need to start creating beautiful works of clay art. We discussed gathering the necessary materials like clay, tools, and workspace accessories. We walked through critical preparation steps like properly storing and conditioning your clay. We explored fundamental handbuilding techniques like pinching, coiling, and slabs. We tried our hand at sculpting simple forms and adding decorative textures. We learned the keys to proper drying and firing to bring your creations to life.
If you want to take your skills even further, there are many additional clay resources available. Look for local pottery classes at community art centers, schools, or paint your own pottery studios. Check your public library for clay technique books and videos. Join an online pottery forum to connect with other artists. Start your own clay blog or YouTube channel to document your journey. Feel free to experiment with clay types, glazing techniques, and intricate sculpting.
Most importantly, have fun unleashing your inner creativity with clay! Building your pottery skills takes practice, but the sense of accomplishment is immensely rewarding. Approach each new project with patience and curiosity. Let the clay be your creative outlet. We hope this beginner’s guide provided a strong foundation. Now get your hands dirty and start making art!
Sources:
[1] https://www.fabercastell.com/blogs/creativity-for-life/clay-art-benefits
[2] https://claygroundonline.com/health-benefits-of-pottery/