Taking Your Clay Sculpting To The Next Level
Clay sculpting is an ancient art form that has been practiced for thousands of years across many cultures. It involves shaping and molding clay to create three-dimensional works of art, sculpture, and pottery. Clay is an extremely versatile material that allows artists to freely sculpt and carve their vision into existence.
There are many reasons why people enjoy sculpting with clay. The process is highly therapeutic and relaxing, providing a sensory experience as you feel the clay take shape beneath your fingers. It allows for creative expression and can be a meaningful hobby that reduces stress. Clay sculpting also develops hand-eye coordination and fine motor skills.
Some of the key benefits of sculpting with clay include:
- Promotes creativity and imagination
- Teaches patience and perseverance
- Boosts self-esteem through a sense of accomplishment
- Enhances focus and concentration
- Relieves stress and anxiety
- Helps improve dexterity and muscle control
As a tactile art medium that engages the mind and body, clay sculpting allows beginners and experts alike to find joy in the creative process.
Required Supplies
Having the right tools and materials is essential for taking your clay sculpting skills to the next level. The type of clay you choose will determine the properties and characteristics of your finished piece. Polymer clay is popular for its versatility and ability to be hardened, painted, and finished in many ways. However, traditional clays like stoneware or earthenware have their strengths for sculpting as well. See this guide on choosing the right clay type for your needs.
Investing in quality sculpting tools will make the creation process much easier. Basic tools like wooden sculpting sticks, loop tools, cutting wires, acrylic rollers are must-haves. For more precise, detailed shaping, specialized tools like clay shapers, ribbon tools, and texture sheets can be very useful. This article outlines the essential sculpting tool kit for beginners.
In addition to clay and hand tools, you may require armatures or frames, paints, glazes, gloss finishes, and other materials depending on your sculpting goals. Wires, aluminum foil, plasticine, and water-based clays can assist in structural support or joined assemblies. Reference material, calipers, and clay cutting tools allow for accuracy. Make sure to research and acquire specialty supplies needed for your chosen clay medium and sculpting techniques.
Sculpting Techniques
There are two main approaches to sculpting with clay: additive and subtractive techniques. With additive sculpting, you build up the form by gradually adding more clay. This involves techniques like coiling, where you roll out snakes of clay and stack them to build up a form. Pinch pots and slab construction also fall under additive techniques.
Subtractive sculpting involves starting with a solid block of clay and removing material to reveal the form within. This requires careful planning and visualizing the end result you want before starting. Subtractive techniques include carving, scraping, and cutting away clay.
Using an armature or frame provides structural support for your clay sculpture. An armature acts like the skeleton of your piece. You can create armatures out of wire, cardboard, wood, crumpled aluminum foil, or other materials. Building up the clay around the armature allows you to create more elaborate, freestanding forms.
Don’t forget to consider texture when sculpting. Add visual interest by impressing patterns into the clay using everyday objects or specialty sculpting tools. Try experimenting with different textures like smooth, bumpy, or grooved. The texture possibilities are endless.
Source: https://www.domestika.org/en/blog/11125-8-must-know-clay-modeling-techniques
Creating Dimension
Adding dimension to your clay sculptures can take them from flat and two-dimensional to having perspective, depth, and layers (source). The goal is to make your clay pieces seem 3D rather than flat. There are a few techniques you can use:
Perspective – Think about adding foreground, midground, and background elements to your sculpture. Objects that are closer to the viewer will appear larger while objects further away will look smaller. This gives the illusion of space and distance.
Depth – Use techniques like texturing, overhangs, overlapping shapes, and levels to give your sculpture the illusion of depth. Parts that recede into the distance will seem further away.
Levels of Relief – Low relief sculpture means the elements project slightly from the background. High relief sculpture has elements that project dramatically from the background. You can combine different levels of relief in one piece.
By playing with dimension in these ways, you can make your clay sculptures come to life in 3D.
Sculpting the Face
When sculpting faces, it’s important to have a basic understanding of facial anatomy such as the structure of the skull and muscles in order to capture realistic proportions. Study references of faces from different angles to understand how the shapes change.
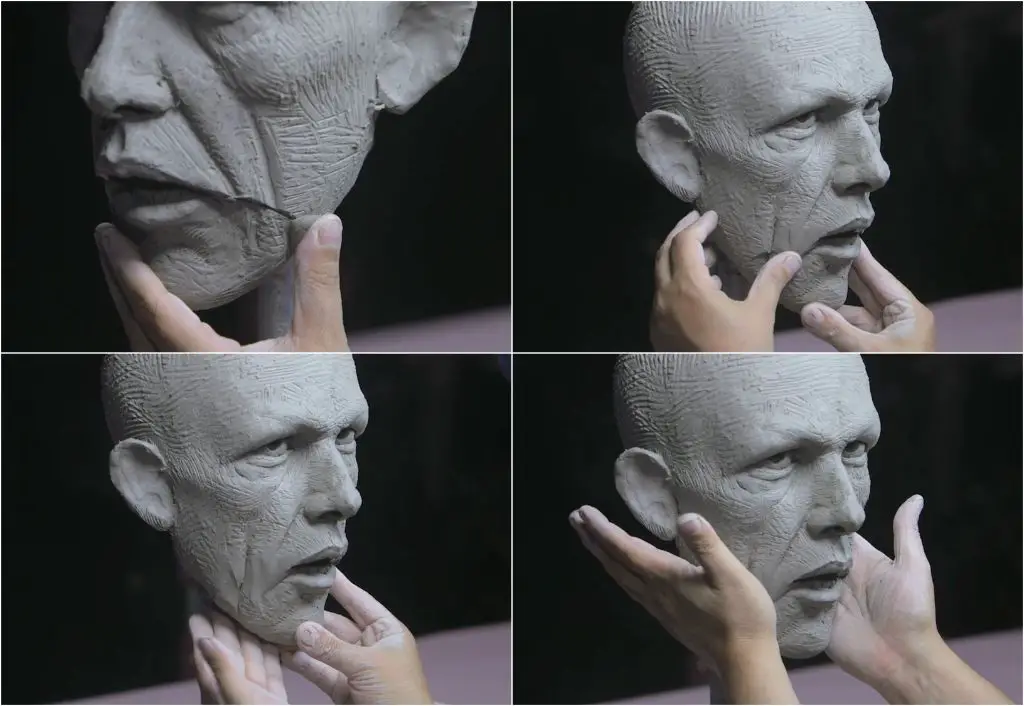
Facial expressions and emotions are also key for bringing your sculpts to life. Consider what feeling or mood you want to portray, whether it’s a subtle smile or a look of surprise. Pay close attention to how different emotions affect various facial features.
You can take a realistic approach, carefully sculpting each intricate detail of the face. Or go for a more stylized look with exaggerated or simplified features. Decide how much realism you want before starting. Aim for accuracy in the eyes, nose, and mouth for realism.
According to wikiHow, some tips for sculpting faces include:
– Start with a basic oval shape for the head.
– Refine the features by adding eyes, nose, lips, etc.
– Use small wooden or metal sculpting tools to carve details and add texture.
Sculpting the Body
When sculpting the human body in clay, it’s important to have a strong understanding of anatomy and proportions to create a realistic figure. The basic proportions are:
– The average person is 7-8 heads tall.
– Women’s shoulders are approximately 2 heads wide, while men’s are around 3 heads wide.
– The torso is 2 heads tall.
Pay attention to anatomical landmarks like the collarbones, ribs, navel, and hips to correctly place the different body parts. Reference photos are very helpful when sculpting the body. Focus on gesture and weight distribution to convey a sense of movement and flow in your sculpture. Start with a solid armature or wire frame to support the weight of the clay. Build up the major muscle groups like the torso, legs, and arms before sculpting details.
Source: https://www.sculptureatelier.com/blog/how-to-sculpt-the-figure
One of the main challenges of sculpting the body is getting the proportions right. Going slowly and frequently measuring distances between body parts will help. Also pay attention to landmarks and angles to capture the essence of the pose.
When sculpting clothing and drapery over the body, build up thin coils of clay for a natural, flowing look. Note where fabric pulls tight over the body and where it drapes loosely. Add subtle textures and wrinkles, but avoid overworking the clay.
Still Life Sculpting
Still life sculpting is the practice of creating sculptures of inanimate objects arranged together. It offers artists an opportunity to carefully observe and analyze everyday items and capture their textures, shapes, proportions and relationship to one another. When sculpting a still life, it’s important to take time studying your subject and noticing all the subtleties that make it unique.
Begin by gathering a variety of interesting objects with different shapes, sizes, and textures to arrange in your still life scene. Fabric, fruit, flowers, books and household items all make great subjects. Take time sketching your still life from various angles, making notes of the textures and forms you see. Consider how light hits across the various shapes and surfaces. As you sculpt, continually refer back to your subject, working to accurately depict the textures and dimensionality of each item.
Pay special attention to the relationships between objects – consider overlapping shapes and relative sizes. Develop the background to give your sculpture a sense of environment and context. Work patiently and methodically until your sculpture captures the essence of your still life scene. With practice and care, you can develop strikingly realistic sculptures from life that showcase your artistic skill and observational prowess.
For inspiration and examples of exceptional still life clay sculptures, visit Still Life Ceramics which features many artists’ works.
Joining and Construction
When creating larger sculptures or attaching multiple pieces together, constructing an internal armature or frame provides important structural support. An armature acts like the skeleton of your sculpture, allowing you to build up clay around it while maintaining the desired pose and proportions. Armatures can be made from wire, wood, plastic, or other materials layered together and attached with tape, wire, or glue.
To join pieces of clay together, it’s important that the surfaces are scored or roughed up first for better adhesion. Smooth clay won’t stick as well. After scoring, moisten the surfaces with water, slip, or clay softener and firmly press the pieces together, smoothing over the seam (Source 1). Let dry partially before continuing to work. For better structural integrity, insert dowels, straws or bits of wire into holes where two pieces meet.
When constructing large clay sculptures, it’s best to build them in sections for manageability and to allow thorough drying. Hollow out forms whenever possible to reduce weight and cracking. Take precautions against pieces sagging or drooping through strategic armature placement and by allowing parts to firm up a bit before adding more clay. Lean heavy sections against support structures while working.
Finishing and Presentation
Once your sculpture is fully formed, there are several steps to finish it off and get it ready for display. Proper finishing techniques will make your sculpture look clean, refined, and professional.
First, focus on smoothing and polishing the clay. Use sandpaper, files, and clay shapers to refine details and eliminate any obvious tool marks. Rub the entire surface with very fine sandpaper to create an ultra-smooth finish. You can also polish it with a cloth.
Next, consider adding color with paints or glazes. Acrylic paints work well for finishing polymer clay sculptures. Mix glazes with a gloss or matte finish to enhance the look. Apply in thin layers and avoid over-brushing to prevent brush marks.
Finally, mount your finished sculpture on a base or stand for display. Find one that matches the style and size of your work. Secure the sculpture with strong adhesives. Position it at an angle and height that allows viewers to see it clearly. With proper finishing techniques, your polymer clay sculpture will really stand out.
Next Steps
Once you have honed your sculpting skills and techniques, the next step is to develop your own personal style. As you gain experience, pay attention to the types of subjects, shapes, and textures you enjoy sculpting the most. Lean into your strengths and preferences to create works that feel distinctly your own.
Connecting with other sculptors is another way to further your development. Joining local sculpting groups or online communities like r/Sculpture on Reddit allows you to get feedback, exchange tips, and find inspiration.
Entering competitions and local art shows is a great way to showcase your work and get it in front of new audiences. Even if you don’t win, the experience of putting yourself out there will make you a better sculptor. Start local with small shows and build up to larger regional or national competitions as your skills progress.
With dedication and practice, you can take your clay sculpting to exciting new levels. Stay curious, keep learning, and don’t be afraid to experiment as you develop your own artistic voice.