What Are The Two Types Of Wheels In Ceramics?
Wheels are an essential tool in ceramic and pottery making. They provide the rotation needed to properly center and shape clay vessels and other ceramic pieces. There are two main types of wheels used in ceramics – the potter’s wheel and the kick wheel.
Potter’s wheels and kick wheels operate differently, but both allow potters to center, throw, trim, and shape clay in a dynamic rotating environment. Understanding the differences between the two main wheel types is key knowledge for ceramicists looking to purchase a wheel or expand their capabilities.
Potter’s Wheel
The potter’s wheel has been used for thousands of years to shape clay into pottery and other ceramic objects. According to the Encyclopedia Britannica, the earliest known potter’s wheels date back to Mesopotamia around 3500-3000 BCE [1]. However, wheel-made pottery may have first emerged in Southeast Asia between 4000-3000 BCE [2].
The basic design of the potter’s wheel has remained relatively unchanged throughout history. A typical wheel consists of a rotating disk known as a wheel head or flywheel that is connected to a shaft and powered by a foot pedal or electric motor. The clay is centered on the wheel head and the potter uses their hands to shape the spinning clay into the desired form.
The potter’s wheel allows for greater efficiency, consistency, and complexity in shaping ceramic pieces compared to handbuilding techniques. It enables smooth, symmetrical forms that would be very difficult to create freehand. The momentum of the spinning clay also allows thinner walls and finer details. However, wheel-throwing requires greater skill and practice to master [3].
Kick Wheel
The kick wheel is the earliest and most basic type of potter’s wheel, originating in ancient Mesopotamia dating back to 3500 BCE. It is a simple, hand-powered wheel that consists of a rotating disk known as a “wheel head” that is attached to a stationary base. To operate a kick wheel, the potter uses their feet to rotate the wheel head by kicking and pushing on paddles or bars attached to the sides or base.[1],[2]
On a kick wheel, the wheel head is raised off the ground so it’s level with the potter’s hands when seated. The potter centers the clay on the wheel head using circular, pressing motions. They shape the clay by pushing and pulling against the spinning wheel while maintaining pressure from both hands and feet. Kick wheels allow potters to create symmetrical round vessels with thinner walls compared to handbuilding.[2]
A major advantage of kick wheels is they can be operated without electricity, making them ideal in places lacking power infrastructure. They are also inexpensive and portable. However, kick wheels require significant physical effort to operate and have a slower spinning speed than modern electric wheels.[2] This can limit the size and intricacy of pieces made. Overall, kick wheels represent an early technology that allowed potters greater control and consistency in throwing vessels.
Wheel Head/Flywheel
The wheel head, also known as the flywheel, is the rotating disc that sits on top of the pottery wheel. Its purpose is to spin consistently at a set speed in order to center and shape clay. The wheel head is usually made of metal, plastic, or wood and attaches to the wheel mechanism below. It spins thanks to an electric motor or foot pedal power.
The main function of the wheel head is to provide centrifugal force that the potter works against to center and shape the clay. The rotating motion of the wheel head keeps the clay spinning at a constant speed while the potter uses their hands to form the clay. This spinning action allows the clay to be smoothly pulled up and outwards into various shapes and forms.
The wheel head must spin true and level to properly center the clay. Any wobble or vibration will make it very difficult to center the clay and achieve smooth forms. Most quality wheels allow the wheel head height to be adjusted up or down to suit the potter’s needs. Some wheels also allow the speed to be precisely controlled during throwing. The right wheel head setup matched to the potter’s height and stance is crucial for successful throwing.
Foot Pedal
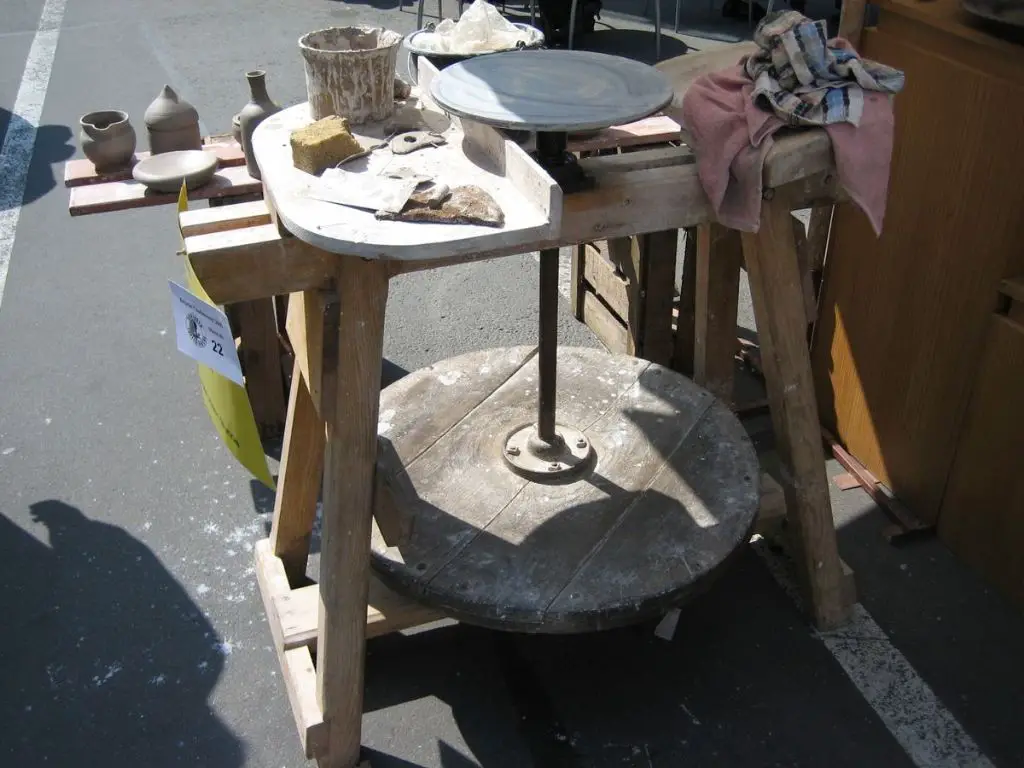
The foot pedal is what allows a potter to operate the wheel hands-free. It is connected to a drive shaft that turns the flywheel and rotates the wheel head. When the potter presses down on the pedal with their foot, it causes the drive shaft to turn, which spins the flywheel and wheel head. This allows the potter to keep their hands free for centering and shaping the clay on the wheel head.
Most modern pottery wheels use a belt or band driven system. A drive belt connects the foot pedal to the flywheel, so when the pedal is pressed, the drive belt causes the flywheel to turn. Older treadle style wheels operate on a similar principle, where the foot pedal is attached to a lever that pushes and pumps a flywheel to spin the wheel head (Source).
The foot pedal allows for variable speed control, so the potter can speed up or slow down the wheel rotation as needed while throwing. It provides hands-free operation so the potter can focus on centering and shaping the clay rather than having to hand turn or crank the wheel manually.
Clay Attachment
Properly attaching the clay to the wheel head is crucial for successful wheel throwing. As the pottery wheel spins, centripetal force pushes the clay outwards. The clay must be securely attached to withstand these forces without detaching from the wheel head.
There are two main techniques for attaching clay to the wheel head:
- Using water – Wetting the wheel head and clay bottom creates suction as the water is squeezed out. The clay sticks to the wheel as it spins.
- Using slip – A liquid clay mixture called slip can be used like glue to attach the clay to the wheel head. Slip fills in pores helping form a tight bond.
To attach the clay:
- Wet the wheel head and clay bottom
- Place the clay on the wheel and press down firmly
- Use your fingers to compress the clay against the wheel as it spins slowly
- Continue compression until the clay stops slipping and attaches to the wheel
Proper clay attachment provides friction and compression to withstand the centripetal forces of wheel throwing. With practice, attachment becomes quick and secure.
Centering Clay
Centering clay on the potter’s wheel is an essential first step in throwing pottery. It involves shaping a lump of clay into a symmetrical form before starting to shape it into a vessel. Centering allows the clay to be evenly supported as it rotates on the wheel, which gives the potter greater control during throwing.
The basic process for centering clay involves the following steps:
- Secure a lump of clay to the wheel head using water or slip.
- Begin rotating the wheel at a moderate speed while applying gentle pressure to the clay.
- Use the palms of both hands to compress the clay into a rounded form.
- Push the clay downward while continuing to shape it into a cone or dome shape.
- Gently press from different angles to center the clay and achieve symmetry.
- Make finer adjustments as needed until the clay is perfectly centered.
Patience and practice are key to mastering the art of centering. It takes time to develop a feel for how much pressure and movement is needed. Having a centered clay form is crucial for maintaining control and stability when throwing pottery on the wheel.
For more details on techniques and tips for centering clay, refer to this excellent step-by-step guide: https://www.thesprucecrafts.com/how-to-center-clay-potters-wheel-2745815
Throwing and Shaping
Wheel throwing is the technique of using the rotational force of the potter’s wheel to shape clay into various forms and shapes. As the wheel spins, the potter uses their hands to gently push and pull the clay upwards to open up the form. Using water as a lubricant, the clay can be carefully manipulated into shapes such as cylinders, bowls, vases, and plates.
The process starts with centering a lump of clay on the wheel head to ensure it stays balanced as the wheel spins. Once centered, the potter can begin opening up the form by pushing their thumbs into the center of the clay while cupping the outside with their fingers. This creates an interior space while the exterior is shaped. Using various techniques of pinching, pulling, and smoothing, the potter can refine the form to create a precise final shape.
Throwing on the wheel requires practice and skill to master, but allows potters to efficiently create identical pieces with thin walls and elegant symmetrical forms. The wheel’s rotational force streamlines shaping the soft clay into an array of functional and artistic objects.
Source: https://www.thecrucible.org/guides/ceramics/wheel-throwing/
Pros and Cons
Both kick wheels and electric wheels have their own advantages and disadvantages. Here is a comparison of the pros and cons of each type of wheel:
Kick Wheel Pros:
- Quieter operation than electric wheels (Source)
- Don’t require electricity so can be used anywhere
- Often less expensive than electric wheels
- More hands-on experience and connection to the process
Kick Wheel Cons:
- Require more physical effort from the potter to keep the wheel spinning
- Difficult for beginners to learn to center clay and throw pots
- Limited speed control compared to electric wheels
- Not as portable or easy to move as electric wheels (Source)
Electric Wheel Pros:
- Easier for beginners to learn to center and throw clay
- Variable speed control allows for different techniques
- Easier to move and more portable in most cases (Source)
- Less physical exertion required from the potter
Electric Wheel Cons:
- Require electricity to operate
- Often more expensive than kick wheels
- Can be noisy
- Less of a hands-on, traditional experience
Conclusion
The two main types of wheels used in ceramics are the kick wheel and the potter’s wheel. Both allow a potter to center and shape clay in a rotary motion, but they operate differently.
The kick wheel is operated by the potter physically kicking a flywheel to spin it. This gives the potter direct control over the speed and motion. It allows for smaller pieces to be thrown, but can be tiring to use for prolonged periods. The potter’s wheel uses an electric motor and foot pedal to spin the flywheel consistently without physical exertion from the potter. This enables throwing larger pieces and working for longer periods of time.
In summary, the kick wheel and potter’s wheel both enable a potter to center and throw clay, but utilize different methods to spin the wheel head. While the kick wheel requires more physical effort, the potter’s wheel offers more convenience and control. The choice comes down to the size of work, skill level, and personal preference of the individual potter.
Both wheels have their pros and cons, and serve an important role in studio ceramics. With an understanding of the differences, potters can choose the type of wheel that best suits their needs and style of work.


