What Are Three Hand Building Techniques?
What is Hand Building?
Hand building refers to any ceramic forming technique that does not involve the use of a potter’s wheel. It encompasses a variety of methods for shaping clay into functional or decorative forms including pinch pots, coils, slabs, drape molds, hump molds, slump molds, and press molds.
Hand building offers several benefits compared to wheel throwing. It provides more direct contact with the clay, allowing the artist to shape it with their hands rather than relying on the spinning wheel. Hand building does not require the same level of dexterity as wheel throwing, making it more accessible to beginners. The techniques can be used to create unique, organic shapes not possible on the wheel. Hand building also allows the artist to work at their own pace without needing to maintain the spinning momentum of the wheel.
While wheel throwing produces uniform wares efficiently, hand building provides an opportunity for more creativity and customization with each unique piece. The hand builder has ultimate control over the form, texture, and decoration of the clay. Whether creating simple pinch pots or elaborate relief sculptures, the direct hands-on experience makes hand building a rewarding way to work with clay.
Pinch Pots
Pinch pots are one of the most basic and intuitive ways to hand build with clay. They are made by pinching and shaping a ball of clay with your fingers into a small container or vessel. The process involves no tools or molds – just your hands (The Pottery Wheel, 2022).
To make a basic pinch pot, start with a ball of clay and push your thumb into the center to create an indent. Then pinch the clay between your thumb on the inside and fingers on the outside to pull the walls up gradually. Turn and pinch the clay continually to thin the walls and shape the form. The clay should feel soft and pliable throughout. Avoid pinching too quickly or unevenly, as this can cause weak spots or tears (Classpop, 2024).
Pinch pots are great introductory projects for beginners and children. They allow you to understand the plasticity of clay and make something simple without any tools. More experienced potters also enjoy making pinch pots for their spontaneity and rustic charm. Pinch pots can be left plain or decorated with markings, textures, or glazes. They have many functional uses like small vases, bowls, cups, and more.
Coil Building
Coil building is a hand building technique where long strands of clay are rolled into coils and then joined together to build up the walls of a pot. According to the article on Gathered, coil pottery is one of the three main hand-building techniques used for making pots in ceramics.
To coil build, you first start with a base which can be a flat slab or shaped form. Then you roll out coils of clay in long strands using your hands or a slab roller. The coils should be uniform in size and thickness. Typical coil widths range from 1/4 inch to 1 inch depending on the project. The coils are then stacked up, one on top of the other, to build the form.
When joining the coils, it is important to compress and blend them together well so there are no interior cracks or weak points. Slip and scoring techniques help join and seal the coils. Some potters also use paddles or ribs to blend coil junctions. Coils can be stacked vertically or spiraled for more organic looking forms. For optimum strength, avoid sharp angles between coils.
Coil building allows for asymmetric and organically shaped pots that are difficult to throw on the wheel. It also gives the artist more control over wall thickness and form. Some examples of coil built wares are vases, bowls, jars and sculptural pieces.
Slab Building
Slab building is a handbuilding technique that involves rolling out even sheets or “slabs” of clay that can then be cut, shaped, and joined together. To start, clay is rolled out to a consistent thickness using a rolling pin or slab roller. These uniform slabs can range in thickness from 1/4″ to 1″ or more. The clay is rolled out on a flat, stiff, non-porous surface like canvas, wood, or plaster.
Once the slabs are rolled out, they can be cut into shapes using templates or freehand. The edges of the slab pieces can be joined together using the score and slip method. To do this, use a tool to score or scratch grooves along the edges to be joined. Then apply water or slip (liquid clay) to the scored areas to help “glue” the pieces together. The seams can be welded together by smoothing over the join with a finger, rib, or tool. Another option is to press slabs over forms to create shapes. Texture and surface decoration can be added to the slab’s surface before or after construction.
Slab building allows for precise construction and joining of geometric or angular forms. It offers great control over wall thickness. Intricate surface textures and patterns can be applied to slab-built works. Care must be taken to ensure an even thickness when rolling out slabs. Letting the clay firm up some before joining can help prevent seam cracking. Pieces may require support from within while constructing larger forms.
Slab building is ideal for making vases, boxes, plagues, tiles, and other decorative objects. Combined with coils, slabs can be used to hand build functional pots and intricate sculptures.
Drape Molds
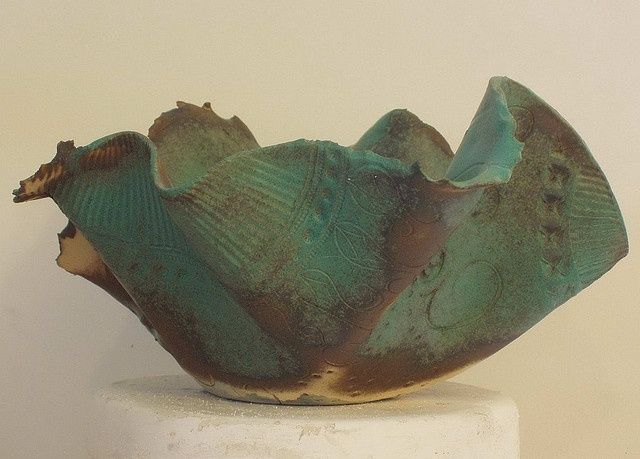
A drape mold is a hand building technique where a slab of clay is draped or pressed into a mold or form to create hollow vessels or bowls. The mold can be made from plaster, wood, foam, or other materials. With drape molds, the clay is supported from underneath while it dries, meaning it can have thinner walls and more delicate shapes than with slump or hump molds (Source: https://www.pinterest.com/daltonstach6932/final-soft-slab-drape/).
To drape with a mold:
- Roll out a slab of consistent thickness and let it sit until slightly dry and leather-hard.
- Place the slab over the mold, gently pressing it into shape from the center outward.
- Smooth seams and trim excess clay with a fettling knife or trim tool.
- Let the clay stiffen slightly before gently removing from the mold.
Drape molds allow for soft, organic asymmetrical shapes. The clay can be stretched and distorted. It’s important to work slowly and methodically. Rushing can cause tearing.
Drape molds are useful for bowls, vases, plates, and other open hollow forms. The mold provides continuous support so the clay can be very thin. A 15″ round serving bowl plaster drape mold is an example (Source: https://www.etsy.com/listing/1216350778/15-coupe-round-serving-bowl-plaster).

Hump Molds
Hump molds are a versatile handbuilding technique used to create hollow, rounded ceramic forms. The process involves draping soft clay over a rounded sculpting form, then refining the shape by smoothing, burnishing, and adding decorative elements.
To create a hump mold:
- Start with a rounded, convex sculpting form made of plaster, foam, or another non-porous material. Simple forms like half spheres or bowl shapes work well.
- Wedge a ball of clay to remove air pockets and create an even consistency. The clay should be soft and pliable.
- Drape or press the clay over the mold form, evenly covering the surface. Use your fingers to smooth seams and blend the clay.
- Allow the clay to set up slightly until it can hold its shape. Carefully remove it from the mold.
- Refine the shape by gently smoothing, paddling, or burnishing the surface. Add decorative elements like textures, incisions, or appliqués.
- Allow the piece to dry completely before firing. Hump molds may require inner support to avoid slumping.
Hump molds allow for asymmetry and organic shapes that would be difficult to throw on the wheel. The technique can yield artful vases, bowls, and sculptural pieces. With practice, intricate surface patterns and textures can be achieved.
Hump mold forms are very versatile. Consider convex shapes like half spheres, wavy bowls, oval domes, and freeform abstract molds. Simple plaster molds can be made from rounded objects. Creative textures can be added to the mold surface for imprinting patterns.
When working with hump molds, take care not to stretch or thin out sections excessively. Allow the clay to set up partially before removing it from the form. Check for and repair any cracks prior to drying and firing the finished piece.
Slump Molds
Slump molds are a type of hand building technique used in ceramics and pottery to shape clay pieces. With slump molds, soft clay is draped or pressed over a three dimensional form and allowed to slump down under the force of gravity. This shapes the clay into the contours of the mold.
The process starts by preparing the mold. This can be made from plaster, clay, wood, or other materials. The mold just needs to be rigid enough to hold its shape. Next, roll out a slab of soft clay to drape over the mold. The clay should be thick enough to hold its shape but soft enough to slowly slump down. Drape the clay over the mold, pressing it gently to adhere. Let it slump naturally, which may take awhile depending on the thickness. Finally, remove the molded piece from the mold and smooth out any seams or imperfections.1
Some best practices when using slump molds include keeping the clay soft and moist, avoiding undercuts on the mold that could trap the clay, and using release agents. Slump molds are great for making organically shaped bowls, vessels, and decorative pieces.2 The flowing shapes match the gravity-led nature of the slumping process.
Press Molds
Press molds are a hand building technique that involves pressing soft clay into a mold to create a pattern or texture. The clay is rolled out into a slab and then placed over the mold. Using hands, tools, or a rolling pin, the clay is pressed into the mold, picking up the design on its surface.
Press molds can be made from found objects like leaves, lace, or rope. They can also be commercially produced molds made from plaster, resin, rubber, or bisqueware. The mold should have some depth and texture to imprint a design.
Press molds allow you to quickly add beautiful surface designs. Intricate patterns like fish scales, flowers, gears, and tree bark can be achieved with press molds. The molded piece should be allowed to set up a bit before removing to avoid distortion.
Press molding is great for embellishing flat ware like plates, platters, and tiles. The molded clay can also be draped over forms to create patterned pots. Combining press molding with other techniques opens up many design possibilities. For example, press mold a slab, cut into shapes, and assemble into a mug or box.
Some best practices when press molding:
– Avoid overworking or stretching the clay when pressing into the mold
– Let clay firm up slightly before removing from mold
– Dust mold with slip or cornstarch if clay is sticking
– Impress mold firmly and evenly into clay
– Clean mold thoroughly after each use
Press molding allows you to add beautiful intricate textures quickly and easily. With a vast array of press molds available and the ability to make custom molds, the design possibilities are endless.
Sources:
https://www.pinterest.com/pin/pottery-tutorials–455145106103389460/
https://www.walmart.com/c/kp/press-mold-ceramics
Combining Techniques
Handbuilding techniques do not have to be used in isolation. Often, combining multiple techniques together can lead to innovative and expressive results. Some ways to combine handbuilding techniques include:
Attach coil pieces to pinch pots or slabs to add decorative elements like handles, spouts, or textures. This allows you to achieve more intricate shapes and designs than using one technique alone (The Crucible, 2022).
Combine pinch pots and coils to build a form with more control over the shape. Pinch pots form the base structure while coils are added for vertical walls or embellishments.
Press molds can be used in conjunction with slabs, coils, or pinch pots to imprint texture and patterns. For example, drape slabs over a press mold, then add coils or slips for embellishment.
Benefits of combining techniques include being able to produce more complex and creative forms, taking advantage of each method’s strengths, and learning a wider range of skills. Combining also allows for more possibilities in surface decoration. For beginners, starting with basic techniques then gradually incorporating additional methods is an effective way to advance skills.
Some examples are a pinch pot with a press molded texture, a slab box with coil handles, or a draped bowl with added coil feet. Experimenting with combined techniques brings out the best of handbuilding’s versatility and potential.
Tips and Tricks
When hand building, keep these tips and tricks in mind to troubleshoot issues and improve your designs:
- Keep your hands and tools wet when working with clay to prevent sticking and tearing (https://ceramicartsnetwork.org/daily/handbuilding-techniques).
- Use plastic wrap or damp towels to cover works in progress to keep the clay moist (https://www.thecrucible.org/guides/ceramics/handbuilding/).
- Consider the thickness of clay sections to prevent cracking and collapse – slabs and coils should be roughly equal thickness throughout the form.
- Blend seams together well using water and tools to create a cohesive surface.
- Use slip and scoring to help sections adhere together.
- Hollow out forms to allow for even drying and firing.
- Use a potter’s needle tool to create surface textures.
- Sand areas lightly once leather hard to smooth and even surfaces.
- Wax unfinished areas like the bottom before firing if desired.
Take your time hand building to produce high quality forms. Consider the overall shape and structural integrity as you work. With practice, you can create beautiful, functional pottery and sculpture using these techniques.


