What Do You Need To Make Keychains With Cricut?
A Cricut machine is an electronic cutting device that allows you to create customized designs and decals by cutting shapes and letters out of materials like paper, vinyl, and cardstock (https://sarahmaker.com/what-is-a-cricut-machine/). Cricut machines come with design software that makes it easy to create and customize text and images. Once your design is ready, the Cricut uses a small blade to precisely cut out the shapes.
Cricut machines are very versatile and can be used to make all kinds of crafts and home decor projects. From custom t-shirts, mugs, and wall art to stickers, iron-on patches, and DIY party supplies, a Cricut opens up a world of possibilities for crafters and creatives. The precision cutting capabilities allow you to make intricate and detailed designs with ease.
In this guide, we’ll cover everything you need to know to make custom keychains using your Cricut machine, from choosing materials to designing, cutting, and assembling your keychains.
Necessary Supplies
To make custom keychains with Cricut, there are a few essential supplies you’ll need:
First and foremost, you’ll need a Cricut cutting machine like the Cricut Explore or Cricut Maker. The cutting machine allows you to precisely cut designs from materials like vinyl, cardstock, and more (Source).
You’ll also need access to Cricut design software like Cricut Design Space. This software allows you to upload images and text to create your keychain designs. You can access Cricut Design Space online or through the Cricut Design Space app (Source).
In addition, you’ll need blank keychain accessories like acrylic keychains, metal keyrings, leather key fobs, etc. The Cricut will cut your custom design from vinyl, cardstock or another material which you’ll adhere to the blank keychain base.
Finally, you’ll need vinyl, cardstock, or other materials for the Cricut to cut. Cricut offers a variety of vinyl options like permanent, removable, and infusible ink. You can also use cardstock, faux leather, and iron-on materials.
Designing Your Keychain
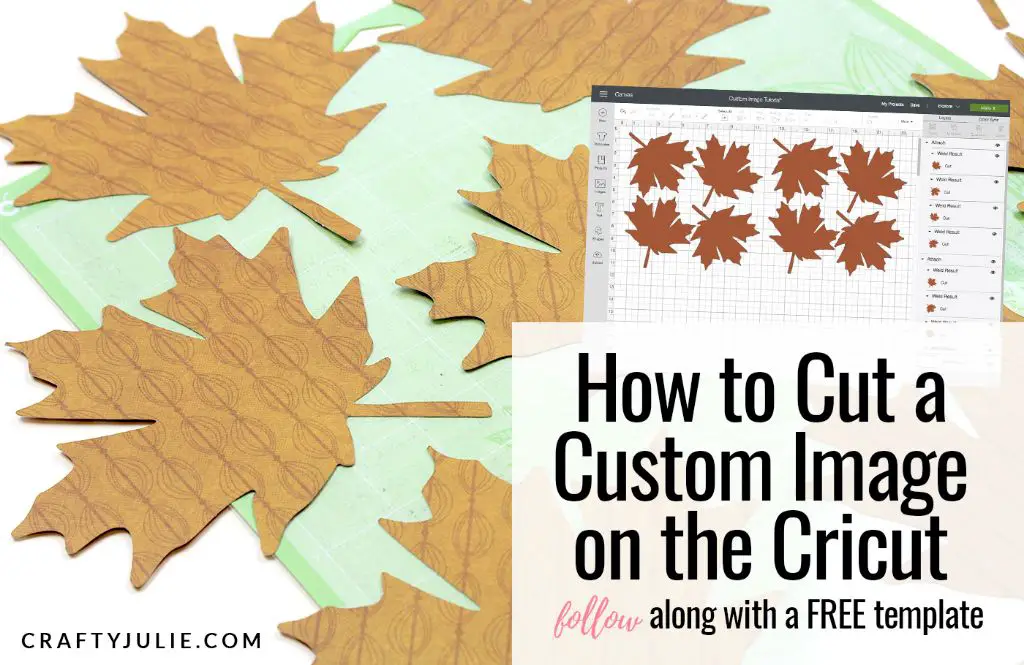
The first step in designing your keychain is to open Cricut Design Space and start a new project. This software allows you to create custom shapes, text, and images that will then be cut out on your Cricut machine.
When designing your keychain, you’ll want to think about what shape you want for the base. Many people like to use simple shapes like circles, squares, hearts, stars. You can upload a custom shape if you’d like as well. Make sure the shape is sized appropriately for a keychain, usually around 2 inches wide.
Once you have your base shape, go ahead and add any text or extra design elements you want. For keychains, it’s common to add someone’s name, initials, or a short phrase or word. Make sure to use a thick, bold font that will show up well when cut out.
As you design, keep in mind the color and material you’ll be using. If using vinyl, solid colors tend to work best. If using cardstock, patterns or gradients can have a nice effect. Get creative with your color combinations!
Cricut Design Space has a wide selection of fonts, images, and design elements you can use. You can also upload your own photos or illustrations to feature on the keychain. Take advantage of all the options to make your design unique.
Once you have your design ready, save it and prepare to start cutting it out with your Cricut machine. Check that the size and shape will work well as a keychain before moving on.
Preparing Your Materials
Before you can start cutting your keychain design, you need to properly prepare and load your materials into the Cricut machine. Here are the main steps for getting your vinyl, cardstock, or other media ready to cut:
For vinyl keychains, you will need to load your removable adhesive vinyl onto the Cricut mats. Make sure the vinyl is laid down smoothly without any bubbles or wrinkles. Secure the edges with masking tape if needed. Use the Cricut standard grip mat for vinyl since it has the right amount of tackiness.
For cardstock keychains, you can load your cardstock directly onto the Cricut mats without any adhesive. Make sure the cardstock is flush against the mat. Use the Cricut light grip mat for cardstock to avoid tearing the paper when removing.
In either case, you need to carefully load the mat into the Cricut machine according to the prompts on the screen. The mat should snap firmly into place.
Most keychain materials require the fine point blade to cut small, intricate designs cleanly. Open the clamp on the Cricut and securely attach the fine point blade, making sure it is pushed in as far as it can go. Consult Cricut’s instructions if unsure how to change the blade.
Now your materials are prepped and ready for cutting! The next step is starting your project in Cricut Design Space and selecting the correct cut settings.
Cutting Your Design
Cutting your keychain design is relatively simple once you have the design file ready to go. First, you’ll want to send your design from Cricut Design Space to your Cricut machine. Make sure your machine is powered on and connected to your computer or the Cricut Design Space mobile app via Bluetooth. In Design Space, click the “Make It” button for your project. You’ll then be prompted to select your machine. After selecting, the software slices your design and gets it ready to cut.
Once you get the notification that your design was sent, the next step is to prepare your material. For acrylic keychains, you’ll want to use either acrylic sheets or charm blanks. Make sure your material is securely fastened to the cutting mat with strong transfer tape. Load the mat into your machine, and double check that the correct cutting tools (blade and housing) are inserted. Hit the “Go” button on your machine to begin cutting.
The machine will first draw a box around your design, then proceed with cutting it out. Depending on complexity, a keychain may take 5-15 minutes to cut out. Once it finishes, remove your material from the mat and begin weeding – or removing the excess material leftover from cutting. Use Cricut weeding tools to easily remove the negative space pieces. Be sure not to throw away the actual cutout of your design!
After fully weeding your material, your design is ready to be assembled into a finished acrylic keychain!
Assembling the Keychain
Once you have cut out your keychain design from vinyl, cardstock, or another material, it’s time to assemble it onto the acrylic keychain blank. There are a few methods you can use to attach your cut materials:
- If using vinyl, remove the backing and stick it directly onto the blank. Smooth the vinyl to remove any air bubbles or wrinkles.
- For cardstock, you can use strong liquid glue like E6000 to adher it to the blank, applying pressure for 30-60 seconds to secure it.
- Another option is making small holes in the top of your cutout design and the blank, threading jewelry cord through both holes and knotting it. This allows the design to dangle from the blank.
- You can also use jewelry findings like rings, chains, or lobster clasps glued to the blank and top of the design to assemble them.
Get creative with how you attach your Cricut-cut keychain art to the acrylic blank! Using the right adhesives for the materials you picked allows for a durable, long-lasting keychain.
Adding Finishing Touches
Once your keychain is cut out and assembled, you can add some extra flair with finishing touches like stones, charms, jump rings, and laminate. This takes your DIY keychain from basic to beautiful!
Charms are a great way to add some personality to your keychains. You can find all kinds of charms like hearts, stars, flowers, animals, and more. Use a jump ring to connect the charm to a hole or link on the keychain. Some popular places to find charms include Michael’s, JoAnn Fabric and Craft Stores, and Etsy.https://www.thecountrychiccottage.net/cricut-keychains/
Rhinestones or flatback crystals add a touch of sparkle and shine. Use hot glue to adhere them, or use a special jewel setting glue like E-6000. Place them decoratively on your keychain design. Switch up shapes and sizes for extra interest.
Jump rings are essential for attaching charms and other embellishments. Make sure to get jump rings in the right size to easily slip onto your keychain components. Closed jump rings are best for a secure hold.
Laminate provides a glossy, protective coat for paper keychains. Use a thermal laminating machine or self-adhesive laminating sheets. Trim close to the edges so it looks seamless. The laminate prevents the paper from tearing or getting wet.
Cricut Keychain Ideas
When making custom keychains with a Cricut machine, the design options are endless. Some popular keychain ideas include:
Names, monograms, quotes – Personalize a keychain by cutting out someone’s name, initials, or a meaningful quote or word. Use a cursive, script, or stylized font for a creative look.
Shapes, characters, logos – Cut out fun shapes like hearts, stars, circles, or triangles. Go for favorite cartoon characters, video game logos, or other icons meaningful to the recipient. Scale shapes up or down for interest.
Consider using different materials like vinyl, cardstock, acrylic, wood, or leather for unique effects. Add other embellishments like rhinestones, enamel pins, or jump rings to take the keychain to the next level. Get creative with your Cricut machine to make personalized, artistic keychains for yourself or to give as gifts.
Troubleshooting Problems
When working on your Cricut keychain project, you may run into some issues with weeding and cutting errors. Here are some troubleshooting tips:
If you are having trouble weeding the vinyl after cutting, the blade may be dull. Replace the blade and perform a test cut on a scrap piece of vinyl to ensure it is cutting all the way through cleanly. You can also increase the blade depth in the machine settings if the cuts are not going deep enough.
Cutting errors like warped shapes or letters not fully cutting out can also indicate a dull blade. However, it could be an issue with the cutting pressure. Try increasing the pressure and perform another test cut.
For software issues, such as Design Space crashing or freezing, clearing the cache may help. If Design Space is down completely, check the Cricut Help Center for known issues.
For hardware problems with your Cricut machine, consult the troubleshooting guide in the Help Center to diagnose issues like the blade not being detected, the mat not loading properly, or other errors. Reaching out to Cricut customer service directly can also help resolve machine malfunctions.
Conclusion
Making a custom keychain with Cricut is not only fun but practical too. The key components for success are having the right Cricut machine and accessories to cut your chosen materials, designing a keychain file in Cricut Design Space, preparing your materials properly, carefully cutting and weeding the design, assembling the pieces with strong adhesive, adding any finishing embellishments, and finally attaching a key ring or chain. Take it slow, follow all the steps, and refer back to this guide if you encounter any problems along the way. With some practice, you’ll be churning out professional-looking keychains to give as gifts or sell online in no time. The end result will be well worth the effort.