What Do You Put Clay In To Harden It?
Clay is a unique material that requires proper drying and firing techniques in order to harden it into a usable ceramic. Clay contains minerals and clay particles that give it its plasticity when combined with water, allowing it to be shaped. However, in its wet form clay remains soft and fragile. For clay to gain hardness and become a fired ceramic, the clay needs to undergo a chemical reaction called hydration. This involves removing some or all of the water from the clay through drying and heating methods. When the water is removed, clay particles can move closer together and bond, allowing clay to harden into finished ceramic ware. Understanding the hydration process is key to properly hardening clay.
Air Drying
One of the most common and easiest methods for drying and hardening clay is through air drying. This involves simply leaving your clay out in room temperature air until all moisture evaporates from the clay and it becomes hardened.
Air drying works thanks to the natural process of evaporation. As wet clay is exposed to air, the water molecules in the clay slowly evaporate into the air. The rate of evaporation depends on factors like temperature, humidity, air circulation, and the thickness of the clay piece. In typical room conditions, it takes around 24-48 hours for a 1/4” thick piece of clay to completely air dry. Thicker pieces will take longer.
Letting clay air dry causes water to evaporate slowly, allowing the clay particles to realign themselves as the moisture leaves. This results in the finished, hardened clay product. As long as the clay is able to fully dry all the way through, it will harden and keep its shape without cracking or warping. Just be sure the clay is of an even thickness to encourage even drying.
Air drying is a handy technique because it requires no special equipment other than enough space to let the clay sit undisturbed. It leaves clay with its natural matte finish. Just be sure to keep air drying clay out of direct sunlight and away from extreme heat to prevent uneven drying. With simple air drying, clay will be ready for painting, baking, or other finishing techniques.
Oven Drying
One of the most common methods for drying and hardening clay is to bake it in a standard kitchen oven. When clay is exposed to temperatures between 175-212°F, the water content in the clay evaporates relatively quickly. As the water evaporates from the clay, the clay particles are able to move closer together, causing the clay to harden and become denser.
When using an oven to dry clay, it’s best to use a low temperature, usually around 175°F. Higher temperatures may cause the clay to crack or become brittle. Place the clay on a cookie sheet or baking dish and put it in the oven for 1-3 hours. Check it periodically until it has hardened. The timing will depend on the amount and thickness of the clay.
Oven drying has the advantage of speeding up the drying process dramatically compared to air drying. It provides an even distribution of heat that penetrates the entire piece of clay, allowing the moisture to fully evaporate. This method enables the clay to harden efficiently while minimizing cracking.
Microwaving
Microwaving is a convenient way to quickly dry and harden modeling clay right in your kitchen. The intense heat of the microwave rapidly draws moisture out of the clay, allowing it to harden in a matter of minutes. When microwaving clay, it’s best to use short bursts of 30 seconds to 1 minute at half power. Check the clay every minute, as overmicrowaving can cause cracking or burning.
It’s important not to microwave clay containing wire, foil or other metal pieces, as this can create sparks and damage the microwave. Only microwave oven-safe modeling clay. Let the clay rest for a few minutes after microwaving before handling so it can finish cooling and complete the drying process.
Microwaving speeds up clay drying time considerably compared to air drying. It’s a convenient method for quickly finishing a clay sculpture or hardening a clay piece before painting or varnishing. Just be cautious of overdrying and let the clay cool before touching or applying any pressure.
Sun Drying
Sun drying is a traditional and popular method for hardening clay that utilizes natural sunlight. To sun dry clay, simply place your clay pieces outdoors in direct sunlight. The ultraviolet rays from the sun cause the clay molecules to link together more tightly in a process called polymerization. This polymerization hardens the clay.
For best results, choose a hot, dry day and place your clay creations directly on a concrete or stone surface. Avoid drying on grass or dirt which can stain the pieces. Turn the items over periodically to ensure even hardening on all sides. Check the clay every few hours and bring items indoors if rain threatens.
Properly sun dried pieces will be fully hardened within 1-3 days depending on climate conditions. Sun drying is a chemical-free and energy efficient way to harden clay, however, it is weather-dependent and may not be possible year-round in some regions.
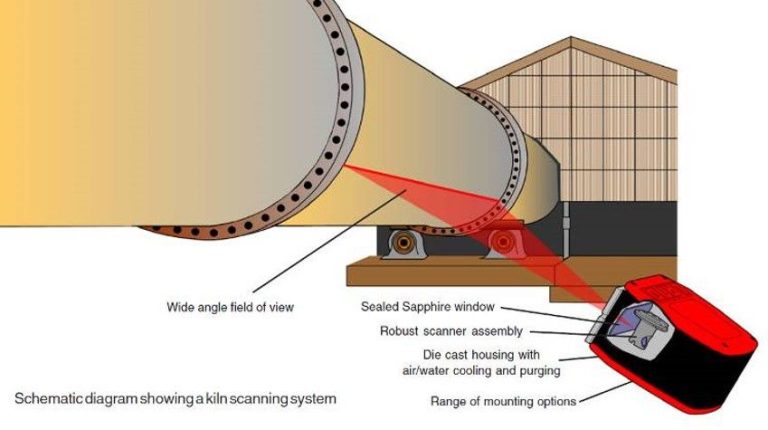
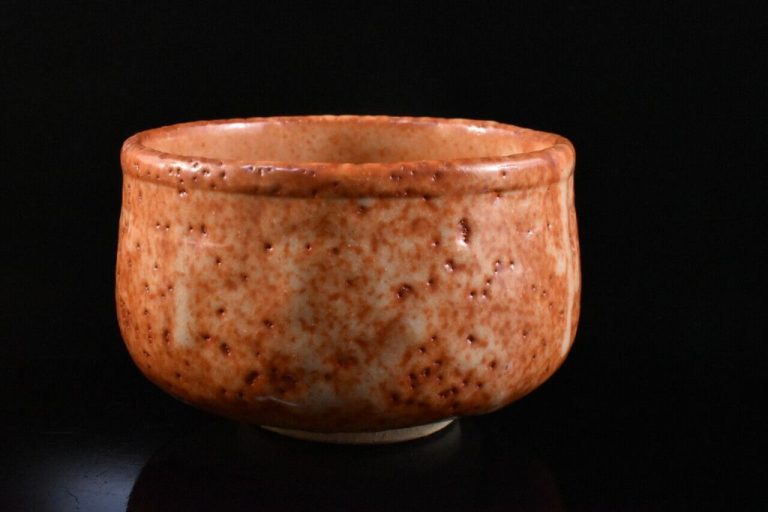
Using a Kiln
Kilns allow you to heat clay to extremely high temperatures – often over 2,000oF or more. At these high temperatures, chemical reactions occur that completely harden and cure the clay. The intense heat fuses any pores and bonds all the materials, creating a dense, finished ceramic product through a process known as sintering.
Most clays require a final firing in a kiln in order to fully harden them, especially stoneware and porcelain clays that are fired at higher temps. The kiln provides an enclosed high-heat environment with ventilation that allows the clay to thoroughly fire throughout at a consistent temperature.
Kilns come in various types like electric, gas, wood, or raku kilns. Many ceramic artists and potters have small electric kilns to fire their creations at home. For very high-temperature firings above 2,300°F, gas and wood kilns are more practical.
Firing clay in a kiln results in much stronger, finished pieces that have their own unique qualities based on factors like the clay type, kiln temperature, length of firing, and more. Using a kiln is essential for creating durable ceramic art, dishware, tiles and other clay objects that require complete hardening.
Cold Finishing
One interesting technique for drying and hardening clay is through cold finishing. This involves storing the clay in colder environments like the refrigerator or freezer. The cold temperatures help draw moisture out of the clay, allowing it to slowly harden over time without the need for additional heat sources.
To cold finish clay, first wrap your clay tightly in plastic wrap or place it in a sealed plastic bag. This prevents the clay from absorbing odors from the refrigerator or freezer. Then simply place the wrapped clay in the fridge or freezer and leave it for at least 24 hours. The longer you leave it, the more moisture is drawn out.
The fridge provides a more gradual hardening at around 40°F. The freezer at 0°F or below creates a more intense drying effect. Just keep in mind that freezing can cause clay to become brittle and crack. Allow the clay to gradually warm back to room temperature before unwrapping to prevent condensation.
Cold finishing is an easy hands-off way to harden and dry clay without any special equipment. It just requires some patience as it takes longer than oven or air drying. But if you’re willing to wait, it can produce excellent results.
Using Desiccants
One way to harden clay without using heat is to bury it in materials that will absorb moisture, known as desiccants. Common desiccants used for clay include:
- Sand – Burying clay in sand will slowly draw out moisture through the porous nature of sand grains. Ensure the sand is dry before using. Play sand or sandbox sand works well.
- Sawdust – Sawdust makes an excellent desiccant for hardening clay. The sawdust should be dry, untreated, and fine consistency. Simply bury the clay in a container filled with sawdust.
- Vermiculite – This is a lightweight mineral material that readily absorbs moisture. Vermiculite is available at most garden stores. Bury clay fully in dry vermiculite.
- Silica gel – While more expensive than other options, silica gel beads work very well to absorb moisture from clay. Ensure beads are fresh before using.
Desiccants work by pulling the moisture out from the outer surface of the clay inwards. Allow several days or weeks for full hardening. Check clay periodically until hard. Using desiccants eliminates the need for an oven or kiln while still hardening clay effectively.
Chemical Solutions
Submerging clay in chemical solutions is another technique that can be used to harden it. Certain solutions like vinegar or Mod Podge cause chemical reactions with the clay that help to set and cure it.
Vinegar is a mild acid that reacts with the clay to draw out moisture and accelerate drying. When soaked in vinegar, clay items will harden as the acetic acid interacts with the material. White vinegar typically provides the best results. The items should be fully submerged in the vinegar and allowed to soak for 6-12 hours or until completely hardened.
Mod Podge is a popular decoupage glue and sealer that can also be used to cure clay. It contains polymers that bind to the clay as the solution dries. Pieces can be brushed with or submerged in Mod Podge. As it dries, it will help harden and add a protective coating to the clay. Multiple coats may be needed for complete hardening.
Experimenting with chemical solutions provides another option for curing and hardening clay through simple natural ingredients or craft products readily available at home. Just be sure to test small samples first and follow safety precautions when working with chemicals.
Conclusion
There are various effective techniques for hardening clay depending on the project and resources available. Air drying clay works well for small items where cracking is not a major concern. Oven and microwave drying speed up drying time but can cause cracks in larger pieces. Sun drying utilizes free solar energy but requires good weather and drying racks. Using a kiln provides the best results for firing clay but requires investment in specialized equipment.
Best practices include drying clay slowly and evenly to prevent cracks, especially for larger pieces. Allowing moisture to evaporate from both sides of the clay by avoiding contact with surfaces speeds drying. Smooth, even clay thickness helps reduce cracks. Consider climate and drying set up based on the clay project. With proper technique, clay can be hardened using simple, accessible methods like air drying or the advanced controlled results of firing in a high-temp kiln.