What Does Centering Clay Mean?
What is Centering Clay?
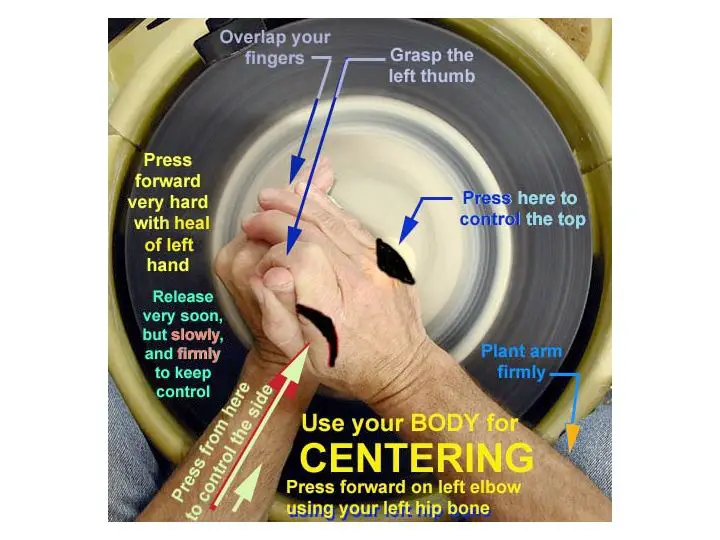
Centering clay refers to the process of centering or shaping a lump of clay into a symmetrical form while it spins on a potter’s wheel (Ceramic Dictionary – by Susan Mussi: CLAY (5) Centering). The purpose of centering clay is to create an even, rounded, and centered base or foundation to build more complex ceramic forms upon. Centering allows potters to create uniform pieces like bowls, vases, cups, and other rounded objects.
The centering process involves placing a lump of clay on the wheel head and applying pressure from the palms, fingers, and edges of the hands to shape and form the spinning clay into a concentric, centered mass (The Spruce Crafts – How to Center Clay on a Potter’s Wheel). As the clay spins, the potter pushes inward and outward to form the clay into the desired shape. Proper centering ensures the clay is perfectly centered on the wheel before pulling up the walls of the piece.
Origins and History
Centering clay on a potter’s wheel dates back thousands of years to ancient cultures around the world. The earliest known evidence of potter’s wheels comes from Mesopotamia (modern day Iraq), where pottery fragments dating back to approximately 3500-3000 BCE show signs of being wheel-thrown. The technology then spread across Europe, Africa and Asia. Potters wheels enabled ceramic artists to create symmetrical pottery more efficiently than handbuilding techniques.
According to Wikipedia, potter’s wheels became widespread across Europe around 1000 BCE as the technology spread through trade networks. In the Mediterranean region, Anatolian and Greek potters adopted the potter’s wheel in about the 7th century BCE. The Romans brought improvements to the potter’s wheel design, adding a flywheel to maintain momentum during throwing. Over centuries, incremental design changes were made to pottery wheels in different cultures to improve efficiency and ergonomics.
While most early potter’s wheels were powered by kicking a flywheel with the foot or having an assistant turn the wheel, the treadle wheel operated by foot pedals emerged in China during the Han Dynasty (202 BCE – 220 CE). More recently, electrically powered wheels emerged in the 20th century along with plaster bats for centering clay. These and other modern innovations such as variable speed controls have made the process of throwing on the wheel faster and easier.
Types of Centering Clay
There are several different varieties and forms of centering clay available for pottery and ceramics work.
Some common types include:
- Stoneware clay – This dense clay holds its shape well when centered and has excellent drying properties. It fires to a strong finished ceramic product. Stoneware clays are usually gray or brown in color. Source
- Porcelain – A very fine white clay that becomes glass-like when fired to a high temperature. Porcelain can be more difficult to center than stoneware due to its very plastic nature, but creates delicate pottery pieces. Source
- Earthenware – Lower-fired clays that result in more porous ceramics. Earthenware comes in a variety of colors including red and brown. It may require extra care when centering due to its softer, more malleable properties.
- Self-hardening clay – Often used for modeling and hand-building. This air-dry clay can be centered on the wheel, but dries quickly and cannot be fired in a kiln.
The specific properties of centering clays affect moisture content, plasticity, hardness, absorbency, shrinkage, and finished look. Having an understanding of these properties will help determine which varieties are best suited for particular centering projects and techniques.
Uses and Applications
Centering clay has several common uses and applications:
On a pottery wheel, centering clay is an essential first step in throwing pots and other vessels. Centering evens out the clay and removes air pockets, allowing potters to successfully raise uniform walled pieces on the wheel. Proper centering technique helps create pots with thinner, more delicate walls and a symmetrical form (Source 1).
Sculpting and molding also benefit from starting with a well-centered clay base. Centering compresses the clay and removes flaws that could transfer to the final sculpture. It creates an evenly distributed mass that’s easier to manage for handbuilding and sculpting complex forms (Source 2).
Centering clay has therapeutic benefits as well. The process can relieve stress and anxiety while improving focus and dexterity. Centering requires full concentration on the present moment, which has a calming, mindful effect. The tactile quality of clay also makes centering soothing and engaging.
Getting Started with Centering Clay
If you’re new to centering clay, here’s what you need to know to get started:
Equipment Needed
To start working with centering clay, you’ll need:
- A potter’s wheel – either electric or kick wheel
- Centering clay – usually a smooth, dense clay like porcelain or stoneware
- Basic pottery tools – trimming tools, ribs, loop tools, etc.
- A work surface – such as a ware board or canvas
- Water and a sponge
Clay Preparation
Before centering, prepare your clay by:
- Wedging or kneading to remove air bubbles
- Forming a ball or cone shape
- Allowing the clay to firm up slightly if too soft
Basic Centering Techniques
To center your clay on the wheel:
- Place the clay on the wheel and press down to secure it
- Begin spinning the wheel and center the clay with steady pressure
- Use the palms of your hands to shape the clay into a cylinder
- Gently compress the clay while keeping it centered
- Use water and your fingers to smooth the clay as you shape it
- Continue refining until you achieve a centered clay column
Be patient, it takes practice to perfectly center clay! Over time you’ll develop a feel for the right clay consistency, pressure, and techniques.
Centering Clay Techniques
Centering clay is an essential technique for pottery and ceramic work. Proper centering allows for even wall thickness and symmetrical pieces when throwing on the potter’s wheel. There are several key techniques for centering clay:
Throwing
When throwing on the potter’s wheel, centering clay is the first step. The clay must be centered before shaping it into a pot or other vessel. To center, place the clay on the wheel and apply even pressure with the palms while the wheel spins at a moderate speed. Use fingers to refine the shape into a cone and compress any air pockets. The clay is centered when it spins evenly without wobbling.1
Sculpting
Centering clay by hand is important when sculpting free-standing pieces. Start with a rough shape and refine it by gently compressing and smoothing with fingers. Turn the clay periodically to check for symmetry. For more control, use sculpting tools like loop tools on centered clay. Well-centered clay withstands carving without cracking or warping.
Molding
Center clay firmly before pressing it into a mold. This allows the clay to fill the mold cavity evenly. First throw or hand-center the clay into a smooth ball, then press it down into the mold. Continue applying even pressure from the center outward until the clay adheres to the mold surface.2
Advanced Techniques
Skilled potters use advanced centering techniques for asymmetric forms or altering wheel-thrown vessels. For example, off-center throwing involves shifting centered clay off-center to shape one side independently. Clay can also be recentered to refine uneven or warped pieces. Mastering traditional centering is key before attempting advanced techniques.
Centering Clay Tools
There are a variety of tools that can help when centering and opening clay on the pottery wheel. The essential tools that every potter should have include:
- Rib: Ribs smooth and compress clay. They come in different shapes and materials like wood, rubber, and metal. Ribs help shape the wall thickness and refine surfaces (source: https://www.strongarmpotterytools.com/).
- Fettling Knife: This is a versatile knife used to trim and cut clay. It has a curved blade that allows precision cutting (source: https://www.baileypottery.com/store-dept-pottery-wheels/store-wheel-accessories/store-wheel-accessories-centering-trimming-tools.html).
- Needle Tool: A needle tool makes holes in clay and attaches parts. The sharp point allows detail work (source: https://www.strongarmpotterytools.com/).
Some specialty tools include:
- Chatter Tools: These imprint patterns onto clay like scales or ridges. Dragging the chatter tool across clay leaves distinctive markings (source: https://www.baileypottery.com/store-dept-pottery-wheels/store-wheel-accessories/store-wheel-accessories-centering-trimming-tools.html).
- Ribbon Tools: Adding a ribbon tool creates ruffled edges along rims and feet. The crimped clay texture is an artistic effect (source: https://www.strongarmpotterytools.com/).
Each tool serves a specific purpose in shaping, detailing, and designing clay items. Mastering the techniques takes practice but allows potters to create anything they envision.
Care and Maintenance
Proper care and maintenance of centering clay is crucial for keeping it in good working condition. Here are some key tips:
Proper storage: Centering clay should be stored in airtight plastic bags or containers to prevent it from drying out. It’s important to remove as much air as possible before sealing. Store clay in a cool, dry place away from direct sunlight. According to https://potterycrafters.com/11-problems-centering-clay-and-easy-ways-to-fix-them/, hardened clay can be rehydrated by misting water and tightly resealing the bag.
Keeping clay workable: As you work with centering clay over time, it will start to dry up. To keep it smooth and moist, spritz water and knead it periodically. Wrap clay in plastic wrap or bags to prevent air exposure when taking breaks. Overly wet clay can also be difficult to center properly – only add small amounts of water as needed.
Cleaning and sanitizing: After each use, clean clay remnants off your wheel and tools. It’s also wise to periodically sanitize equipment to prevent mold growth. Use a bleach/water solution or other pottery disinfectants. Let all surfaces dry fully before storing.
Troubleshooting Issues
Centering clay can present some common problems that potters and ceramic artists may encounter. Here are some of the most frequent issues and tips for troubleshooting them.
Common Problems
Some typical problems when centering clay include the clay going off-center when opening, the walls collapsing when pulling up, cracking or splitting clay, and being unable to center large amounts of clay (https://potterycrafters.com/11-problems-centering-clay-and-easy-ways-to-fix-them/). These issues generally stem from factors like incorrect consistency or moisture content, flawed technique, or using lower quality clay.
Fixing Cracking or Drying
To prevent cracking or excess drying while centering, keep a spritzer bottle of water handy to mist the clay. Wrap plastic over sections not being worked to retain moisture. Avoid overworking one area too long. If cracks appear, stop centering and remix the clay, adding water as needed. Let the clay rest before trying again.
Achieving Desired Consistency
The ideal centering clay consistency is like firm dough – pliable but not sticky or mushy. Test consistency by squeezing a ball of clay in your fist. There should be some give but also resistance. If too wet, the clay will be loose and collapse when centering. If too firm, it will resist being centered and may crack. Adjust moisture by letting clay dry slightly or wedging in water until the right consistency is reached.
Centering Clay Community
There are lots of ways for centering clay enthusiasts to connect with one another and continue learning. Some popular options include:
Online forums and groups like the Ceramic Arts Daily community provide a place to get feedback, ask questions, and learn from other centering clay potters worldwide.
Local classes and workshops are a great way to improve skills and techniques in-person. Many local art centers, studios, and schools offer classes at beginner and advanced levels.
Connecting with other local enthusiasts, either informally or through pottery clubs and groups, allows for sharing knowledge and motivation for the craft.
Between online and in-person opportunities, centering clay has an engaged community eager to welcome newcomers and support one another’s growth.

