What Is A Rubber Paint Roller Used For?
What is a Paint Roller?
A paint roller is a tool used for applying paint quickly and evenly onto surfaces such as walls and ceilings. It consists of a cylindrical roller covered with an absorbent material mounted on a handle [1]. The roller is placed in a tray filled with paint, which soaks the absorbent material covering. As the roller is moved across the surface, the paint is transferred in a smooth, uniform coat.
Standard paint rollers are around 2 inches in diameter and 6 inches long. The roller is covered in a material such as polyester, lamb’s wool, or mohair that holds and releases paint. The handle ranges from 9 to 18 inches long to allow the user to apply broad strokes. Paint rollers are designed to quickly coat large, open areas that would be time-consuming to cover using just a paintbrush.
Paint Roller Parts
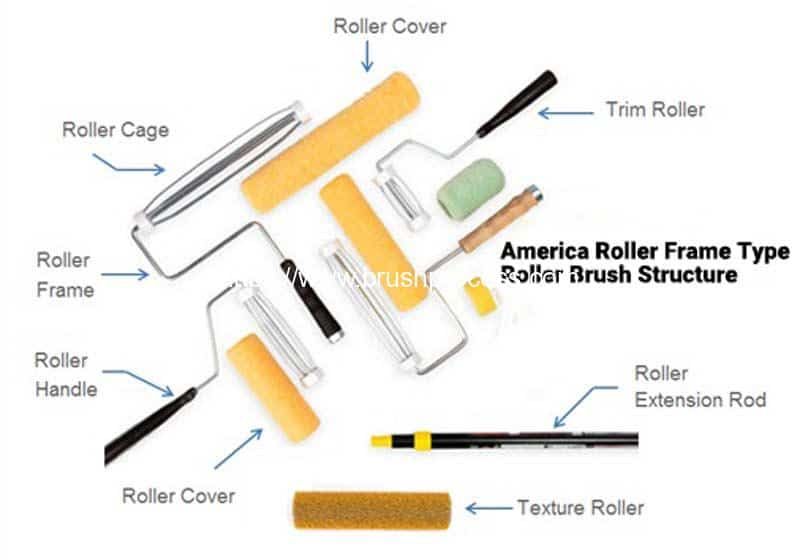
Paint rollers consist of several key components that work together to apply paint smoothly and evenly across surfaces. The main parts of a paint roller include:
Core
The core is the inner cylindrical part that supports the roller cover. Cores are typically made of plastic, metal or cardboard. Plastic cores are the most common and provide a balance of strength and flexibility to hold the roller cover without bending or crushing. Metal cores are extremely rigid and durable for heavy duty use. Cardboard cores are the least expensive option but can bend or deform easier over time.
Nap/Pile
The nap or pile refers to the fuzzy texture on the outside of the roller cover. The length and density of the nap helps determine the capacity and coverage ability of the paint roller. Shorter naps like 1/4″ work best for smooth surfaces, while longer 3/4″ naps are ideal for thicker paints on uneven surfaces. The pile can be made from polyester, lamb’s wool or synthetic blends.
Frame/Cage
The frame or cage holds the roller cover in place around the core. It typically consists of thin metal prongs that grab onto the core while allowing the nap to spin freely. The open ends of the cage allow the cover to be slipped on and off for replacement. Frames come in a range of sizes from small 4″ rollers up to 18″ for walls.
Handle
The handle connects to the frame for grasping and applying force to push the roller. Most roller handles have an indented grip area and are between 7″-9″ long. Some are threaded to allow pole extensions to be attached for reaching higher areas.
Types of Paint Rollers
There are several types of paint rollers designed for different surfaces and paint finishes. The main differences between paint roller types come down to the roller nap, the covering material, and the roller core.
Nap Lengths
The nap refers to the fuzzy texture on the outside of the paint roller. Short-nap rollers, around 1/4-3/8 inch, are best for smooth surfaces like doors and trim. Medium-nap rollers, around 3/8-1/2 inch, work well on semi-smooth surfaces like drywall. Long-nap rollers, 1/2 inch or more, are ideal for rough or textured surfaces like concrete and stucco. Using the right nap length helps achieve an even coat and minimize drips and splatter 1.
Covering Materials
Common paint roller cover materials include polyester, lambswool, mohair, and foam. Polyester works for most indoor painting jobs. Lambswool applies paint smoothly on walls and trim. Mohair is good for glossy surfaces. Foam works on rough or textured exteriors. The cover material impacts the finish quality and durability 2.
Core Types
Paint roller cores are either plastic, metal, or wood. Plastic cores are lightweight and disposable. Metal cores are reusable and good for large painting jobs. Wood cores provide maximum paint absorption for oil-based paints. Core type determines the roller’s weight, strength, and paint capacity.
Uses for Paint Rollers
The main use for paint rollers is to apply paints, stains, and varnishes onto surfaces quickly and efficiently. Paint rollers excel at coating large, broad surfaces like walls, ceilings, and floors. According to Quizlet, paint rollers allow you to cover these larger surface areas much faster than using just a brush.
Paint rollers are commonly used to apply two coats of paint onto walls and ceilings during interior house painting. The paint roller’s sleeve evenly distributes the paint in a thin layer across the entire surface. Paint rollers are also handy for staining floors and wooden furniture. The slight texture left by the roller sleeve can help the stain adhere properly.
Compared to paintbrushes, rollers apply an even coat of paint across surfaces more quickly and efficiently. This helps save time and effort during large DIY or professional painting jobs. Proper use of a paint roller can leave a smooth, professional-looking finish on walls, ceilings, floors, furniture, and more.
Advantages of Paint Rollers
Paint rollers provide several key advantages over other paint application methods like brushes or paint sprayers. Some of the main benefits of using a roller to paint include:
Fast Coverage: Paint rollers can quickly coat large surface areas with paint. The roller head holds more paint than a regular brush, allowing you to cover more ground in less time. This makes rollers ideal for painting large flat surfaces like walls and ceilings.
Uniform Coating: The roller applies an even layer of paint across the surface. Unlike with a brush, you are less likely to end up with uneven coats or thick brush strokes. The uniform coating provides a smooth, professional looking paint finish.
Easy to Use: Paint rollers are simple to use, even for novice DIYers. You don’t need any special skills or training to use a roller effectively. Just load the roller with paint, roll it across the tray to distribute the paint evenly, then apply using long, steady strokes.
Disadvantages of Paint Rollers
While paint rollers have many benefits, they also come with some drawbacks. One of the main disadvantages of paint rollers is that they can leave behind stippling or texture in the final paint job. This occurs because the pile of the roller leaves slight impressions in the paint as it’s applied. Stippling is especially noticeable when painting smooth surfaces like walls and ceilings.
Paint rollers are also not ideal for painting trim, edges, and other detailed areas. The width of the roller makes it difficult to maneuver around intricate trimwork and corners. Paint rollers work best on broad, open surfaces where you can roll in long, uninterrupted strokes. For painting trim and edges, a brush is usually a better choice.
According to sources like https://www.jamestdavis.com/james-t-davis/paint-roller-vs-sprayer and https://propaintsprayer.com/paint-sprayer-vs-roller/, paint rollers can also be more time consuming than other paint application methods like paint sprayers. The constant reloading and rolling of paint tends to extend the painting process compared to simply spraying paint onto surfaces.
Choosing the Right Paint Roller
When choosing a paint roller, there are several key factors to consider based on the specifics of your painting project:
Surface Type – The texture of the surface you are painting determines the nap length you need. Smooth surfaces like drywall or paneled walls do well with shorter naps around 1/4″ to 3/8″. Rough surfaces like concrete, stucco or textured walls need a longer nap around 1/2″ to 3/4″ so the roller can get into the grooves and fully coat the bumps.
Paint Type – The viscosity of the paint plays a role too. Thinner paints like stains can use shorter naps. Thicker paints like primers may require longer naps so the paint doesn’t get clogged in the roller. Read the manufacturer recommendations for best pairings.
Job Size – Short naps work well for faster touch-ups while longer naps hold more paint for bigger walls. Rollers between 3/8″ to 1/2″ are considered versatile for most mid-sized projects.
Material – Rollers come in polyester, lambswool, microfiber and more. Softer fabrics like lambswool apply paint smoothly but require more frequent rinsing. Synthetics like polyester are more durable and hold their shape better.
Consider all these factors – surface, paint type, size and materials – when choosing the optimal roller for your painting project. Benjamin Moore provides helpful guidelines on pairing the right roller to the job.
Using a Paint Roller
Using a paint roller properly is key to achieving an even, professional-looking paint job. Here are some tips for getting the most out of your paint roller:
Prep work is an important first step before starting to paint. Make sure the wall surface is cleaned, patched, and sanded. Lay down drop cloths or tarps to protect floors and furniture. Stir or mix the paint thoroughly before pouring it into the paint tray.
When loading the roller, dip it into the paint tray and roll it back and forth to evenly distribute the paint across the entire surface of the roller. Roll off any excess paint on the ridged part of the tray. The roller should be soaked but not dripping.
Begin rolling paint onto the surface starting at the top of the wall. Apply the paint in a horizontal ‘W’ pattern with downward strokes, overlapping slightly as you move to cover the entire section. Move methodically from top to bottom. To avoid lap marks, always maintain a wet edge by painting from wet into dry areas.
Use steady, moderate pressure as you roll. Pressing too hard can cause uneven paint transfer. Work in approximately 4 foot by 4 foot sections. Once the section is covered, re-load the paint roller before moving on.
For cutting in corners and edges, use an angled paint brush. Roll horizontally across the adjacent wall section to blend and feather the paint’s edge.
Take breaks periodically to re-saturate the roller with paint. Follow the manufacturer’s instructions for cleaning and storing paint rollers after use.
Maintaining Paint Rollers
Properly maintaining paint rollers is important for getting the most use out of them and keeping them working properly. Here are some tips for cleaning, storing, and knowing when to replace paint rollers:
Cleaning
After each use, paint rollers should be thoroughly cleaned to prevent paint from drying on the roller. To clean a roller:
- Remove excess paint by rolling the roller against the ridges in the paint tray.
- Rinse the roller under running water, using a hose or sink sprayer to forcefully spray water through the roller to remove paint.
- For water-based paints, work a small amount of mild detergent into the wet roller to further breakdown paint. Rinse thoroughly.
- For oil-based paints, rinse the roller with mineral spirits instead of detergent.
- Use a roller spinner to extract as much moisture as possible.
Allow the roller to air dry completely before storing or reusing.
Storage
Between painting sessions, store paint rollers properly to avoid damage or paint drying on the roller:
- Wrap the roller tightly in plastic wrap or a damp rag to prevent drying out.
- For short-term storage between coats, you can suspend the wrapped roller in the paint tray.
- For longer storage, keep the covered roller in an airtight plastic bag in the refrigerator.
Replacement
Paint rollers should be replaced when they become too saturated with paint to clean effectively, the nap becomes matted down and cannot be restored, or the roller stops spinning smoothly. Typically, basic rollers can be reused 5-10 times before needing replacement.
Paint Roller Alternatives
While paint rollers are a popular and effective tool for painting walls and ceilings, there are some alternative tools that can be used for certain situations or preferences. These include:
Paintbrushes
Paintbrushes allow for more control and precision when cutting in edges and painting trim or smaller surfaces. They come in various sizes and bristle types. Paintbrushes can reach areas that rollers can’t, but they require more time and effort to cover large surfaces.
Paint Sprayers
Paint sprayers use compressed air to apply paint in a fine mist. They can cover large areas faster than brushes or rollers. However, sprayers require masking off any nearby surfaces you don’t want painted. They also create more paint mist and overspray compared to other tools.
Paint Pads
Paint pads are applicators made of a sponge or microfiber material attached to a handle. They can save time versus brushes for cutting in edges. Paint pads also minimize drips. However, they may leave a slightly stippled texture.
Paint Mitts
Paint mitts fit over the hand and are made of lambskin, microfiber, or other fabrics. They allow painting large, flat surfaces using a rubbing motion. Paint mitts are a quick and simple tool for small DIY projects. However, they don’t offer the thickness or holding capacity of a roller.
When choosing alternatives to standard paint rollers, consider the surface type, project size, desired finish, and your personal preferences. Proper preparation and technique will help ensure a quality paint job with any tool.