What Is It Called To Make Pottery On A Wheel?
What is Pottery Wheel Throwing?
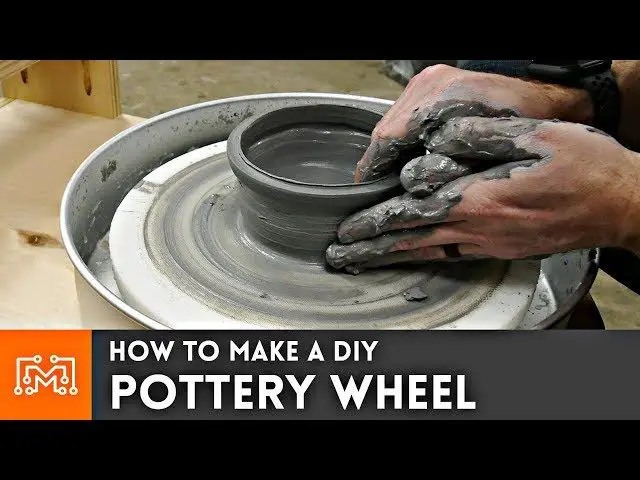
Pottery wheel throwing is the process of using a potter’s wheel to shape clay into pottery and ceramic forms. It involves centering a lump of clay on a rotating wheel head and using tools and hand movements to raise the walls of a piece.
The earliest known example of a potter’s wheel was found in Mesopotamia and dates back to around 3,000 BC [1]. However, archaeological evidence suggests pottery wheels may have first emerged in various locations between 6,500-3,500 BC [2].
Basic tools used in wheel throwing include calipers, ribs, fettling knives, loop tools, and sponges. The wheel itself can be powered by electricity, a foot pedal, or hand cranking. Key materials are clay, water for lubrication, and slip (liquid clay).
How Does a Pottery Wheel Work?
A pottery wheel consists of several main parts that work together to spin the wheel head and shape clay. The key components are:
- Wheel head – The circular platform that spins. It is made of plaster, plastic, or metal and can range in size from 12 to 30 inches across.
- Electric motor or foot pedal – Provides power to spin the wheel head. Kick wheels use a foot treadle that the potter pumps with their foot. Electric wheels use a motor with variable speed control.
- Platter or bats – Flat discs that clay is centered on top of on the wheel head.
- Splash pan – Catches water and clay scraps.
On an electric wheel, the motor turns a band or wheel connected to the wheel head axle underneath. This spins the wheel head at a consistent speed set by the potter, typically between 50-300 RPM. Kick wheels require the potter to continually pump the foot pedal up and down to achieve momentum.
As the wheel head spins, centripetal force pushes the clay outwards and keeps it in place. The potter uses their hands to shape and form the spinning clay into the desired pot or vessel.
Sources:
https://thepotterywheel.com/how-does-a-pottery-wheel-work/
Centering Clay on the Wheel
Centering the clay properly is one of the most important steps in throwing pottery on a wheel. If the clay is off-center, it will wobble as you try to pull it up into shape, making it very difficult to raise the walls evenly. Proper centering gives you a solid base to work from.
To center the clay, first wet the wheel head slightly to help the clay stick. Take a lump of clay and press it down onto the wheel, molding it into a rough cone or dome shape. Apply even pressure with both hands on either side of the clay as the wheel spins slowly. Use the heels of your hands to compress the clay downward and inward. The goal is to push out any air bubbles and condense the clay into a compact, centered mass 1.
As you center, look for any wobble in the clay. If one side is heavier, press down more firmly on the lighter side. If the clay starts to flatten out too much, give it a few more lifts and presses to bring it back to a rounded form. Work patiently until the clay holds its shape without any movement. An evenly centered lump will have walls of equal thickness all the way around.
Common issues like off-centered clay, warped walls, and air bubbles can be fixed with more compressing and centering. Don’t be afraid to re-center if needed. With practice, centering clay will become fast and smooth. Well-centered clay is vital for pulling up evenly shaped pots.
Opening the Clay
Once you have centered the clay on the wheel, the next step is to open up the clay into a cylinder shape. This process involves using your fingers and pottery tools to gently press down into the centered clay and widen the walls outwards.
To start opening the clay, wet your hands and press your thumb down into the center of the clay, working slowly outwards. Use your fingers to gently push the clay walls outward, rotating the wheel as you work. Go slowly and evenly so you don’t stretch or tear the clay. You want the clay walls to be an even thickness all the way around.
Pottery tools can help during this process as well. A rib tool can smooth the inner and outer walls as you open the clay. A wooden modeling tool can also help define the base and refine the cylinder shape.
Some common issues that can occur when opening the clay include the walls being too thick or thin, the clay sticking to your fingers, or cracks appearing from stretching the clay too quickly. Make sure to frequently wet your hands and tools. Go slowly, supporting the clay from both the inside and outside as you shape it. If the clay starts drying out, pause to splash it with water. Pay attention to the thickness and refine it frequently for the best results.
Take your time with this opening process and don’t rush it. Smooth, even clay walls will set you up for success as you start to pull up the walls and shape your final piece.
Pulling the Clay Up
Once the base is formed, the next step is pulling the clay up to raise the walls. This takes practice and coordination to evenly pull the clay upwards.
Start by wetting your hands to prevent the clay from sticking. Then place your palms against the exterior of the clay, applying gentle pressure as you push upwards. Move your hands in a smooth, steady motion to slowly pull the clay upwards and form the walls. Your fingers can also help shape and support the clay as you pull up.
The key is using the right amount of pressure – too little and the clay won’t move, too much and you’ll distort the shape. Work slowly and methodically. The interior should rise at an even rate as you shape the exterior with your hands.https://sparanoarts.com/2017/04/13/how-to-pull-a-wall-without-fking-up/
You can also use ribs, scrapers, and other pottery tools to help smooth and refine the shape as you pull up the clay. The goal is to achieve an even, symmetrical form.
Forming the Base
After pulling the clay up into a cylinder, the next step is forming the base. This involves shaping the bottom of the cylinder into a flat, even surface.
To create a flat base, you need to compress the clay while it’s spinning on the wheel. Use your thumbs to press the clay downward and spread it outward into a disk shape. Apply even, firm pressure so the bottom remains centered. Avoid pushing down too forcefully in one area, as this can cause the base to become lopsided.
As you shape the base, use a rib tool to smooth and refine the surface. Glide the rib from the bottom’s center toward the outer edges to remove any bumps or grooves. Check frequently that the base is flat by holding a tool across it and looking for gaps.
An uneven base can lead to problems like wobbling or cracking during drying and firing. Taking care to form a flat, smooth bottom ensures your piece will have a solid foundation (The Crucible).
Raising the Walls
Once the base is formed, the next step is to raise the walls to the desired height. This takes patience and practice to evenly raise the walls upward. The clay should be centered well initially to ensure the walls raise straight up.
Determine how tall you want the final piece to be. Walls can be raised to varying heights depending on the type of piece. Some common heights for mugs are 3-4 inches, while vases may have walls 6 inches or taller.
As you raise the walls, use your thumbs on the inside and fingers on the outside to support and shape the clay. Apply even, firm pressure as you push upward. Use a rib tool on the inside to smooth and stabilize the walls as they grow taller. Some potters also use a small handheld paddle tool on the outside to shape and refine the exterior surface.
It’s important not to rush the process. If the walls get too tall too quickly, they may collapse. Take your time raising the walls little by little. Periodically stop to compress the clay and ensure even thickness all the way around. You can sponge excess water as you work to firm up the clay. The key is patience as you gradually build the desired height.
With practice, you’ll gain a feel for how fast you can safely raise the walls before they become too unstable. Eventually you’ll be able to pull taller vessels with thinner walls using your fingertips. But when starting out, go slowly and use tools for leverage and support. Working methodically will produce the best results.
Shaping the Rim
Once the walls of the pottery piece have been raised to the desired height, the next step is to shape the rim. There are several techniques potters use to create the ideal rim thickness and shape:
Using Fingers: One of the most direct ways to shape the rim is through the use of your fingers. By pinching and pressing the clay at the top opening, you can create a rounded lip or flatten the rim as desired. The warmth and moisture of your hands allows you to smoothly shape and refine the clay edge.
Using Ribs: Ribs are thin, flat pieces of wood or rubber that can be used to both shape and thin the rim. Holding the rib perpendicular to the wheel while it spins will shave clay off, refining the shape and creating a sharper edge. Ribs allow for careful control in thinning the rim.
Using Tools: There are many specialized shaping tools that potters use to finesse the rim such as loop tools, ribbon tools, and various scrapers. These can create ridges, indents, frills, and other decorative effects at the rim. The tools provide additional options for crafting the perfect finishing shape and thickness.
With practice, potters learn to expertly combine pinching, ribs, and tools to bring their vision for the rim to life. The possibilities are endless for creating diverse and artistic edges through thoughtful shaping techniques.
Trimming and Refining
Once the pottery piece is initially shaped on the wheel, it often needs additional trimming and refining before the final firing. This is done while the clay is still pliable, but has achieved a leather-hard state. Trimming involves placing the shaped pottery back on the wheel and using metal loop tools to carefully remove any excess clay and refine the shape further.
Trimming allows the potter to refine the silhouette and form, removing any uneven thickness in the walls or imperfections in shape. It is an important step for achieving a symmetrical and aesthetically pleasing final piece. The potter trims the foot of the pot by holding a metal trimming tool with one hand and resting the other hand on the pot to stabilize it. Gentle scraping motions are used to shape the foot and trim excess clay. The walls can also be thinned and smoothed in the process. Loop tools with different angles can refine curved areas and hard to reach spots.
Trimming and refinement requires patience, but allows the potter to perfect the form before the final firing. It is an essential intermediate step in wheel thrown pottery between shaping and glazing.
Drying and Firing
After the piece is pulled off the potter’s wheel, it must be allowed to dry thoroughly before firing. It’s important to dry clay slowly and evenly to prevent cracking and warping. Once shaped on the wheel, pieces should be covered or stored in a climate-controlled environment until bone dry, which can take days or weeks depending on size and thickness (Source).
The next step is the bisque firing, the first time the clay is fired in a kiln. Bisque firing further hardens the clay and makes it less porous before applying glazes. Typical bisque firing temperatures are around 1800°F. After bisque firing, glazes can be applied to add color, texture, and effects to the pottery. Glazes melt during firing and create a glassy coating.
The final firing, also known as the glaze firing, typically reaches over 2200°F to fully melt and fuse the glazes to the clay body. The firing schedule, including ramp up and cool down rates, must be optimized to achieve the desired results. With proper drying, bisque firing, glazing, and final firing, an unfinished clay form is transformed into a finished ceramic vessel.(Source)