What Is Oven-Bake Clay Adhesive Used For?
What is Oven-Bake Clay?
Oven-bake clay, also known as polymer clay, is a modeling and sculpting material that cures and hardens when baked in a regular oven. It is made from polyvinyl chloride (PVC) resin and various plasticizers and fillers that give it a dough-like consistency that can be easily shaped and molded.
The main ingredients in oven-bake clay are:
- Polyvinyl chloride (PVC) – provides structure
- Plasticizers – keep the clay soft and flexible
- Fillers – enhance properties like strength and elasticity
- Color pigments – for a variety of colors
The distinguishing characteristic of oven-bake clay compared to air-dry clay is that it cures and hardens through heating in an oven rather than drying in air. While air-dry clay simply hardens as its water content evaporates, oven-bake clay undergoes a chemical reaction and polymerizes when baked, giving it more strength and durability. This makes oven-bake clay items less prone to cracking or crumbling over time versus air-dry clay.
Types of Oven-Bake Clay
There are several types of oven-bake clays that are commonly used in arts, crafts, and other creative applications:
Polymer Clay
Polymer clay is made from PVC resin and has an oil-based and soft, pliable texture. It maintains its shape while baking but hardens permanently after heating. Polymer clay can be shaped by hand without any special tools. Popular brands of polymer clay include Sculpey and Fimo.
Pottery Clay
Pottery clay is natural clay that has been processed to improve its workability and baking characteristics. It requires some moisture while shaping to prevent cracking. After firing in a kiln, pottery clay becomes hard and more durable. Common types of pottery clay are earthenware, stoneware, and porcelain.
Paper Clay
Paper clay is made from natural clay mixed with cellulose fiber material like paper pulp. It has a soft texture similar to lightweight modeling clay. Paper clay can be shaped without specialized tools and hardens when oven baked. It is often used for detailed sculptures, jewelry making, and decorative items.
Cold Porcelain
Cold porcelain is a non-clay modeling material made from binders like glue and cornstarch or other ingredients. It has a porcelain-like texture that hardens when dried in the oven or air. Cold porcelain is lightweight and easy to sculpt detailed shapes without specialized tools. It is commonly used to handcraft delicate jewelry, flowers, and cake decorations.
Uses and Applications
Oven-bake clay is versatile and can be used for a wide variety of crafts and projects. Some of the most popular uses and applications for oven-bake clay include:
Jewelry Making
Oven-bake clay is commonly used to handcraft beads, pendants, charms, earrings, rings, and other jewelry pieces. The lightweight nature of cured clay makes it ideal for jewelry components. Clay can be rolled out, cut into shapes, molded, sculpted, and textured. Once baked, clay becomes hard and durable.
Figurines and Sculptures
The pliable and shapeable nature of oven-bake clay makes it perfect for sculpting detailed figurines, miniatures, and clay sculptures. From simple shapes to intricate designs, oven-bake clay can be formed into any creation. Sculptures made from clay have an artisan, handmade appeal.
Craft Projects
Oven-bake clay can be used for nearly any type of craft project imaginable. It can be used to make holiday ornaments, decorations, beads, buttons, embellishments, magnets, picture frames, and more. The finished clay pieces add interest and texture to craft projects.
Home Decor
From bowls, vases, coasters, and tiles to wall art and decorative boxes, oven-bake clay can be fashioned into decorative objects to embellish the home. The clay takes on the shape of any mold, resulting in professional looking finished products.
Working with Oven-Bake Clay
Oven-bake clay requires some preparation before you can start sculpting and molding your creations. Here are some tips for working with oven-bake clay:
Conditioning and Preparing
When you first open a new pack of oven-bake clay, it will be quite stiff and firm. Kneading and conditioning the clay before use makes it smooth and pliable so it’s easier to shape and mold. Take a chunk of clay and knead it firmly with your hands for a few minutes until it softens up. If the clay is still too firm, try slicing it into smaller chunks and kneading each piece separately.
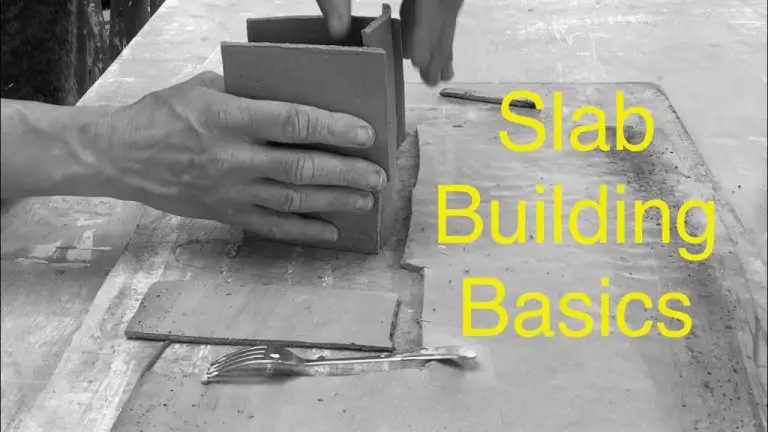
Shaping and Molding
Once your clay is conditioned, you can begin shaping it into whatever you desire. Roll the clay into balls or logs, flatten it into sheets or discs using a rolling pin, and cut out custom shapes using cookie cutters or a craft knife. Mold pieces together to form 3D shapes and sculptures. Oven-bake clay is very versatile!
Texturing Techniques
You can add interest and detail to clay creations using various texturing techniques. Press molds, stamps, stencils, rollers, and texture sheets into the surface to imprint patterns. Use a toothbrush or stiff brush to create brushed looks. Add textures like scales, wrinkles, and veining by pressing and dragging tools through the soft clay.
Baking Instructions
Refer to the packaging instructions for exact baking times and temperatures. In general, oven-bake clay should be baked at around 130°C for 15-20 minutes to fully harden. Place pieces on a baking sheet or foil-lined pan spaced apart. Avoid overlapping. Cool completely before handling after baking. Under-baked pieces will be sticky, while over-baked clay may burn or darken.
Popular Clay Brands
There are several popular brands of oven-bake polymer clay that are commonly used by artists and crafters:
Sculpey
Sculpey is one of the most well-known brands of oven-bake clay. They offer a wide variety of colors and finishes like original Sculpey, Sculpey III, Sculpey Premo!, and Sculpey Souffle. Sculpey clays are versatile and easy to work with making them a good choice for beginners.
Fimo
Fimo is another leading brand that has been around for many years. They offer standard Fimo in various colors along with specialty lines like Fimo Soft, Fimo Professional, and Fimo Kids. Fimo clays are high quality and hold fine detail well.
Cernit
Cernit is a polymer clay brand from Germany known for its very smooth texture and wide color palette. It’s especially suitable for sculpting detailed objects and making canes. Cernit clays are also strong when cured and resistant to fingerprints.
Other Brands
Some other popular brands include Kato Polyclay, which is very sturdy when cured, Bake Shop, an affordable clay good for kids, and Makin’s Clay, known for its flexibility. There are also clays formulated for special purposes like translucent clays, glow-in-the-dark clays, and clay for baking food-safe items.
Clay Tools
When working with oven-bake clay, having the right tools makes the process easier and helps achieve the desired results. Here are some essential and optional specialty tools to consider:
Essential Tools
These tools are must-haves for working with oven-bake clay:
- Roller – A roller tool evenly flattens out clay and gets it to the desired thickness. An acrylic roller works well.
- Cutter/Knife – A tissue blade or craft knife cuts clay cleanly and precisely.
- Mold – Molds help shape clay into 3D objects or press patterns into clay.
- Smoothing tool – These tools smooth seams and shape details. Try a silicone shaper or sculpting tool.
Specialty Tools
While not essential, these tools allow for special techniques and effects:
- Extruder – An extruder pushes clay through dies to create long strings or tubes.
- Dotting tool – Makes consistent dots for decoration.
- Texture sheets/stamps – Press these into clay to add patterns.
- Clay cutters – Cut shapes like hearts, stars, and circles.
- Molds – Intricate molds provide more shaping options.
With the right combination of essentials and specialty clay tools, you can take your oven-bake clay projects to the next level.
Clay Safety
When working with oven-bake clay, it’s important to keep safety in mind. Here are some tips for staying safe:
Follow the manufacturer’s guidelines for proper baking temperatures and times. Baking the clay at the right temperature will ensure it cures properly. Going over the recommended temperature can result in burning or scorching.
Work in a well-ventilated area. Some clays give off fumes during baking, so good airflow is important. Open windows, use a fan, or consider baking clay outdoors if ventilation is poor.
While oven-bake clay is non-toxic, the dust can irritate skin for some people. Wearing gloves while sculpting can prevent skin irritation. Wash hands after working with clay. If skin becomes dry or irritated, use lotion to moisturize.
Supervise children closely when working with oven-bake clays. Do not eat or ingest the clay.
Allow clay sculptures and projects to cool fully before handling after baking. The clay can remain hot and burn fingers.
Take care not to drop large or heavy clay sculptures, as they can break into sharp pieces. Wear shoes while carrying large baked clay projects.
Store clay properly in sealed containers to prevent it from drying out. Keep out of reach of pets and young children.
Troubleshooting Issues
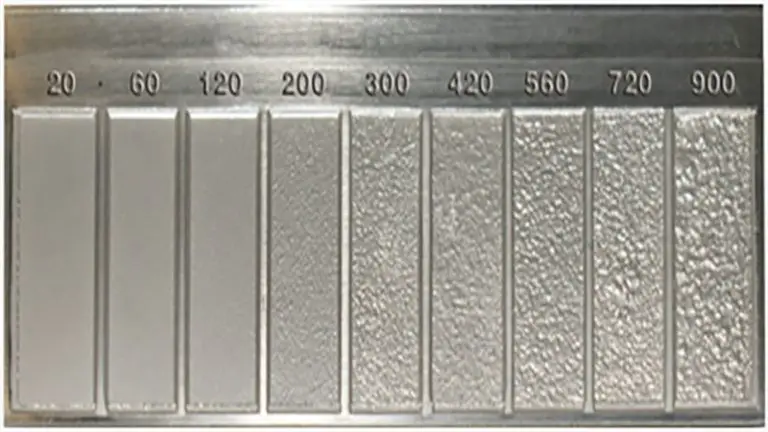
When working with oven-bake clay, some common issues that may arise include cracking, blistering, burning, and more. Here are some tips for troubleshooting these problems:
Cracking
Cracks in cured polymer clay can occur for several reasons:
- Baking at too high of a temperature – Try lowering oven temperature in 25 degree increments.
- Insufficient baking time – Increase baking time in 5-10 minute increments.
- Clay was conditioned inadequately – Knead clay thoroughly until soft and pliable before sculpting.
- Applying pieces too thick – Keep individual pieces of clay less than 3/4″ thick to prevent cracking.
Blistering
Blisters in baked clay can be caused by:
- Trapped moisture – Let clay sit out for 30 mins before baking to release excess moisture.
- Baking too fast – Start at a lower temp and slowly increase heat to prevent blisters.
- Insufficient baking time – Blisters may indicate the clay needs more time to properly cure.
Burning
Dark brown or black burnt spots can happen when:
- Baking at too high of a temperature – Reduce oven temp if burning occurs.
- Overbaking – Clay can burn if left baking for too long after curing.
- Uneven baking – Rotate pan periodically for even heating.
Proper conditioning, baking times, and temps can prevent many issues with oven-baked polymer clay. When in doubt, refer to manufacturer guidelines for recommended practices.
Clay Storage
Proper storage is crucial for keeping oven-bake clay soft and pliable for reuse. Here are some tips for storing clay:
Use airtight containers: Store clay in a plastic bag or airtight plastic container. This prevents the clay from drying out and becoming hard and brittle. Plastic bags are good for short term storage while airtight containers are better for long term.
Avoid direct sunlight: Sunlight can dry and discolor clay. Keep clay away from direct light such as windowsills.
Consider climate conditions: In hot, dry, or humid environments, clay dries out faster. Store clay in an area with a consistent cool temperature.
Revive old clay: Clay that has dried out can be revived by kneading it while gradually working in a few drops of water at a time. Once it becomes malleable again, keep it stored properly to maintain its flexibility.
Freeze for long-term: For storage over several months, tightly wrap clay in plastic wrap then freezer bag and freeze it. Frozen clay stays usable for years. When ready to use, thaw in the refrigerator overnight before letting it come to room temperature.
Inspiring Clay Projects
Oven-bake clay opens up a world of DIY craft possibilities. With just a few simple tools and techniques, you can create an endless array of decorative, artistic, and functional items out of clay. Here are some inspiring project ideas to fire up your creativity:
Jewelry
Clay is a perfect medium for making jewelry. Simply roll out thin coils and cut shapes for pendants, beads, and charms. Texture the clay by pressing in stamps, stencils, or found objects from around the house before baking. Thread your clay creations onto cord, chain, or wire to make necklaces, bracelets, and earrings.
Figurines
Sculpt miniature characters, animals, and figurines out of oven-bake clay. Start with a solid base, then build up the shape by hand or use basic modeling tools. Add details like eyes, clothing, and accessories. The clay holds fine details nicely after baking. Display your clay figures around the house or give as gifts.
Faux Stained Glass
For a stained glass effect, roll out the clay in different colors into thin sheets. Cut into geometric or irregular shapes with a blade or scissors. Arrange the pieces in overlapping layers on a baking sheet and bake. Hang in a window for gorgeous sun-catching “stained glass” art.
Mosaics
Cut or form small clay tiles in an array of colors. Arrange and glue onto glass, wood, terra cotta, or other materials to create a mosaic design. Use clay mosaics to decorate mirrors, boxes, frames, vases, coasters, and more. The clay adheres easily when baked onto a primed surface.
Textured Canvas
For mixed media art, roll out clay directly onto canvas. Use tools to carve patterns and textures. Layer colors of clay. Add dimensional details like beads. Bake the clay onto the canvas according to package directions for a durable finished piece.