What Is The Best Way To Create A Slab Of Clay?
Slabs are sheets of clay that are an essential part of handbuilding techniques in pottery and sculpture. Slabs can be used to construct functional ware like bowls, platters, and vases as well as freestanding sculptures. The uniform thickness and flat surface of slabs make them versatile for both structural and decorative elements in ceramic art.
Creating accurate and consistent slabs is an important skill for any ceramic artist working with clay. Well-formed slabs result in professional looking finished pieces with clean lines and even surfaces. Mastering just a few simple techniques can help ensure your handbuilt clay projects start out right with a perfectly rolled slab.
Gather Materials
The first step in creating a slab of clay is gathering the necessary materials. The main item you will need is the type of clay you wish to use. There are three primary types of clay that are commonly used for handbuilding and slab construction:
- Stoneware clay – This dense clay has excellent workability for slabs and holds its shape well when built. It vitrifies (becomes glass-like) at high temperatures making it durable and water-resistant when fired.
- Porcelain clay – Smooth and finely grained, porcelain can be rolled very thin but still maintains its strength when fired. It tends to keep more of its plasticity during construction. Porcelain has a bright white color when fired at high temperatures.
- Earthenware clay – A more porous clay body, earthenware clays are easy to work with. They have a coarser texture than stoneware or porcelain. Earthenware fires at lower temperatures resulting in a weaker finished piece.
Consider the characteristics of each clay type and what you plan to create when selecting your clay. In addition to the clay, you will also need basic tools such as a rolling pin, guides or slats, and work surface.
Prepare Workspace
Before you begin rolling out your slab of clay, it’s important to prepare your workspace. Choose a flat, sturdy surface like a table or countertop that allows plenty of space for rolling out the clay. Clear the area completely to give yourself enough room to work.
Gather the tools you’ll need nearby, including a rolling pin and fettling knife for adjusting the clay. A basic wooden rolling pin without handles works well, providing an even, smooth rolling surface. Have your fettling knife handy to trim and shape the clay edges as needed.
Make sure your work surface is clean and dry before laying out the clay. Any debris or moisture on the surface can transfer into the clay and cause cracking or weak spots in the slab. A clean, dry, and flat workspace helps ensure your clay slab rolls out evenly without sticking or tearing.
Wedge Clay
Wedging the clay is a critical step to remove any air bubbles trapped inside the clay. Air bubbles can lead to cracks and explosions during the firing process later on. To properly wedge the clay, follow these steps:
Take a large lump of clay and cut it in half, placing one half aside for now. Slam the clay down onto your work surface firmly to force out air bubbles. Use the palm of your hand to compress the clay down. Fold the clay in half and repeat slamming and compressing to force out air. Continue folding, compressing, and slamming about 20 times.
Pick up the second lump of clay and repeat the wedging process. Finally, combine the two wedged lumps together and wedge again. The clay should now have a smooth, uniform texture free of air pockets.
Create Even Rolling Pin Guides
To ensure your slab of clay is rolled out evenly, you need two rolling pin guides that are exactly the same thickness. The easiest materials to use are two pieces of wood or PVC pipe cut to the same length. The thickness of your guides will depend on how thick you want your final slab of clay to be. Generally 1/4-1/2 inch is a good thickness for most handbuilding projects.
Cut your two rolling pin guide pieces so they are a few inches longer than the width of the clay you’ll be rolling out. Sand the edges so they are smooth. Measure across the width of each guide at several points along the length to confirm they are precisely the same thickness. Uneven guides will lead to an uneven slab.
Having two identical rolling pin guides allows you to roll from both sides of the clay and helps prevent the slab from warping or becoming thinner in the middle as you work. The guides keep the thickness uniform across the entire surface area.
Roll Out Clay
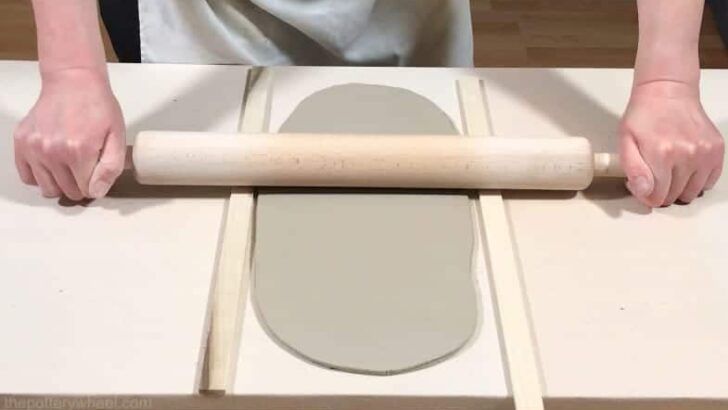
Once you have wedged your clay thoroughly and created rolling pin guides, you are ready to roll out your slab. Place your clay between the two rolling pin guides so they act as barriers to roll between. Hold the rolling pin with both hands at the ends and apply even pressure as you roll back and forth over the clay. Roll slowly and methodically, applying medium pressure.
Rotate the clay 90 degrees every few rolls to ensure you are evenly distributing the pressure. As you roll, the clay will flatten out into a slab between the guides. Keep rolling until the slab reaches your desired thickness. Aim for an even thickness throughout. You may need to occasionally check with a ruler and adjust your rolling pin guides wider or closer together to achieve the thickness you want.
Take care not to roll too thin, as slab clay needs sufficient thickness to hold its shape without tearing or cracking. Most slabs tend to be rolled out to between 1/4 inch and 1/2 inch thickness. Once your slab is at the desired size and thickness, you can move on to trimming the edges.
Trim Edges
Once you’ve rolled out your slab to the desired thickness, it’s important to trim any uneven or rough edges before transferring it to your work surface. This helps create clean lines and a professional look to your final piece.
Use a fettling knife, also called a pottery ribbon tool or ceramic ribbon tool, to trim away excess clay along the sides. These tools have thin flexible blades that allow you to slice cleanly through the clay. Work slowly and carefully, holding the knife at a 45-degree angle to the work surface. Apply even pressure as you slice off rough edges and corners.
You may also use decorating ribs or other metal sculpting tools to further smooth and refine the edges. Just be sure not to drag or compress the sides, which can distort the shape. Use a gentle scraping or flicking motion instead.
Trimming the slab edges helps remove any irregularities from the rolling process and creates a pristine canvas for transferring and decorating. Even slabs with clean edges also stack and join together much easier. Taking the time to trim thoroughly results in a higher quality finished product.
Transfer to Work Surface
Once you have rolled out your clay slab to the desired thickness, it’s time to move it to your work surface. This part requires care and patience.
Make sure your work surface is clean and ready before transferring the clay. Carefully lift up the slab from your rolling surface using both hands – be gentle and move slowly. Clay can tear easily if handled roughly.
As you transfer, support the slab from underneath while keeping it flat and even. Place it down onto the work surface and make sure the entire slab is laying flat with no air bubbles underneath. Smooth your hands over the surface to adhere it to the work surface.
Take care not to let the slab fold over on itself or crease. If your slab is large, you may need a friend to help transfer it. Work together to gently move and support the clay.
Once transferred, your clay slab is ready for the next steps of your project – smoothing, cutting shapes, adding texture, etc. Take your time during transfer and handle the clay gently to keep the slab intact.
Smooth Surface
Once the slab of clay is transferred to your work surface, it’s time to smooth out the surface. This step is important for creating a slab that has an even thickness throughout and removes any imperfections from the rolling process.
Use a metal rib or similar smooth, straight tool to gently smooth over the surface of the slab. Apply even pressure as you work across the clay. The rib will slice off any thicker areas and compress any divots or holes.
Work methodically across the entire surface, first in one direction, then perpendicular. You may need to flip the slab over and repeat the smoothing on the other side as well. Pay close attention to the edges and corners where unevenness often occurs.
Take care not to overwork the clay when smoothing. Too much smoothing can thin out the slab. The goal is to create an even, level surface without distorting the form.
Once the top and bottom are satisfactorily smooth, the slab can be further refined and shaped for your intended project.
Next Steps
After you have created your clay slab, there are some important next steps to ensure it is ready for sculpting or joining.
First and most importantly, allow the slab to dry before attempting to sculpt or attach it to other slabs. Clay shrinks as it dries, so letting it dry helps prevent cracks from forming. How long you need to let it dry depends on the thickness of the slab and the type of clay, but a good rule of thumb is to let it sit overnight. Thicker areas may require longer drying time.
As the slab dries, check it periodically for warping or uneven drying. Gently flex the slab to prevent warping and rotate it to promote even drying. You can also carefully flip it over. Avoid disturbing the slab too much though, as that can cause cracking.
Once your slab has dried evenly, it is ready for the next steps of your sculpting or construction process. With a sturdy dried slab, you’ll have a strong foundation to create whatever you envision out of clay.