What Is The Ratio Of Clay To Grog?
What is Clay?
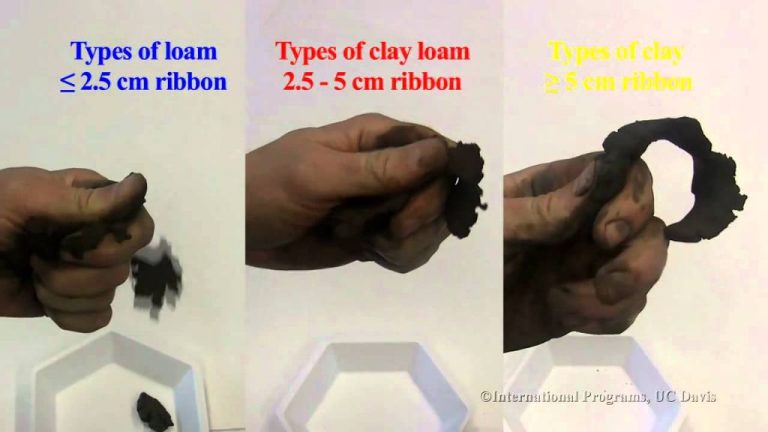
Clay is a naturally occurring material composed primarily of fine-grained minerals, which show plasticity through a variable range of water content, and become hard, brittle, and nonmalleable upon drying or firing. There are many different types of clay used for pottery and ceramics, the most common of which include:
– Earthenware clays – These fire at lower temperatures and tend to be highly plastic and smooth but prone to cracking and abrasion. Examples are red clay and ball clay.
– Stoneware clays – These fire at high temperatures and are less plastic but very strong in their fired state. An example is kaolin.
– Porcelain clays – These fire at very high temperatures and are not very plastic but become extremely hard and impermeable when fired. An example is china clay.
The key properties of clay that make it ideal for pottery and ceramics are its plasticity when wet, which allows it to be shaped and molded, and its ability to become permanently hard and chemically stable when fired at high temperatures, allowing it to maintain its formed shape.
What is Grog?
Grog refers to an additive made of previously fired and ground up clay that is mixed into wet clay to create a clay body. Grog has an open internal structure which helps make the clay more porous. There are two main reasons grog is added to clay:
First, the porosity created by the grog allows gases to escape from the clay during firing. This reduces cracking and breakage. Second, the grog serves as a filler material that reduces shrinkage and warping as the clay dries and is kiln fired. Common materials used to produce grog include fired earthenware, stoneware, porcelain, and firebricks.
Grog provides thermal shock resistance and structural durability to ceramic wares. It also lowers the plasticity and drying time compared to pure clay. Grog is an important component in many clay bodies used for pottery, sculpture, and construction applications.
Why Add Grog to Clay?
Adding grog to clay provides several advantages that enhance the properties and performance of the clay body. Grog helps control shrinkage and strengthens the clay as it dries and fires. It also reduces the weight of the final piece and improves thermal shock resistance.
Grog is used to modify the physical characteristics of clay. It opens the clay body, making it less dense and more porous. This porosity allows water and air to move through the clay more freely. As excess water evaporates from the clay, it shrinks. A higher grog-to-clay ratio reduces shrinkage by limiting how much clay is present to shrink. The porous grog particles act as structural supports within the clay matrix, keeping it more rigid and stable as the water exits the material.
Grog also helps clay withstand rapid temperature changes and thermal shock during firing. The thermal expansion of the grog particles offsets some of the thermal expansion of the clay body. This creates small pockets and pathways for air that insulate the clay against fractures. The end result is fired clay that is stronger, lighter in weight, and more resilient to cracking from firing.
Typical Clay to Grog Ratios
When mixing clay and grog together, potters generally use standard clay to grog ratios depending on the type of pottery they want to make.
For soft pottery like pots and vases, a typical starting ratio is 3 parts clay to 1 part grog by volume. This mix provides enough grog to strengthen the clay body while still keeping it relatively soft and pliable for throwing on the wheel.
For hard-wearing pottery like tiles and outdoor planters, a ratio of 1 part clay to 1 part grog is common. This 50/50 blend makes a very strong clay that can withstand weather and heavy use.
For sculptural work, a ratio of 4 parts clay to 1 part grog helps reduce cracking and breakage once the sculpture is dry while still allowing flexibility for sculpting.
In general, higher grog ratios strengthen and toughen clay but make it less plastic. Lower grog ratios increase workability and plasticity but reduce durability. Finding the right balance for each pottery type and project is key.
Testing different ratios and adjusting the percentages allows potters to fine-tune the clay body to get their desired results.
Calculating Clay to Grog Ratios
There are two main ways to calculate clay to grog ratios – by weight or by volume. Calculating by weight is more precise, while calculating by volume is quicker and easier.
To calculate clay to grog ratios by weight:
- Weigh the amount of clay needed for your project. For example, let’s say you need 1 lb of clay.
- Decide the ratio of clay to grog you want to use. For example, a 50/50 ratio.
- For a 50/50 ratio with 1 lb of clay, you would need 1 lb of grog. So weigh out 1 lb of grog.
- Combine the 1 lb of clay with the 1 lb of grog and mix thoroughly.
To calculate clay to grog ratios by volume:
- Measure the volume of clay needed. For example, 2 cups of clay.
- Choose your clay to grog ratio. Let’s use a 2:1 ratio.
- For 2 cups of clay at a 2:1 ratio, you would need 1 cup of grog.
- Measure out 1 cup of grog and mix it thoroughly with the 2 cups of clay.
When calculating by volume, be aware that clays and grogs have different densities. A cup of grog may weigh more or less than a cup of clay. Calculating by weight provides a more precise ratio.
Factors that Influence Clay to Grog Ratios
There are a few key factors that determine the ideal ratio of clay to grog for a particular ceramic project.
The type of clay being used is important. For example, stoneware clays are typically quite strong and dense. Adding grog gives stoneware more porosity and makes it easier to throw on the wheel. On the other hand, earthenware clays are porous and prone to cracking, so a higher percentage of grog (up to 50%) helps reinforce the clay body. Porcelain clays are very fine and dense, so minimal grog (10-20%) is needed.
The type of grog matters too. Larger grog particles create more porosity and texture. Finer grog particles reinforce strength while minimizing texture. Some clays work best with a specific grog material like chamotte or silica.
The desired properties and purpose of the finished ceramic piece should also dictate grog percentages. If a sturdy, porous planter is needed, 40-50% grog is ideal. For a smooth porcelain sculpture or dinnerware, 10-20% grog would be better to minimize texture while reinforcing strength.
Testing out different clay to grog ratios and adjusting based on the workability, drying time, firing results, porosity, and strength will help determine the optimal balance. But keeping the clay properties, grog characteristics, and end-product goals in mind helps narrow the focus.
Testing and Adjusting Clay to Grog Ratios
Once you have mixed up a batch of clay with a certain grog percentage, it’s important to test it out before committing to using it for finished pieces. The best way to do this is by making some simple test tiles.
Form some tiles using your clay/grog mix and fire them according to the planned firing temperature and schedule. Pay close attention to the workability of the clay as you form the tiles. Is it too stiff or too soft? Does it crack or tear easily when shaping?
When the test tiles come out of the kiln, observe them carefully. Check for warping, cracking, pitting, scorching or other flaws. Consider the color achieved and the overall fired strength and durability.
Based on your observations and how the test tiles performed, you can adjust the grog percentage up or down as needed. If the clay was too soft, tear-prone or showed excessive warping, you may need more grog for structure. If it was too stiff and unworkable, reduce the grog. Test again with the new ratios.
It often takes some trial and error testing to hone in on the ideal grog percentage for a particular clay body and your purposes. The key is to be very systematic in your testing and make careful observations so you know what and how to adjust.
Tips for Mixing Clay and Grog
When mixing clay and grog, it’s important to use proper techniques to achieve an even distribution of grog particles throughout the clay body. Here are some tips:
Mix thoroughly – Make sure to mix the clay and grog together very thoroughly. Doing so will help prevent pockets of grog or clay forming when you use the mix. Mix for at least 5-10 minutes after adding grog to dry clay. For wet clay, you may need to mix for up to 20 minutes. Mixing by hand or with a paddle mixer tends to be better than a drill with attachment for even distribution.
Avoid overmixing – While thorough mixing is important, overmixing can cause the edges of the grog particles to break down and become part of the clay body. This can alter the properties you’re aiming for, so mix just until the grog and clay are evenly integrated.
Screen out clumps – After initial mixing, pass the clay/grog mixture through a screen to break up any remaining clumps. This will help achieve uniform distribution.
Contamination – When mixing, try to avoid introducing contaminants. Ensure all equipment is clean. Work on a clean surface and avoid adding anything but the specified amounts of clay and grog. Contaminants can affect drying, firing, and overall strength.
With proper mixing techniques and care taken to avoid contamination, you can achieve a uniform clay/grog blend that will provide the desired characteristics in your finished pieces.
Storing and Reclaiming Clay/Grog Mixes
Properly storing clay/grog mixes is important for maintaining the quality and workability of the clay. Here are some tips for storage:
- Store clay in airtight plastic bags or containers to prevent drying out.
- For short term storage, you can store clay in the same bag with the grog mix.
- For longer storage, consider separating the grog and clay into separate airtight bags or containers.
- Make sure clay is softened before storing – wedge thoroughly to remove air pockets.
- Store clay in a cool, dark place to prevent mold growth.
- Some clays can be stored frozen, but make sure to read manufacturer instructions first.
If clay does start to dry out, it can usually be rehydrated and reclaimed:
- To rehydrate, break the clay into chunks and soak in water for several hours or overnight.
- Knead the rehydrated clay until it reaches the proper consistency.
- If there are hard, dry chunks that won’t soften, those pieces may need to be discarded.
- Add a few drops of olive oil while wedging to enhance rehydration.
For unused clay/grog mixes:
- Unused mixes can be reclaimed, but the ratio may need adjusting after wedging back together.
- It’s best to reclaim unused mixes within 2-3 months for optimal workability.
- Always wedge the reclaimed clay thoroughly to evenly distribute moisture and recombine ingredients.
- Test the clay’s plasticity and adjust grog ratios as needed after reclaiming old mixes.
In Summary…
The ratio of clay to grog is an important consideration when mixing clay bodies for pottery and ceramics. Grog, which refers to pre-fired clay particles, is added to clay to alter its structural and working properties. While there are typical starting ratios, many factors go into determining the ideal clay to grog ratio for a particular project.
Key factors that influence the clay to grog ratio include the type of clay body, desired plasticity and workability, drying performance, and firing results. Using too little grog can result in excessive shrinkage and cracking, while too much grog reduces plasticity. Testing different ratios is key to achieving optimal properties.
The ideal clay to grog ratio depends on the individual potter’s needs and preferences. While general guidelines provide starting points, testing ratios through making test tiles is important to dial in the perfect balance of properties. The desired results when firing, whether for functionality, strength, or aesthetics, ultimately determine the best clay to grog ratio for a clay body recipe.