What Will You Do To Make A Bowl From A Ball Of Clay?
Gather Materials
The first step in making a bowl from a ball of clay is to gather the necessary materials. At a minimum, you will need the following:
- Clay – Pottery clay is specially formulated for shaping and firing. Select the type of clay based on your plans for the finished piece.
- Pottery wheel – This spinning wheel allows you to center and shape the clay symmetrically. The wheel head should be thoroughly cleaned and dampened before use.
- Sculpting tools – Basic tools include wooden ribs, loop tools, sponges, and wire cutters. Have an assortment on hand to refine the shape.
- Water – Keep a bowl or spray bottle of water nearby. Water lubricates and smooths the clay as you work.
- Apron – Wear an apron to keep your clothing protected from water and clay.
Once you have gathered these basic supplies, you will be ready to begin shaping your clay into a bowl.
Prepare the Clay
Before working with clay, it’s crucial to properly prepare it so that it has an even consistency and contains minimal air bubbles. This process is known as “wedging” the clay. Start by cutting off a workable amount of clay from your main supply. For a bowl, usually 1-2 pounds of clay is sufficient. Slam this lump down onto your workspace to pop some initial air bubbles. Then, using your hands, fold the clay over itself and press down firmly to knead it. Continue kneading and folding, occasionally slamming the clay back down. You may need to repeat this process for 5-10 minutes. The clay should end up with a uniform texture, free of cracks or dry spots. Test the clay by poking it – if it still contains tiny air bubbles that resist popping, continue wedging. Well-prepared clay is essential for sculpting bowls that hold their shape without cracking or exploding when fired. So take your time at this stage to thoroughly wedge and knead until the clay is smooth, elastic, and bubble-free.
Center the Clay
Once you have prepared your clay and are ready to begin shaping it into a bowl, the next step is to center the clay on the pottery wheel. This is a crucial foundation for creating a nicely shaped bowl.
Start by placing the ball of clay in the middle of the pottery wheel. Apply water to the wheel and clay to help it stick while spinning. Ensure the clay is centered by eyeing it from multiple angles above the wheel. Spin the wheel slowly and make adjustments by gently pushing the clay towards the center until it stays put when spinning.
Having the clay precisely centered is essential. An off-center starting point will result in a lopsided or uneven bowl. Take your time getting the ball of clay perfectly centered before moving onto the next steps of opening up the clay and pulling up the walls.
Open the Clay
After the ball of clay has been centered on the pottery wheel, the next step is to open up the clay to form the bowl shape. To do this, wet your hands slightly to prevent the clay from sticking. Then, press your thumbs down into the center of the top of the ball of clay. Apply even pressure as you push your thumbs down, while allowing the sides of the clay to rise up around your thumbs.
This motion will create a bowl shape, opening up the solid ball of clay so you have walls to shape. How far you push depends on how wide you want the bowl’s opening to be. A wider opening will allow more room to shape the bowl’s walls. Just be careful not to push too far, as this could make the walls too thin. Go slowly, pressing your thumbs down incrementally to gradually widen the bowl’s mouth.
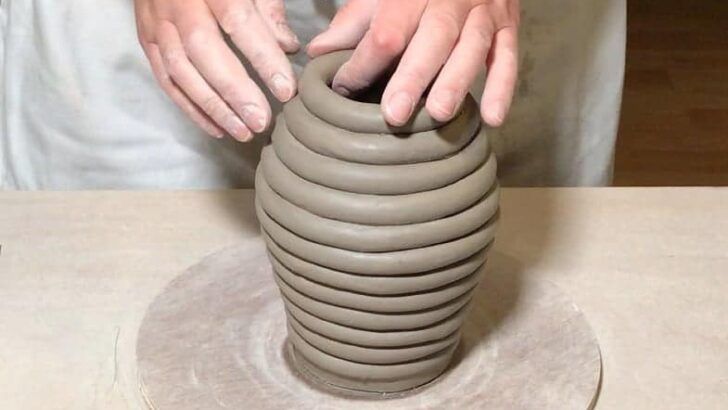
Shape the Walls
Once the clay has been centered on the pottery wheel and opened up, it’s time to begin shaping the walls of the bowl. Use your fingers to gently press into the sides of the clay, slowly pulling the walls upwards and outwards to form the bowl shape. Make sure to shape the walls evenly so they distribute the clay in a uniform thickness. Going slowly and gently is key, as too much pressure can cause the walls to become too thin or even tear. Continue pulling the clay walls upwards until the desired height and width is achieved. Check frequently from all angles to ensure the bowl shape is even. This takes practice to perfect the technique and understand how much clay is needed for different sizes. The most important thing is to have patience and let the clay guide you – with care, it can be molded into any shape imaginable.
Refine the Shape
Once you have shaped the basic walls of the bowl, it’s time to refine the shape using various sculpting tools. Use a rib tool to smooth the inside and outside edges of the bowl. Gently run the rib along the walls at an angle to compress the clay and create smooth surfaces. You can also use loop tools to refine curves and add indentations. As you refine the shape, focus on creating clean lines and establishing the final contours of the bowl.
Take time in this step to clearly define the shape you want for your finished piece. Carefully smooth any lumps or uneven areas. If the walls are too thick, gently press them inward from the outside to thin them. Define the thickness and curve of the rim. Add any decorative elements like carvings, textures, or slipped surfaces to create visual interest. Continually turn the bowl to refine it from all angles. Work slowly and methodically for best results. Once the shape looks clean and matches your vision, you can move on to the next steps before firing.
Add Decorations
After the basic shape of the bowl has been formed, the next step is to add decorative elements to make it unique and visually interesting. There are many options for decorating a handmade clay bowl.
One common technique is incising, which involves using tools to cut into the surface of the leather-hard clay. Incising allows you to create linear designs, patterns, or images by carving into the clay. Some commonly used incising tools include bamboo skewers, sculpting loops, and even the edge of a spoon. When incising, consider geometric patterns, natural elements like leaves or flowers, or simple line designs. Take care not to cut too deeply or the bowl may be prone to cracking.
Adding handles or feet to the bowl are another decorative option. Handles can be pulled and curved from the clay, then smoothed and blended into the body of the bowl. Feet can also be hand formed into shapes like balls, ridges, or a flat base. Decorative elements like handles and feet serve both form and function.
The possibilities for embellishing and personalizing a handmade clay bowl are endless. Incising designs and adding handles or feet are just two techniques to make the bowl unique. Other ideas include adding texture with stamps, attaching cut-out shapes, or painting once the clay has dried. The added decorations will give the finished piece visual flair and personality.
Smooth the Clay Surfaces
Once you’ve shaped the basic form of the bowl and added any decorative elements, it’s time to smooth the surfaces. This helps create a uniform look and feel. It also evens out any lumps, cracks, or uneven areas in the clay.
Use a metal rib tool to smooth the inside and outside of the bowl. Dip the rib tool in water periodically so it glides smoothly over the clay. Apply even pressure as you work the tool over all surfaces. Smooth in a circular, back-and-forth motion.
Pay extra attention to the rim of the bowl, as you want a nice clean edge. You can also use your fingers to compress and smooth out the clay. Be patient and take your time smoothing, until you achieve the look you want.
Smoothing out the surfaces will help give your finished piece a polished, professional look. It also ensures an even thickness of the clay walls, which is important for even drying and firing.
Set Aside to Dry
Once you have finished shaping and smoothing your clay bowl on the pottery wheel, it’s time to carefully remove it and set it aside to dry. When working on the wheel, the clay remains wet and malleable. Before you can fire the clay in a kiln to permanently harden it, you need to allow adequate time for the bowl to air dry.
Slowly stop the spinning wheel and place your hands on either side of the clay bowl to support it. Gently lift the bowl off of the wheel, being careful not to distort the shape. You may want to briefly put it back on the wheel and give it a quick spin to smooth out the base if needed. Place the freshly shaped clay bowl on a drying rack or board. Make sure it is level so it doesn’t warp or crack as it dries. Allow plenty of space between bowls on the drying rack so air can fully circulate.
Depending on factors like humidity, air circulation, and thickness of the clay, drying time can take anywhere from a few hours to several days. Check the bowl periodically. When the surface feels cool, dry, and leather-hard to the touch, it is ready for bisque firing. Firing too soon can cause cracks or explosions from steam, while firing too late can result in warping. With practice, you will learn the ideal dryness for your clay projects. Patience and allowing sufficient drying time is key for successful results.
Fire the Kiln
Once the clay has dried thoroughly, it’s time to fire it in the kiln. This is a crucial step that hardens the clay through extremely high heat. There are generally two firings – the bisque fire and the glaze fire.
For the bisque fire, carefully load the greenware bowl into the kiln on stilts or a kiln shelf to prevent any sticking or warping. Slowly ramp up the temperature to around cone 08-04 for earthenware clays or cone 4-6 for stoneware clays. Hold at the peak temperature for a period of time to allow the clay to fully mature. Then slowly cool back down to room temperature.
After the bisque fire, the bowl can be glazed. Apply your choice of food-safe glazes by dipping, brushing or spraying. Load the glazed bowl back into the kiln, being sure to place it on stilts or kiln posts again. Bring the kiln up to the glaze’s specific firing temperature – usually around cone 6. Soak for the recommended time to fuse the glaze onto the clay body. Slow cool once more.
The final result will be a strong, finished ceramic bowl ready for practical use or display! Be sure to fully understand the kiln firing process before attempting it yourself, as precise temperatures and timing are essential.