Why Is My Clay Not Hardening?
It’s frustrating when clay doesn’t harden properly no matter how long you let it dry. Clay that remains sticky, soft, or cracks easily could be the result of several factors. The composition of the clay, how it was prepared, the water content, drying conditions, and firing temperature are key elements that affect the hardening process. We’ll explore the reasons clay may not be hardening and provide tips to help ensure your clay creations cure properly.
Clay Composition
Clay is made up of small particles derived from decomposed rocks containing aluminum and silicate minerals. The specific composition and ratio of minerals affect a clay’s properties and how it hardens. There are three main types of pottery clay:
Earthenware Clay
Earthenware clays contain a high amount of iron and other impurities. They are coarse clays that can be easily worked and shaped. However, earthenware has larger particles and more pores, making it prone to cracking and absorbing water, which inhibits hardening.
Stoneware Clay
Stoneware clay contains less impurities than earthenware. It has finer particles and a dense composition that makes it less porous. Stoneware clays require higher firing temperatures to fully vitrify and harden. The decreased porosity makes stoneware stronger and more water-resistant than earthenware.
Porcelain Clay
Porcelain clays have the highest concentration of kaolinite minerals with very few impurities. The ultrafine particles and lack of iron result in a pure white color. Porcelain has extremely low porosity, making it highly non-absorbent and durable. However, the dense composition requires very high firing temperatures around 2300°F to fully fuse and harden.
Clay Preparation
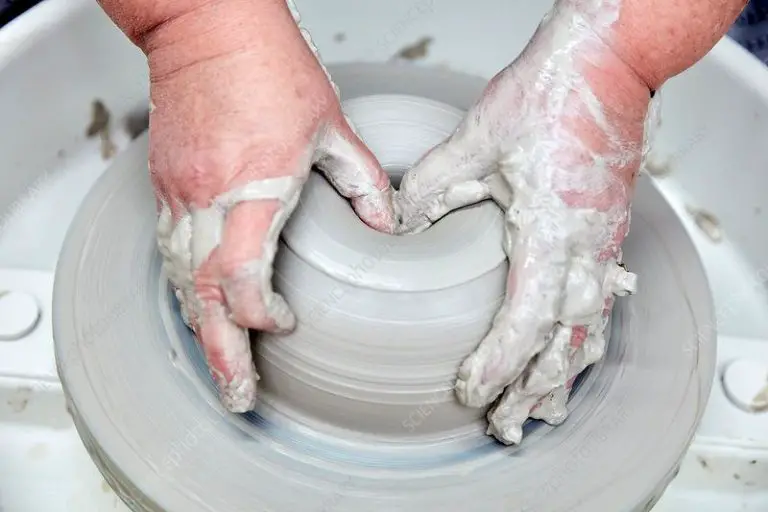
Proper clay preparation is crucial for removing air bubbles and ensuring your sculpture can harden fully. The two main techniques are wedging and kneading.
Wedging involves cutting the clay into chunks, slamming it against the table, and reforming it into a ball shape repeatedly. This process squeezes out air bubbles and blends the moisture evenly throughout the clay. Do not be timid when wedging – use force and plenty of downward pressure to thoroughly work the clay. Wedging for 5-10 minutes per lump of clay is ideal.
Kneading is similar to wedging but done entirely through hand manipulation rather than slamming the clay against a surface. Roll and squeeze the clay continuously, pressing out any visible air pockets gently with your fingers. Kneading for at least 5 minutes helps remove bubbles. However, wedging is still more effective than kneading alone.
Always wedge or knead clay fully before beginning any sculpture. Insufficient preparation leads to air pockets that prevent the clay from hardening correctly. Taking the time to properly mix, wedge, and knead your clay helps remove any barriers to proper hardening.
Water Content
Water is a critical ingredient when preparing clay that will affect its ability to harden properly. The ideal water content can vary based on the type of clay.
In general, clay requires sufficient water to fully hydrate the clay particles and allow them to bond together through hydrogen bonding. However, too much water will over-hydrate the clay, leaving excess water that must evaporate for the clay to harden.
Earthenware and stoneware clays typically require 15-25% water content by weight. For example, 100g of clay would be mixed with 15-25g water. Less porous clays like porcelain require more water, around 25-35% by weight.
Insufficient water will not fully saturate the clay body, leaving dry pockets that remain fragile after drying and firing. On the other hand, excessive water will over-saturate the clay, requiring prolonged drying times that can lead to cracks from uneven shrinkage.
The ideal water content will make clay pliable enough to shape easily without becoming sticky. Tested clay should form into a ball that holds its shape without crumbling when gently squeezed. Finding the optimal water content for a specific clay type and project takes experimentation.
Drying Conditions
The environment in which clay is dried can significantly impact how well and quickly it hardens. Temperature, humidity levels, and airflow all play a role in proper drying.
Warmer temperatures allow clay to dry faster, while cooler temperatures slow the drying process. Try to keep clay in a warm environment between 70-80°F if possible. Temperatures lower than 60°F may prevent clay from drying properly.
Lower humidity allows clay to dry more efficiently than high humidity. Make sure the area has adequate ventilation and airflow to circulate drier air around the clay. You may need to use fans, dehumidifiers, or dryers to maintain a low humidity environment.
Air circulation is crucial for carrying away evaporating water from the clay. Stagnant air will slow drying, so position a fan to blow air over the surface. Open windows or doors when possible for cross ventilation.
Drying clay too quickly can also cause issues like cracking or warping. Find the ideal balance of warm temperatures, low humidity, and gentle airflow for your particular clay project.
Firing Temperature
The firing temperature and duration are critical factors that impact how well clay hardens. Clays require sufficient heat to undergo physical and chemical changes that solidify the material. However, firing at too high of a temperature can cause problems like bloating, cracking, or melting.
The optimal firing temperature range depends on the clay composition. For example, earthenware clays generally fire at lower temperatures between 1000-1200°F. Stoneware clays require higher temperatures of around 2200-2400°F. Porcelain clays need the hottest kiln temperatures in the 2300-2600°F range.
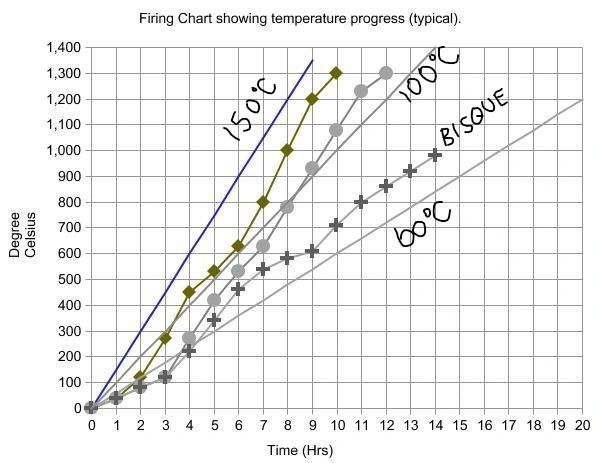
In addition to max temperature, the length of time at peak heat affects hardening. Fast firings may not allow enough time for clays to fully vitrify. Slow firings ensure the material soaks up enough heat. Typical firing durations are 6-12 hours but can vary based on kiln type, clay thickness, and desired results.
Testing pieces produced using the same clay body but fired at different temperatures and durations can help determine the ideal heat range for proper hardening. Keeping detailed notes on firing cycles and their outcomes will inform best practices.
Preventing Cracks
Cracking is a common issue that can prevent clay from hardening properly. Here are some tips to avoid cracks during the drying and firing process:
- Dry slowly and evenly. Avoid quick drying that can cause exterior drying faster than the interior. Place in a room temperature area out of direct sunlight.
- Avoid clay that is too thick, which can crack from shrinkage stresses. Roll out clay to 1⁄4” thickness or less.
- Don’t let clay dry out completely. Wrap in plastic when not working to keep moisture inside.
- Smooth out seams and joints to remove points of weakness before drying.
- Fire slowly, no faster than 200°F per hour. Fast firing causes exterior to shrink before interior.
- Support pieces during firing to prevent stresses. Place on stilts or fire on kiln shelves.
- Apply a paraffin wax dip after bisque firing to help minimize glaze cracking.
Paying close attention to proper drying and firing methods is crucial to prevent cracks that inhibit clay from hardening into a strong finished piece.
Additives
Certain additives can be mixed into clay to help it harden properly during the firing process. One of the most common is grog, which is made from previously fired clay that has been ground into a granular form. Adding grog serves several purposes:
- It creates pores within the clay body, allowing gases to escape during firing. This prevents bloating and cracking.
- It stiffens the clay mixture, helping it dry and fire at a suitable pace.
- It allows moisture to evaporate from the clay more readily.
- It increases thermal shock resistance, preventing cracks from heat stresses.
Typically, grog is added in percentages ranging from 10-30% of the total clay body. The optimal amount depends on the specific types of clay and grog used. Too much grog can weaken the fired clay. The particle size of grog also affects its properties – larger particles create bigger pores.
In addition to grog, other common additives are silica sand, ground glass, vermiculite, perlite, and volcanic ash. Each has their own unique effects on the structural properties of clay. Testing small samples to observe shrinkage, hardness, and firing results will help determine the best additives and proportions for a given clay body.
Troubleshooting
If you are having issues with your clay not hardening properly, here are some troubleshooting tips:
Adjust the water content – Too much water can prevent clay from hardening fully. Try wedging or kneading the clay to remove excess moisture, allowing it to air dry further before firing, or baking at a lower temperature first to slowly evaporate excess water.
Check the firing temperature – Firing clay at too low of a temperature is a common reason for insufficient hardening. Verify your kiln temperature gauge is accurate. Increase firing temperatures in small increments to find the optimal level for your clay type.
Avoid exposure to moisture – Once fired, hardened clay can absorb moisture from the air over time, causing it to soften again. Store finished pieces in airtight containers or seal the surface with a glaze.
Let it dry thoroughly – Insufficient drying can prevent clay from reaching its maximum hardness potential. Allow adequate air drying time before firing based on the size and thickness of your pieces.
Improve firing time and ramp speed – Quickly raising the temperature or not holding the peak temperature for long enough can inhibit proper hardening. Slow the firing rate and extend time at the highest temperature.
Check for cracks or flaws – Cracks and holes can be weak points where clay does not fully harden. Fill in gaps with clay slip before firing. Handle pieces gently to prevent cracks from forming.
With some testing and tweaking of these variables, you should be able to improve the hardening results of your clay projects.
Conclusion
In summary, there are several key factors that affect the hardening process of clay:
– Composition – Clays with higher kaolin content tend to harden better. Adding grog, sand, or other additives can improve hardening.
– Water Content – Too much water will prevent hardening. An optimal consistency should allow the clay to be malleable without being soggy.
– Drying Conditions – Clay requires slow, even drying to harden properly. Avoid quick drying that causes cracking.
– Firing Temperature – Firing clay at the right temperature for the clay type is essential for vitrification and hardening.
– Preventing Cracks – Slow drying, wrapping clay, and adding plasticizers can help minimize cracks that impede hardening.
– Additives – Ingredients like grog and calcium carbonate can aid hardening in certain clays.
By understanding these factors and making adjustments, you can achieve successful hardening results for your clay projects.


