What Size Holes To Drill For Salt And Pepper Shakers?
Salt and pepper shakers are a staple on most kitchen and dining tables. The number and size of holes in salt and pepper shakers play an important role in how easily and quickly the seasonings come out. This article will provide an overview of standard hole sizes for salt and pepper shakers, factors that determine ideal hole size, how to drill shaker holes properly, tips for installing shaker tops, troubleshooting clogged holes, specialty shaker designs, decorative and custom drilling options, and safety tips for drilling your own shaker holes at home.
The goal is to provide comprehensive information to help readers understand best practices for drilling shaker holes so they can customize salt and pepper shakers to get the right seasoning flow for their needs.
Standard Hole Sizes
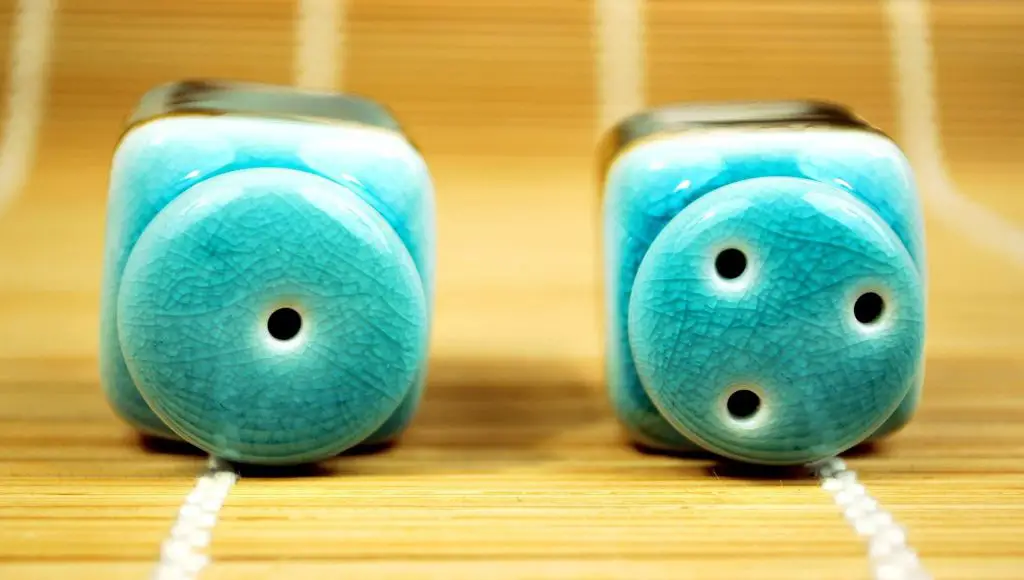
For standard tabletop salt and pepper shakers, the typical hole size for salt is around 1/8 inch or 3mm in diameter. Pepper shakers tend to have smaller holes around 1/16 inch or 1.5mm (The Art of Doing Stuff). The slightly larger holes in the salt shaker allow the granules to pass through more freely compared to ground pepper, which has finer particles. Some sources recommend 3 holes for pepper shakers and 5 holes for salt shakers (All Recipes).
The size differential allows both seasonings to pour at an ideal rate – not too quickly so the salt and pepper do not spill out uncontrollably, but not so slowly that it is tedious to season food. The smaller pepper holes prevent clumping and clogging issues. Using appropriately sized holes for each seasoning ensures an optimal user experience.
Factors That Determine Hole Size
The size and number of holes drilled in salt and pepper shakers depends on several key factors:
Salt vs. Pepper Granule Size
Salt granules are generally smaller than peppercorns. According to this woodworking forum thread, salt shakers typically need smaller holes than pepper shakers in order to control the pour rate. The small granule size of salt means it can flow freely through openings that would cause peppercorns to clog.
Desired Pour Rate
The hole size also controls the speed at which the salt or pepper comes out. Larger holes allow a faster pour, while smaller holes create a slower, more controlled pour. The desired pour rate depends on personal preference and how the shakers will be used. In restaurants, larger holes may be preferred to allow quick seasoning during busy meal service.
Clogging Prevention
Hole size also affects the likelihood of clogging. Holes that are too small can lead to clogged openings, especially with pepper’s larger granule size. According to The Salt & Pepper Rule, a minimum diameter of 1/8″ is recommended for pepper shaker holes to prevent clogging issues.
Drilling the Holes
When drilling holes for salt and pepper shakers, the most important factors are choosing the right drill bit size and using proper techniques for the shaker material. The standard drill bit size is 1/8″ for pepper holes and 3/16″ for salt holes (sawmillcreek.org). However, some prefer slightly larger holes of 5/32″ for pepper and 1/4″ for salt. The optimal size comes down to personal preference and the coarseness of the spices used.
For plastic shakers, use a sharp drill bit and drill slowly to avoid cracking around the holes. Keeping the shaker square to the drill press helps prevent slipping. Apply only light pressure. For metal shakers, use a center punch to mark the holes first. Use cutting oil as lubricant when drilling metal to keep the bit cool and prevent cracking. Clamp the shaker tightly to prevent vibration.
To prevent cracks around holes in all materials, make sure to drill perpendicular to the surface. Take care not to apply too much pressure. Maintaining sharp drill bits is also key to minimizing cracking and chipping. Start with a pilot hole before drilling the full-size opening to further reduce stress on the material (pneumaticaddict.com). With proper bit sizing and drilling techniques, you can add custom holes to shakers without damage.
Installing Shaker Tops
Properly installing the tops on salt and pepper shakers is important to ensure the seasonings flow freely. There are a few methods for securing shaker tops:
- Using slip – Applying ceramic slip to the rim of the shaker body and pressing the top into place. Allow to dry completely before firing.
- Gluing – Using a ceramic adhesive like E-6000 to glue the top to the shaker body. Allow several hours to cure before use.
- Cork – Inserting a cork gasket between the shaker top and body creates a tight friction fit. The cork helps absorb any slight imperfections in the rim or top.
It’s critical that the holes in the top are properly aligned with the interior of the shaker body for the seasoning to flow freely without clogging. There are two main ways to ensure alignment:
- Marking Alignment Dots – Before firing, use a tool to mark dots on both the rim of the shaker and on the base of the top piece. Line these dots up when assembling.
- Test Fitting – Having a snug fit between the pieces can help with alignment. Test fit the top while the clay is still wet. Make adjustments to ensure the holes line up with the shaker interior.
Taking care during assembly to get a tight seal and proper hole alignment will result in salt and pepper shakers that reliably season foods without clogging.
Troubleshooting Clogged Holes

For salt and pepper shakers to work properly, the holes need to stay clear so the seasoning can flow freely. But it’s common for the holes to get clogged over time as moisture and particles get stuck. Thankfully, there are some simple solutions for unclogging the holes and preventing future blockages.
Cleaning Techniques
If the holes seem clogged, first try tapping the shaker upside down on a hard surface to dislodge anything stuck inside. Run water through the holes while scrubbing with a small brush or pipe cleaner. Soak the shaker tops in warm water mixed with vinegar for 15-30 minutes to dissolve salt and calcium deposits. Use a needle or pin to gently poke inside the holes and break up any compacted bits.
Strategies to Prevent Clogging
To stop holes from clogging as quickly, make sure to fully dry the shaker tops after washing. Shake out excess moisture and allow to air dry upside down. Wipe the holes with a dry cloth before replacing tops after each use. Only fill shakers halfway to limit moisture exposure. Store shakers in a dry area. Consider buying shakers with fewer, larger holes that are less prone to clogging. Switch to grinders with adjustable grinds rather than holes if clogging is an ongoing issue.
Specialized Shaker Designs
While standard shaker hole sizes work for most situations, you may want to customize the holes based on the type of seasoning you’ll be using. Two common variations are shakers designed for coarse salt or finely ground pepper.
Coarse sea salts and kosher salts have large grains that clog up smaller holes. For these, you’ll need to drill holes larger than 1/8″ diameter. Holes around 1/4″ work well for coarse salt. This allows the grains to flow freely without jamming.
On the flip side, finely ground pepper can pour out too quickly through large holes. For pepper mills or shakers filled with fine ground pepper, smaller holes around 1/16″ diameter are ideal. This allows you to control the flow and prevent the pepper from dumping out rapidly.
Consider the texture of your seasoning when choosing a hole size. Larger grains need wider openings, while fine powders flow better through smaller holes. Test different drill bit sizes to find the right balance for each shaker’s contents.
Decorative and Custom Drilling
If you want to get creative with your shaker holes, there are many decorative options to consider. Instead of a standard round hole, you can create custom patterns and designs.
Some ideas for decorative hole patterns include:
- Stars
- Hearts
- Moons
- Diamonds
- Flowers
- Geometric shapes
- Monogrammed initials
The hole shape possibilities are endless. Just make sure the total open area is large enough to allow spices to flow freely.
For specialty drilling needs, there are services that can create custom shaker tops to your specifications. They use computerized machines to drill intricate patterns with precision.
Benefits of custom drilling services include:
- Ability to create any custom design
- Consistency across large orders
- Advanced tools for detail work
- Variety of material options
Whether you DIY or hire a professional, decorative and personalized shaker holes let you showcase your style in the kitchen.
Safety Tips
Drilling holes in household objects like salt and pepper shakers can be dangerous if proper safety precautions aren’t taken. Here are some important safety tips to keep in mind:
Wear eye protection. Drilling can cause wood or metal fragments to become airborne. Wearing safety goggles or glasses will protect your eyes from injury.
Secure the shaker while drilling. Use clamps or a vise to hold the shaker in place and prevent it from spinning when the drill bit contacts it. This will help avoid accidental damage or injury.
Unplug drill when changing drill bits. Always unplug your drill before removing or inserting drill bits. This prevents accidental startup while your hands are near the drill chuck.
Check for hidden wires or pipes. Ensure there are no electrical wires, plumbing pipes, or other hazards behind the drilling surface that could be struck and damaged by the drill bit.
Use sharp drill bits. Dull bits can catch in the material and cause the drill to twist dangerously in your hands. Keep bits sharp for smoother, safer drilling.
Drill at proper speed. Excessive drill speed can cause overheating and damage. Consult your drill’s manual for the optimal speed for the material and bit size.
Let drill come to complete stop. Always wait for the drill bit to stop fully before setting the drill down to avoid accidental contact with the still-spinning bit.
Conclusion
When drilling holes for salt and pepper shakers, the most important factors to consider are the size of the grains and holes needed for proper dispensing. Standard hole sizes range from 1/16 inch for finely ground salt up to 1/4 inch for coarse salt crystals or whole peppercorns. Adjust the bit size as needed based on testing. Use a drill press for clean, precise holes. Plastic and metal shakers may require different techniques. Clean holes regularly with a toothpick to prevent clogs. Consider creative shaker shapes and artistic drill patterns for a custom look. Follow safety protocols and work carefully when drilling. With the right drill bit size selection and proper drilling technique, you can easily create salt and pepper shakers with holes optimized for shaking out just the right amount.


