Advanced Clay Sculpting: Techniques For Lifelike Results
Clay sculpture is one of the oldest and most fundamental forms of artistic expression. For thousands of years, artists across many cultures have shaped and molded clay into breathtaking works of art. Clay offers unique properties that make it an ideal medium for sculpture. It can be easily shaped and formed into almost any design. When fired in a kiln, clay becomes hardened and durable while still retaining its flexibility. This allows clay sculptures to last for generations while maintaining intricate details.
The goal of this guide is to provide techniques for creating realistic and lifelike clay sculptures. Hyper-realistic sculpture requires careful attention to anatomy, proportion, texture, and facial details. With diligent practice and the right tools and knowledge, artists can sculpt figures and forms that seem to come to life. This guide will cover choosing the right clay, essential tools, armature building, developing convincing textures, capturing realistic facial expressions, refining anatomy, and finishing techniques. Follow along to take your clay sculptures to the next level.
Sculpting with clay is challenging but also extremely rewarding. There’s something magical about starting with a formless lump of clay and molding it into a realistic work of art. With the techniques covered here, you’ll be on your way to creating clay masterpieces.
Clay Types and Properties
The two main types of clay for sculpting are oil-based and water-based. Each has its own unique properties and is suited for different uses.
Oil-based clays like plasticine are made from oils, waxes, and clay powders. They have a smooth, silky texture and are very firm and dense. Oil-based clays don’t dry out or harden, allowing sculptors to rework pieces over longer periods. Popular brands include Chavant NSP and Roma Plastalina. These clays are great for fine details and refined sculpting. However, the stiffness can make sculpting larger works challenging.[1]
In contrast, water-based clays contain water and are softer and more malleable. They resemble moist earthen clay. Water-based clays are easier to knead and shape for larger sculptures. Brands like Creative Paperclay dry to a hard finish and don’t require baking. The softer texture allows for speedy sculpting but can lack fine details. Water-based clays are more accessible for beginners.[2]
When selecting clay, consider the sculpture size and desired textures. Oil-based clays suit small, refined sculpts. Water-based clays work better for larger, expressive pieces. Most clays can be conditioned to improve texture for sculpting. With practice, both clay types can produce professional, lifelike finishes.
Sculpting Tools
Having the right sculpting tools is essential for working with clay and achieving lifelike results. Three of the most important types of sculpting tools are wire tools, carving tools, and sculpting loops.
Wire tools have thin, flexible metal wire or wooden sticks attached to handles. The wire allows you to slice cleanly through the clay to remove pieces or refine edges and details (source: https://createwithjennifer.com/clay-sculpting-tools-for-beginners/). Wire tools are great for cutting through and hollowing out areas of the sculpture.
Carving tools like ribbon tools, gouges, and sculpting knives allow you to refine shapes and textures. Their rigid edges can scrape, carve and slice the clay to remove material and create grooves and intricate patterns (source: https://insidethepotterstudio.com/products/clay-sculpting-tools-set-3-pcs). Using a variety of carving tools allows for finer control over details.
Sculpting loops or ribbon tools have thin metal wires shaped into loops or curvy blades. These can blend and smooth seams in the clay while creating flowing, natural looking textures. The loops allow you to refine the clay’s surface without removing large amounts of material.
Having wire tools, carving tools and sculpting loops available will allow you to efficiently shape, refine and add realistic detail as you sculpt figures and forms out of clay.
Armatures and Structures
When sculpting a large or complex figure, it’s important to build a strong armature or inner framework to support the clay. According to instructables.com, wire is commonly used to create armatures as it can be bent into shape and is sturdy enough to hold the weight of the clay https://www.instructables.com/Make-an-Armature-for-Sculpting/. An armature provides structure so the figure can be freely posed without risk of collapse. It should be customized to the specific pose and proportions of the sculpture.
When designing an armature, it helps to have reference models of human or animal anatomy. Study skeletal and muscular diagrams to understand how to build the framework to support the figure realistically. Pay special attention to joints and limb connections which experience the most stress and weight. Use thicker gauges of wire for the central spine and thinner flexible wire for smaller extremities. Wrap connecting joints with a thin wire to stabilize them.
Build the armature section by section, beginning with the torso, head and pelvis, then adding the limbs. Use pliers to tightly wrap joints and create smooth contours. Test the strength of the armature before adding clay by bending joints through their full range of motion. The finished armature should be sturdy but flexible enough for posing.
Anatomy and Proportion
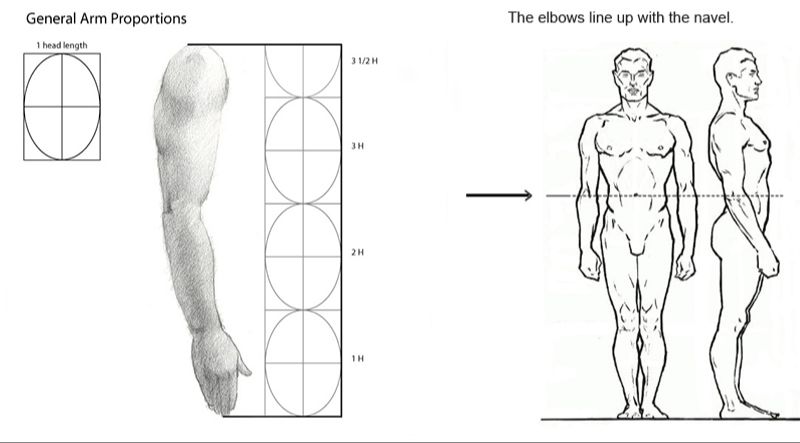
Proper anatomy and proportions are crucial for creating realistic clay sculptures. Studying human and animal anatomy helps sculptors understand the underlying bone and muscle structure to accurately depict it in clay. Using measurements ensures various body parts are sized correctly in relation to each other. There are standard anatomical measurements that can serve as guidelines.
For human figures, a common measurement is that the body is generally 7 to 8 heads tall. The head makes up about 1/8 of the entire body height. Other proportions include the width of the shoulders being 2 heads wide and the length of the forearm being equivalent to the length of the foot. Animal anatomy also has standard proportional ratios that should be followed. For example, a cat’s body tends to be about 3 heads long not including the tail, with the head itself being approximately a third of the body length.[1]
Sketching out the skeletal and muscular forms before sculpting helps map out the proportions accurately. Calipers and rulers can be used to precisely measure and mark lengths. A plumb line helps maintain symmetry and alignment of body parts. With practice and careful observation from reference images, sculptors can train their eyes to identify when proportions look off and make adjustments to achieve realistic results.
[1] https://www.pinterest.com/pin/105412447511258019/
Textures and Details
Creating realistic textures and details in clay sculptures can truly bring them to life. When sculpting things like hair, skin, and clothing, it’s important to carefully observe references and use specialized techniques to recreate the proper textures.
For sculpting hair, use various loop and coil tools to make flowing locks and strands. Vary the thickness and twist pieces together. Add waves and curls for more interest. Use a clay shaper to add finer details like frizz and flyaways. Hair close to the scalp should be smoothed down while ends can flare out.
For lifelike skin, build up thin layers of smooth clay for a translucent look. Use a clay shaper to add subtle veins, pores, wrinkles, and imperfections. Adding a light sheen of water or oil-based clay gloss will make the skin look fresh and lively.
For fabric textures, use various loop, ribbon, and drag tools to mimic patterns and drapes. Add creases, folds, fraying hems and texture details like stripes or floral prints. Allow thick fabrics to support weight while finer fabrics can appear more delicate and light.
Observing real-world references is key for rendering convincing textures. Photos of hair, skin, and clothing in similar poses are very helpful. With practice and the right tools, clay sculptors can achieve remarkably realistic details and convince the eye.
Facial Features
Creating expressive and realistic facial features like eyes, noses, and mouths is key to sculpting a lifelike face in clay. The eyes are often seen as the “windows to the soul,” so pay special attention to shaping lively and natural-looking eyes. According to the tutorial on Sculpting Faces in Clay (https://missbaide.wordpress.com/sculpting-faces-in-clay/), the eyes should have a rounded, sphere-like shape rather than being flat circles. Gently press the back of a spoon into the clay to form the eye sockets before smoothing out the surrounding brow area. Adding a slight upward tilt at the outer eye corners can create a more lively, awake expression.
The nose is another important feature that brings character to a sculpted face. Build up the bridge of the nose gradually using small balls of clay attached to the face base. Pinch and blend the clay together to create smooth nostrils. Shape the tip of the nose to suit your desired look, keeping in mind facial proportions. A section on sculpting noses in the WikiHow article (https://www.wikihow.com/Sculpt-a-Face) recommends making the nostrils about one-third the size of the nose tip.
For the mouth, roll two small balls of clay into tapered teardrop shapes and attach them with a flatten piece for the upper lip. Blend the seams together smoothly. The upper lip is usually a bit thinner and less defined than the fuller lower lip. Add expression by shaping the mouth into a subtle smile or parted lips. Pay attention to the corners and curves of the mouth to convey realistic emotion.
Body Shaping and Posing
Creating natural poses and capturing a sense of gesture and dynamism in a sculpture requires careful attention to anatomy and proportions. The underlying skeletal structure and musculature will determine the range of realistic movement and give a pose a feeling of weight and balance.
When shaping the body, focus first on the gesture line that defines the overall movement and flow of the form. Consider the angles created at the hips, shoulders, and other joints that support the body’s position. Use armatures or wire to establish this line before adding clay.
Pay attention to weight distribution and gravity. Shift the center of gravity in relation to the supporting limbs and points of contact with a surface. Note the pull and compression of muscles and soft tissue in the direction of movement or force.
Study human anatomy and look at photos of live models in dynamic poses. Observe how muscles contract and relax, how the torso twists, and how the limbs extend and bend to achieve different effects. Translating these complex interrelationships into sculpture requires a deep understanding of the form (How to Sculpt a Portrait in Clay – YouTube).
Aim to create an organic sense of flow rather than stiff or rigid posture. Subtle details like the curve of the spine, tilt of the head, flexing toes, or bounce in mid-step can lend a sense of realism and life to a sculpture.
Finishing and Polishing
After the sculpture is fully formed, you need to refine the surface for a smooth, professional finish. Proper finishing techniques help bring out details and give your sculpture a realistic, lifelike appearance.
Start by sanding the surface with fine grit sandpaper like 400 or 600 grit. Sand evenly across the entire sculpture, working in small circular motions. Focus on smoothing any rough areas or seams. Gradually work up through finer grits like 800, 1000 or even 2000 for an ultra-smooth finish. Avoid sanding too aggressively or you may remove important details. After sanding, wipe away any residue with a dry cloth (https://www.instructables.com/Finishing-and-Detailing-a-Sculpey-Polymer-Clay-Scu/).
You can further polish the sanded surface by buffing with a soft cloth or brush. Use a very fine polishing compound designed for clay or plastic. Apply the compound and buff in circular motions until you achieve a smooth, glossy surface. Fiberglass resin can also be brushed over the sculpture to create a durable, glass-like coat.
To protect and seal the sculpture, apply a finish like acrylic sealant, varnish or glaze. Multiple thin coats are better than one thick coat. Allow each coat to fully dry before adding the next. Clear finishes work best for realistic colors, while tinted finishes can enhance the look. Allow adequate drying time before displaying your finished sculpture (https://horseart.net/ceramic-kilns-working-with-clay/how-to-paint-clay/).
Displaying Sculptures
Properly displaying your clay sculptures can enhance their beauty and allow viewers to fully appreciate your artistic vision. Consider the following tips for optimal display:
Bases
Choose an appropriate base or stand for your sculpture. The base should complement the sculpture without detracting focus. Neutral colors work well for most pieces. Consider material and height carefully when selecting a base. Refer to sources like A How-To Guide for Displaying Sculptures In Your Collection for advice.
Lighting
Proper lighting can make details and textures shine. Avoid direct overhead lighting which can create harsh shadows. Try positioning adjustable lamps or track lighting at angles to sculpt interesting highlights and contours. Refer to sculpture galleries for lighting inspiration.
Presentation
Decide if your sculpture is best displayed in isolation, against a plain background, or as part of an arrangement. Space sculptures far enough apart for comfortable viewing. Angle pieces slightly for interest. Keep the display space uncluttered and neutral to avoid visual competition. Rotate pieces periodically to showcase different views.