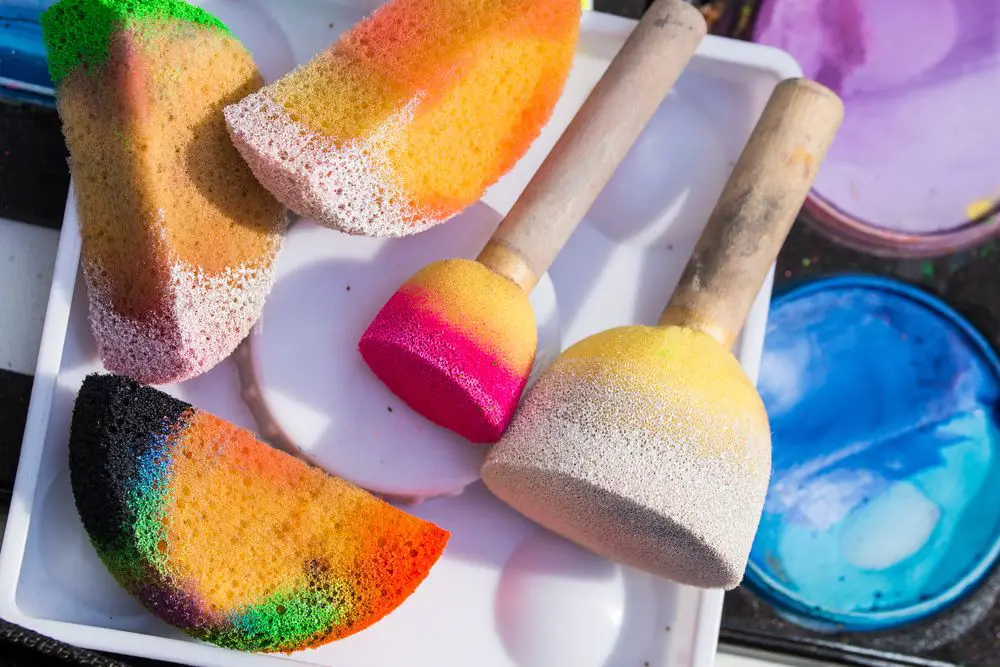
Are Sponge Brushes Good For Painting Walls?
Sponge brushes, sometimes called foam brushes, are painting tools made from a porous foam material shaped into a brush. They are a popular tool for painting walls and other large surfaces because the sponge material provides an easy way to quickly apply paint in smooth, even coats.
Sponge brushes are low-cost, disposable options that can be an alternative to traditional bristle brushes. The spongy foam head soaks up paint and distributes it evenly across the surface as you brush back and forth. The porous foam creates a subtle stippling effect as paint is applied.
Pros of Using Sponge Brushes on Walls
One of the main benefits of using a sponge brush to paint walls is the unique textures and patterns it can create. The open-cell foam construction leaves behind a slightly mottled, streaky finish that simply can’t be achieved with a traditional bristle brush (https://abutterflyhouse.com/foam-brush-vs-paint-brush/). The irregular porous surface of the sponge soaks up more paint than bristles, resulting in a layered, variegated look.
Sponge brushes are great for stenciling, creating faux finishes, applying glazes and washes, and distressing paint effects. Dabbing and stippling motions with a sponge brush build up color for an organic, mottled look. Sponging on layers of complementary glazes over a base wall color is an easy way to add visual depth and character.
For projects like painting furniture or decor pieces, sponge brushes lend themselves perfectly to shabby chic finishes. The natural streaking helps create a timeworn, faded look. Sponges can also be used to remove excess paint and blend edges when creating an antique distressed paint effect.
Cons of Using Sponge Brushes on Walls
One of the main downsides to using a sponge brush on walls is that it can be difficult to achieve an evenly smooth coat of paint. The porous nature of the sponge material means paint is absorbed into the brush rather than sitting evenly on the surface. This can lead to an uneven, blotchy appearance once the paint dries.
Sponge brushes are also prone to leaving brush strokes in the paint since they typically have a coarse application surface. The marks left behind can detract from the look of the finished wall.[1] Roller brushes are generally better at avoiding unsightly brush strokes.
It takes more effort to get a sponge brush to glide smoothly across the wall surface. The spongy texture creates drag as you paint. This resistance can lead to an uneven application of paint. It’s easier to maintain smooth brush strokes using a high-quality bristle or microfiber roller.
Sponge brushes don’t hold much paint, so you have to repeatedly dip back into the paint tray to reload the brush. This interrupted workflow makes it challenging to maintain an even coating technique. Brushes that hold more paint allow for longer continuous strokes.
The porous sponge material also tends to soak up a lot of paint. More paint gets wasted inside the sponge versus transferred to the wall. This drives up the overall cost of painting.
Types of Sponge Brushes
There are two main types of sponge brushes – natural sea sponges and synthetic sponges.
Natural sea sponges are harvested from the ocean and have an irregular, porous texture that allows them to hold and release paint smoothly. Sea sponges come in a variety of shapes and sizes, with finer pore sponges better for detailed work. They are reusable but need to be cleaned thoroughly after each use. Natural sponges also tend to be more expensive than synthetic options. Many painters prefer the soft, organic texture of real sea sponges.
Synthetic sponge brushes are made from man-made materials like polyurethane foam. They come in wedge shapes or paddle styles. Synthetic sponges have a more uniform pore structure compared to natural sponges. They are inexpensive, disposable options good for painting large wall expanses. Synthetic sponges work well with all types of paint. However, some find they do not hold as much paint or release it as evenly as natural sponges.
When choosing a sponge brush, consider the texture you want and the scope of your project. Synthetic sponges are ideal for one-time or small jobs. Natural sea sponges make a good investment for frequent painting tasks and create subtle stippling effects. Check the quality and density of any sponge brush before purchasing. Higher density sponges of either type distribute paint more evenly.
Prep Work for Using Sponge Brushes
Properly preparing and priming the walls is an essential step before using sponge brushes to paint. Here are some tips for prep work:
Remove any wallpaper, loose paint or flaking surfaces. Sand glossy areas to rough up the surface. Fill any holes or cracks with spackle and sand smooth once dry. For best results, ensure the wall surface is smooth and free of defects before painting.
Wipe down the walls with a damp cloth to remove dust and debris. Let the walls fully dry before priming or painting.
Apply primer designed for the wall material (drywall, plaster, etc.) to create a uniform surface for painting. Tint the primer close to the final paint color if possible. Let the primer fully dry before painting, usually 24 hours.
Use painter’s tape to mask off any adjacent surfaces you don’t want to get paint on, like baseboards, ceilings or door/window trim. Remove outlet covers and switch plates before painting.
Make sure the room is well-ventilated before painting and use a drop cloth to protect floors. Temperature and humidity can affect paint application and drying time.
Now the walls are prepped and primed, ready for sponge painting. Be sure to use high-quality sponge brushes designed for walls to achieve the best results.
Painting Technique with Sponge Brushes
Proper technique is essential to get the most out of sponge brushes when painting walls. Here are some tips:
Wetting the Sponge
Before starting, thoroughly wet the sponge under running water and squeeze out the excess. The sponge should be damp but not dripping wet. Overly wet sponges will create drips and uneven coverage.
Dabbing Motions
Use a dabbing or bouncing motion to apply paint with the sponge. Avoid brushing or dragging the sponge across the wall. Dabbing pushes the paint into the texture of the wall for better adhesion and coverage. Make overlapping dabs to ensure even coverage without bare spots.
Apply light pressure and work in small sections. Work from top to bottom of each section. Let sections dry before moving on. Going back over semi-dry paint can lift off the paint. Pay extra attention to corners and edges.
The unique porous surface of sponge brushes allows for a textured, mottled finish. Varying the amount of pressure applied creates different effects. Light dabbing provides a subtle stipple while firm dabbing produces more pronounced texture.
Achieving Specific Looks
Sponge painting allows you to easily create a variety of interesting textures and effects on your walls. Here are some of the most popular techniques:
Sponging
Sponging gives walls a mottled, variegated look. Load the paint onto a dry sponge in a random pattern. Then dab the sponge lightly and randomly on the wall, overlapping the paint in some areas. Work in sections for the best results. Sponging works well for creating an antique, washed out finish. For tips, see this Home Depot guide on sponge painting.
Stippling
Stippling produces a mottled texture using small dots of paint. Use a stiff, dense sponge brush and hold it perpendicular to the wall. Dab and lift in short, bouncing motions to apply specks of paint. Stippling is great for a stone or mineral look. See this YouTube video for a stippling paint technique tutorial.
Texturing
For bold textures, use brush strokes in different directions. Try circular, vertical, or criss-cross patterns. You can also dent or carve patterns into a damp painted wall for a three-dimensional look. Experiment with textured materials like sponges, rags, plastic bags, or scouring pads. Texturing creates an artsy, hand-painted finish.
Best Paints to Use for Sponge Brushing Walls
When selecting paint for sponge brushing walls, it’s generally recommended to use higher quality latex paint with a matte or flat finish. Latex paint is water-based so it doesn’t smell as strong as oil-based paints, and it’s easy to clean up with just soap and water. The matte or flat finish helps the layers of paint applied with the sponge remain distinct, enhancing the textured look.
Higher quality latex paints provide better coverage and usually allow for multiple coats without getting gummy or sticky. Budget or economy paints may become too thick and compromise the sponging effect. Investing in a premium latex paint from brands like Benjamin Moore or Sherwin-Williams is advisable for sponge painting walls.
Avoid glossy paints, which can cause the layers of sponged-on paint to blend together into a uniform coat. The texture and dimension achieved with sponge painting comes from the paint absorbing differently based on the amount applied. Glossy finishes don’t allow for this absorbency variance.
In addition to using a quality latex matte paint, proper prep work like sanding and priming the walls will also help the sponged paint adhere and last without flaking or chipping down the road.
Maintenance and Touch-Ups
Over time, painted walls may get scuffed or damaged in places. Thankfully, it’s easy to do spot repairs on walls painted with a sponge brush.
Start by cleaning and lightly sanding the damaged area to remove any loose paint or debris. Use a damp sponge to wipe away dust. Allow the spot to fully dry before painting. Use the same paint color that was originally used. Dip a clean sponge brush into the paint and dab it onto the spot, blending the edges into the surrounding paint. Apply several coats until the repair is no longer visible. Sponge Wipe with Handle, 2 in 1 Brush Bathroom Wall Cleaning Brush and Toilet Brush and Bathtub Scrub Brush for Shower, Tile, Tub, Grout, Floor (1 Count)
Matching the texture of a sponge painted wall is important for seamless touch-ups. Examine the surrounding paint to determine the pouncing motion used – circular, up and down, etc. Recreate the same pouncing technique with the sponge brush on the repaired spot. Use a brush with a similar stiffness and density as the original. Test the texture on an inconspicuous area first before moving to the repair area. With practice, you can achieve a uniform texture for flawless spot repairs. 2pcs Wall Cleaning Brushes Heavy Duty Sponge Scrub Brush for Bathroom/Kitchen/Home UsePerfect for Tub/Shower/Tile/Grout Cleaning Brushes Grey
Conclusion
In summary, sponge brushes have both pros and cons for painting walls. On the pro side, they create a textured, decorative finish and are good for blending and softening sharp edges. They also work well for stippling and making repaired patches blend in. However, the texture can show imperfections in the wall surface more, and they don’t provide as smooth or uniform of a coat as other brushes. They also require more prep work.
For most smooth wall painting, a high-quality roller or angled brush is still the best choice. But sponge brushes can be a good option if you want a textured finish or need to blend patched areas. Focus on prep work to ensure a smooth base wall texture. Test different sponge brush techniques on sample boards first to achieve the desired look. Use with paints that are formulated to prevent dripping and splattering. With the right technique and paint, sponge brushes can create beautiful faux finishes on walls that would be difficult to achieve with standard brushes.