Can I Make Earrings With Polymer Clay?
Polymer clay is a type of modeling clay made from polyvinyl chloride (PVC) and plasticizers that remains malleable until it is cured at high temperatures. It is available in a range of colors and can be shaped, molded, and textured in creative ways. Polymer clay has become a popular DIY craft material among jewelry makers, artists, and hobbyists due to its flexibility, durability, and versatility[1].
Polymer clay is an ideal medium for making earrings and other jewelry pieces. It can be rolled flat to cut shapes, formed into balls or beads, sculpted, molded into molds, and imprinted with textures. The lightweight nature of cured polymer clay makes it comfortable for wearing earrings. A wide selection of colors allows jewelry makers to create colorful, funky, or classic earring designs. Polymer clay is also strong and durable once cured in the oven, making earrings withstand daily wear. This article will provide a step-by-step guide to making your own polymer clay earrings.
Supplies Needed
To make polymer clay earrings, you will need the following supplies:
- Polymer clay – Popular brands include Sculpey and Fimo. Choose clay in colors you want for your earrings.
- Clay tools – At minimum you need a ruler and acrylic roller. Other handy tools include basic shape cutters, craft knife, and mold shapers.
- Findings – You’ll need earring hooks, jump rings, beads or other embellishments. Choose gold, silver or other finishes.
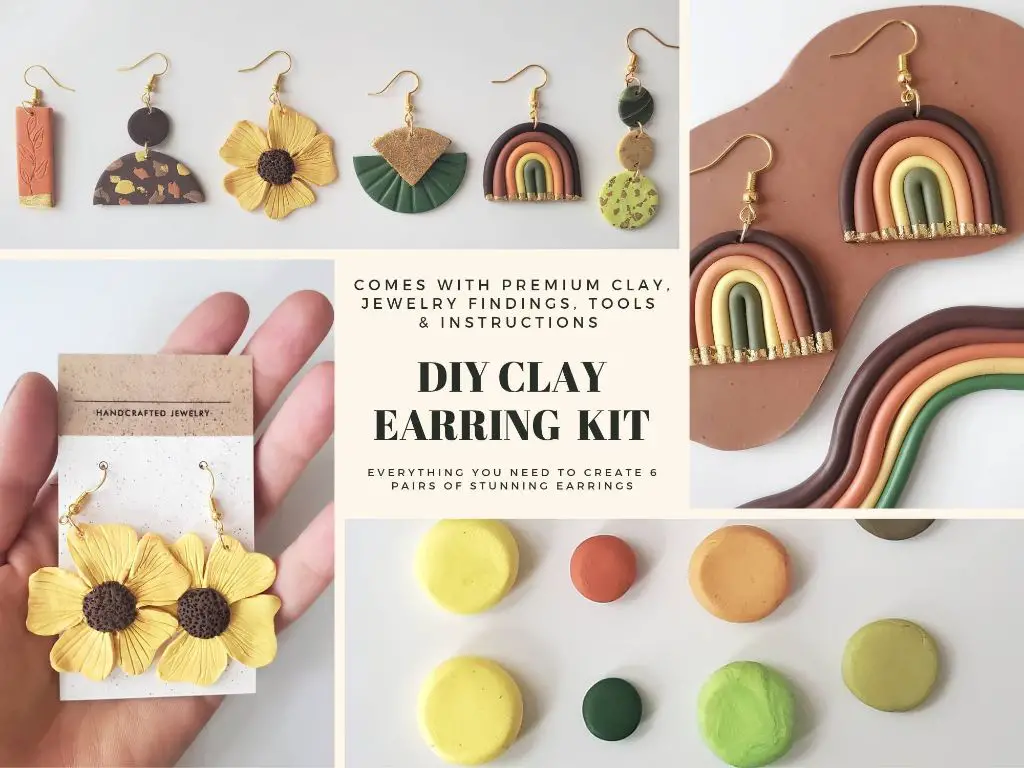
You can find these supplies at local craft stores or online. Having the right tools will make working with polymer clay for earrings much easier.
Shaping the Clay
Properly conditioning the polymer clay is an important first step before shaping earring components. Knead the clay thoroughly until smooth and pliable, without any cracks. This ensures your clay will harden properly and provides an even consistency for shaping.
For simple round or geometric shapes, roll conditioned clay out evenly to your desired thickness using an acrylic roller. Aim for 1/8” thickness for lightweight earrings. Work on a smooth, nonstick surface for best results. Then cut out shapes using cookie cutters or a blade (SarahMaker).
For unique, organic shapes, hand shaping allows for more custom designs. Roll small balls of clay between your palms or pinch and pull clay into interesting textures. Let your creativity guide you, while keeping earring weight in mind.
Baking Instructions
Properly baking polymer clay is essential for curing it and obtaining a durable finished product. The baking temperature for polymer clay ranges from 275°F to 300°F depending on the brand. General baking times are 15-30 minutes per 1⁄4 inch of thickness. It’s important not to under-bake the clay, as it will remain soft and not cure properly. Over-baking can cause discoloration or scorching. Refer to the manufacturer’s instructions for exact time and temperature.
Most polymer clay brands recommend baking at 275°F for 15 minutes per 1⁄4 inch of thickness. For example, a 1-inch thick piece would bake for 60 minutes. Larger pieces may require longer baking times at a lower temperature to prevent over-baking on the outside before the inside is cured. Pieces over 3 inches thick should bake for 1 hour at 230°F then finish baking at 275°F until cured through. Let polymer clay pieces cool completely before handling after baking. Test for doneness by inserting a toothpick, which should come out clean when fully cured.
“To achieve the best results when baking polymer clay, follow the temperature and times provided by the manufacturer. Under-baking can lead to weak, fragile pieces, while over-baking may burn or discolor the clay. With proper baking, polymer clay will cure into a strong, durable material suitable for jewelry, decorative items, and more.” (Source)
Adding Embellishments
There are many ways to embellish polymer clay earrings to make them unique. One popular technique is pressing beads, glitter, mica powder or other small objects into the surface of the clay before baking. This adds color, texture and visual interest. According to https://www.pinterest.com/embelllady/embellished-polymer-clay/, some common embellishments to press into clay include beads, glitter, mica powder, rhinestones, and seeds or spices.
Another embellishment technique is wrapping conditioned polymer clay around charms, gems or other objects. This fully encases and secures the objects in the clay. As the clay bakes it will harden, forming a bezel to hold the embellishment. Wrap the clay tightly so the object is fully enclosed. Make sure to press and smooth the clay so there are no gaps or air bubbles around the embellishment before baking.
Assembling the Earrings
Once your polymer clay earring components are baked and cooled, it’s time to assemble them into finished earrings. There are a couple methods you can use:
Using Pliers to Attach Earring Hooks and Jump Rings
One common technique is to use pliers to open jump rings and attach earring hooks. First, open a jump ring by grasping each side with two pairs of pliers and gently twisting in opposite directions. Attach one side of the open jump ring to the top of a baked clay earring piece. Then open an earring hook and attach it to the jump ring before closing it. This is an easy way to connect earring hooks to polymer clay pieces.1
Connecting Clay Pieces Together Pre-Baking
You can also assemble polymer clay earring components before baking if you plan to bake them together. Roll a small piece of fresh clay into a snake and press it onto two clay pieces to connect them. Or you can wet one piece with a bit of water/glue and attach it to another unfired piece. Let them cure fully, then bake according to the clay instructions. This can create an integrated look for polymer clay earrings.1
Finishing Touches
After baking the polymer clay earrings, it’s important to sand and buff the pieces to create a smooth finish. This will remove any excess clay from the edges and give a polished look. Start with a fine grit sandpaper like 400 or 600 and gently sand the earring surface and edges. Be sure to wipe away any clay dust. Then use very fine sandpapers up to 2000 grit for an ultra-smooth finish.
Next, buff the earrings by hand or using a rotary tool like a Dremel to create a nice sheen on the clay. Use a muslin buffing wheel or piece of soft cloth to gently buff the earring surface. Take care not to overheat the clay when buffing.
Applying a liquid polymer clay glaze or gloss finish will give the earrings a beautiful shine. Use a brush to apply a thin layer of glaze evenly across the surface. Allow it to fully dry before wearing the earrings. Alternatives like Sculpey Glaze or Varathane water-based polyurethane also work well to enhance the earring finish.
Proper sanding and buffing creates smooth, professional looking polymer clay earrings with a polished, glossy finish. Just remember to work gently and avoid overheating the clay.
Sources:
https://www.jessamatutorials.com/finishing-polymer-clay-2.html
https://thebluebottletree.com/polymer-clay-earrings-mistakes/
Design Ideas for Polymer Clay Earrings
When making polymer clay earrings, you have endless options for creative designs. Some popular ideas include using geometric shapes, nature themes, and mixing clay colors and patterns.
Geometric polymer clay earrings can feature circles, triangles, rectangles, or any other angular shapes. These clean lines create modern and stylish accessories. You can use cookie cutters or clay cutters to form uniform shapes. Or try freehand cutting the clay into abstract geometric designs.
Nature is also a great source of inspiration for polymer clay earrings. Botanical themes like leaves, flowers, trees, and vines translate beautifully into clay designs. You can imprint real leaves or petals into the clay to capture their natural texture and shape. Mix green and brown clays to mimic leaves or floral colors for flowers.
Lastly, combining and blending various colors and patterns of polymer clays results in striking designs. You can marble several colors together, create dots and stripes, or layer clays for an ombre look. Skinner blends, canes, and millefiori techniques involve patterning and shaping clays for intricate effects.
Let your creativity run wild when conceptualizing polymer clay earring styles. Keep in mind the versatility of the medium as you explore geometric, nature, color blending, and other motifs.
Care and Cleaning
Properly caring for your polymer clay earrings will help them last longer and retain their beauty. Here are some tips:
Before baking, make sure to store the raw clay in an airtight container or plastic bag. This prevents it from drying out. Keep it away from heat sources like direct sunlight or appliances that get hot. Once cooled after conditioning, the clay can be stored for months.
For finished baked clay pieces, avoid prolonged exposure to moisture, humidity and sunlight which can cause fading over time. Store earrings in a clean, dry place inside a closed jewelry box or fabric pouch. To clean, use a slightly damp soft cloth with mild soap and gently wipe down. Do not soak the earrings in water as polymer clay is porous. Allow to fully dry before wearing again.
Take care not to bend or warp the shape of baked clay pieces. While polymer clay is flexible, it can break if repeatedly stressed. Handle them with care just like any delicate jewelry.
With proper storage and occasional gentle cleaning, polymer clay earrings will retain their color and last for many years of wear. Avoid harsh chemicals or cleaners like acetone, rubbing alcohol or bleach when cleaning.
Conclusion
Making your own polymer clay earrings allows you to tap into your creativity and make custom designs. We walked through the full process, from choosing the right clay and tools, to baking and embellishing the earrings. With some practice, you’ll be able to shape the clay into any form you can imagine.
Polymer clay is very versatile for making earrings. You can mix colors, layer textures, add charms or beads, and create geometric or nature-inspired shapes. The finishing options are endless, from glossy finishes to rubbing powders for a metallic look. Your unique handmade earrings will be a statement piece in your jewelry collection.
We hope this guide has shown how approachable and fun it is to make polymer clay earrings. The best way to further your skills is to simply try it out. Start with some basic shapes and experiment adding your own flair. Let the clay be your canvas to make your wildest earring dreams come to life. Happy crafting!

