How Do I Start Hand Building?
Handbuilding is a ceramic and pottery forming method that involves creating shapes and vessels by hand without the use of a potter’s wheel. It is one of the oldest and most versatile techniques for working with clay. Handbuilding allows makers to produce one-of-a-kind, customized pieces that can be both decorative and functional.
Learning handbuilding skills provides a solid foundation for any potter or ceramic artist. The techniques help develop dexterity, patience, and problem-solving abilities. With practice over time, the hands gain “muscle memory” allowing more intricate shapes and thinner walls. While the wheel throwing technique has limitations based on centrifugal force, handbuilding allows complete freedom and control when designing forms.
The basic steps for handbuilding involve gathering clay and tools, preparing a workspace, learning techniques like pinch, coil, and slab construction, starting with simple forms, practicing consistency, refining skills over time, decorating, and properly drying and firing finished work. This guide will walk through this entire process start to finish.
Gather Materials
When starting hand building, you’ll need to gather some basic supplies and tools. Here are the essentials:
Clay – Choose an air-drying earthenware clay that is suitable for hand building. Look for a clay that is smooth and elastic, free of debris, and fires to a light color like white or cream. Avoid clays that are really sticky or have a lot of grog (gritty particles). A smooth, flexible clay will be easiest to work with.
Modeling tools – You’ll want an assortment of tools for sculpting, smoothing, carving, and detailing your clay pieces. Helpful tools include loops, ribs, rubber tipped tools, metal scrapers, sponge, wire, Exacto knife, paint brushes, and more. Start with the basics and build your toolkit over time.
Work surface – Cover your work table with canvas or butcher paper to keep it protected. You’ll also want batts of clay for sculpting on top of the table.
Water – Keep water in a spray bottle or small container for misting clay to prevent cracking and help with smoothing.
Other useful supplies include plastic bags, a roller, cutters, acrylic paints or glazes, and sealants once you are ready to finish your pieces.
Prepare Your Workspace
Setting up a comfortable and efficient workspace is key for successful handbuilding. Here are some tips:
Choose a space with good ventilation and access to water, like a garage, basement, or spare room. Make sure it is a clean, dust-free area (source). Have a large table or countertop as your central work surface, at least 2′ x 4′ for adequate space. Get a sturdy stool so you can work comfortably at your worktable (source).
Install shelving units to store clay, tools, works in progress, and finished pieces. Plastic bins or boxes are great for organizing smaller supplies. Have a dedicated space for clay storage so it stays moist. A standalone drying rack is useful for holding unfired pieces.
Good lighting is essential; set up task lighting above your worktable. Keep tools organized and within easy reach while working. A rolling cart is great for transporting clay and tools around the studio. An apron or smock will keep your clothes clean.
Consider the room’s layout and make sure there is enough space to move around comfortably. Allow for areas to wedge clay, a trimming wheel if desired, and an easy path to load and unload your kiln.
Learn Techniques
The three main handbuilding techniques are pinch, coil, and slab construction. Each technique requires learning specific skills and offers unique creative possibilities.
Pinch pots are the most basic handbuilding technique and involve pinching and pulling the clay to make simple pot forms. Pinch pots are one of the oldest forms of pottery and great for beginners to start with. To make a pinch pot, take a ball of clay and push your thumb into the center while pinching the sides to shape the form. Pinch pots can be left simple or embellished with textures and cutouts.
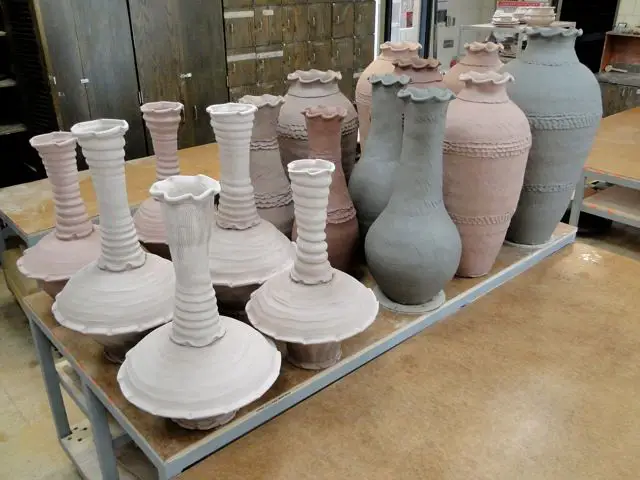
The coil technique involves rolling out “snakes” of clay into long coils, then stacking the coils on top of each other to build up the form. Coils can be stacked vertically or spiraled to create different shapes. The joints between the coils are smoothed together using water and various tools. Coil building allows creating elaborate, customized handbuilt vessels.The coil method is one of the oldest techniques of handbuilding with clay.
Slab construction starts with rolling out flat, even slabs of clay as building blocks. The slabs can be cut into shapes and joined together, often using slip. Vessels and sculptures can be made by layering and connecting the slab pieces. Slab construction is great for making flat planes and angles. Textures can be rolled into the slabs before constructing the form.
Learning each technique opens up creativity and possibilities for handbuilding. Focusing on one method at a time allows developing skills and confidence, before combining techniques for more complex forms.
Start Simple
When first getting started with hand building, it’s best to begin with basic functional forms before attempting more complex sculptures. Simple projects like mugs, bowls, and plates allow you to practice fundamental techniques. As recommended in this article, some easy beginner hand building ideas include:
- Pinch pots
- Coil pots
- Slab built boxes
- Basic stamps and textures
Creating simple, functional items helps you get comfortable with the clay. As you build consistency in your methods, you can add details like feet, handles, lids, and decorative elements. Over time, advance to more intricate hand built pottery as your skills develop. But remember – start simple.
Practice Consistency
Consistency is key when handbuilding with clay. You want to maintain an even thickness throughout your pieces. Slabs or coils that are too thick in some areas and too thin in others can lead to cracking and breakage when drying and firing. Aim to roll out slabs to a consistent 1/4 inch thickness. For coils, try to keep each coil the same width as you build up the form.
Additionally, be diligent about smoothing joints between slabs or coils. Any gaps or uneven joints will become weak points. Carefully blend slab edges or coil seams together by gently smoothing with your fingers, a rib, or sponge. Remove any excess slip or water as you blend. The smoother the joints, the stronger the finished piece will be. Consistency in thickness and smoothing ensures sturdy, lasting handbuilt ceramics.
Refine Your Process
As you gain more experience handbuilding, focus on refining your techniques to achieve smooth, professional results. Pay close attention to the drying process, as inconsistent drying can lead to cracks and weak spots. Here are some tips:
- Use rib tools, scrapers, and sponges to smooth the surface while leather hard. Going over the surface while still malleable ensures smooth joins between coils or slabs (https://www.thecrucible.org/guides/ceramics/handbuilding/).
- Control drying speed by storing projects in plastic bags or damp boxes. Allow even, gradual drying over 1-2 weeks to prevent cracking (https://www.soulceramics.com/pages/handbuilding-pottery).
- Wedge clay thoroughly before handbuilding and knead coils or slabs together well to bond the clay and eliminate air pockets.
- During assembly, score and slip surfaces generously to fuse pieces together. Compress joins firmly.
- Avoid overworking or handling clay too much, as this can lead to weakness in the material.
Paying attention to consistency at each step will help take your handbuilding skills to the next level. With practice, you’ll be able to create smooth, professional-looking finished pieces.
Decorate
Decorating your handbuilt pieces is one of the most enjoyable parts of the process. You can add color, textures, and designs to make each piece truly unique. There are many decorating techniques to explore with handbuilt ceramics.
One of the most popular options is glazing. Glazes come in endless colors and finishes like glossy, matte, or crackled. You brush or dip glaze onto bisqueware and then the glaze melts and hardens during firing to create a glass-like coating.[1] Another technique is painting directly onto bisque pieces with underglazes, which get absorbed and fuse with the glaze firing. Underglazes allow you to hand paint intricate designs.
You can also decorate by carving patterns and textures directly into the clay. Options include sgraffito, mishima, and scrafitto. Carving allows you to create beautiful designs revealing the bare clay body underneath any glaze or slip. Consider combining carving with glazing for added visual depth.
The options for decorating handbuilt ceramics are nearly endless. Experiment with different techniques to find your favorites and develop your own unique decorative style.
[1] “Ceramic Decorating Techniques.” Ceramic Arts Network, https://ceramicartsnetwork.org/daily/ceramic-decorating-techniques. Accessed 1 Mar. 2023.
Fire Pieces
Once you are ready to fire your pieces, take them through the first bisque firing below 1000°F. Even pieces made from porcelain should be bisque-fired first to vitrify and strengthen the clay. Set your kiln to around cone 04-06. Place pieces so they do not touch each other inside the kiln and raise the temperature slowly over several hours. Maintain these lower temperature for 1-2 hours before shutting off the kiln to let it cool slowly.
After the initial bisque firing, you can glaze fire the pieces if desired to add color and finish. Apply glazes according to package instructions and fire according to the glaze cone to melt and fuse the glaze. Raise the temperature in the kiln gradually to the glaze cone temp and hold for sufficient time before cooling.
Unglazed pieces can be finished with a high fire to cone 8-10 to densify and vitrify the clay. Go slow during temperature increases. Use a kiln sitter or pyrometer to determine when the firing is complete. Shut off and allow the kiln to cool completely before removing bisque or glazed pieces.
Troubleshooting
Some common issues that can arise when handbuilding pottery include cracking, distortion, blistering, exploding, and more. It’s important to understand why these problems occur so you can avoid them in the future.
Cracking often happens when clay dries too quickly or unevenly. To prevent cracking, keep your clay work covered with plastic when not working on it so it dries slowly. Also, make sure walls and bases are even thickness. If a piece does crack slightly during building or drying, early cracks can be repaired by scratching slip into the crack and smoothing over gently with a rib.1
Blistering and bubbling on the surface can be caused by trapped air or moisture. Knead your clay thoroughly and use a rib to smooth surfaces. If blisters form during firing, the kiln temperature may have risen too quickly.2
Explosions happen when trapped air or moisture causes a rapid expansion of the clay during firing. Let pieces dry thoroughly before firing, and fire slowly, increasing heat gradually. Poke holes in the clay while building to allow steam to escape.2

