Can I Teach Myself Pottery At Home?
Pottery has been a popular craft and art form for thousands of years, with evidence of pottery making dating back over 20,000 years. While pottery was essential for tasks like cooking and storage in ancient times, today many people take up pottery primarily as a relaxing, engaging hobby and creative outlet. The process of handcrafting clay into functional works of art can provide a sense of satisfaction, achievement, and connection to ancient craftspeople. Learning pottery allows you to develop artistic skills and create one-of-a-kind pieces to keep or give as gifts. With some dedication and practice, it’s entirely possible to teach yourself pottery techniques at home without taking formal classes. This guide covers everything you need to know to get started with pottery as a hobby and artistic endeavor from the comfort of your own home.
Benefits of Learning Pottery at Home
Taking up pottery as a hobby at home offers many benefits. According to https://mummyfique.com/five-health-benefits-of-pottery-making/, pottery provides a creative outlet to express yourself through art. The tactile process of working with clay is intrinsically rewarding and relaxing. Successfully creating pieces you envision can provide a tremendous sense of accomplishment. Pottery requires focus and patience, which helps quiet mental chatter and reduce stress levels. The repetitive motions involved are meditative, inducing a calm, relaxed state. Having a creative pastime at home enables you to take a break from everyday worries and immerse yourself in an enjoyable activity at your own pace.
Essential Supplies and Equipment
When starting pottery at home, there are some basic supplies and equipment you’ll need to get set up. The essentials include:
Pottery Wheel
A pottery wheel allows you to throw and form clay pieces with symmetry and uniformity. Look for an electric wheel with variable speed control for beginners. Make sure it’s sturdy and heavy enough not to wobble or shift while throwing. Prices range from $200 for basic models up to $600+ for professional-grade wheels.
Some good starter wheel options are the Speedball Artista or Brent Model B.
Kiln
You’ll need a kiln to fire clay pieces at high temperatures to harden and finish them. Electric kilns designed for home use start around $300. Look for a small to medium sized top-loading kiln that reaches at least cone 6 (2232°F) temperatures.
Good beginner options are the JenKen Raku-Deluxe or the Skutt KM Series.
Clay
Pottery clay comes in natural earthenware, stoneware, and porcelain varieties. For starting out, a moist mid-range stoneware clay is a good all-purpose option. Avoid specialty or extremely smooth/sticky clays until you gain more experience.
Some quality starter clays are Standard Clay and Laguna Speckled Buff.
Tools
Basic hand tools like ribs, wire loops, sponges, trimming tools, and sculpting knives will help shape, smooth, trim, carve, and detail your clay pieces. A basic tool set can be purchased affordably online or at most ceramic supply stores.
Glazes
Glazes are applied before firing to color and finish the surface of pottery. Starter glaze kits provide a variety of basic colors to experiment with. Be sure to get lead-free glazes rated for the type of clay and firing temperature you plan to use.
Good beginner glaze options are Mayco Cone 5/6 and Amaco Celadon.
Finding the Right Clay
Choosing the right type of clay is a critical first step when learning pottery at home. The three main types of clay are earthenware, stoneware and porcelain. Each has different properties that affect the finished results.
Earthenware is a soft, porous clay that can be easily shaped by hand. It fires at lower temperatures but results in more fragile pieces. Earthenware is a good choice for beginners, as it is the most forgiving to work with.
Stoneware is denser and less porous than earthenware. It fires at higher temperatures and produces sturdier, more durable pottery. The finished pieces have a finer surface and can hold water. Stoneware is useful for functional pieces like mugs, bowls, and vases.
Porcelain is the most refined clay. It fires at very high temperatures and produces delicate, translucent pieces. However, it can be more challenging for home potters to work with. Porcelain is ideal for sculpture and decorative items.
When starting out, aim for an earthenware or stoneware clay body formulated for handbuilding and wheel throwing. Craft stores sell smaller amounts you can try. For larger quantities, look for suppliers of pottery clay in your area or order online. Buy pre-mixed clay to avoid having to blend and wedge the clay yourself.
Important Techniques to Learn
There are several fundamental techniques to focus on when learning pottery at home. Mastering these will allow you to create a wide variety of pieces.
Centering
Centering is the process of making sure clay mounted on the pottery wheel is perfectly centered before beginning to shape it. This involves applying even pressure with both hands while the wheel spins until the clay is centered and balanced (Learn Some Basic Pottery Techniques). Centering takes practice but is essential for throwing pots symmetrically.
Throwing
Once centered, throwing is the technique of using your hands to pull the clay up into shapes while the wheel spins. Throwing allows you to make round pieces like bowls, vases, and cylinders. It requires coordination and a feel for the clay that develops over time.
Trimming
Trimming involves using specialized tools to refine the shape and create clean edges on thrown pieces once they have dried to a leather hard state. Trimming requires patience and attention to detail but gives pieces a polished, professional look.
Glazing
Glazes are essential for finishing and decorating pottery. They come in endless colors and textures. Learning proper glazing techniques like dipping, pouring, and spraying will allow you to create stunning visual effects. Mastering glaze chemistry takes time but is immensely rewarding.
Creating a Home Studio
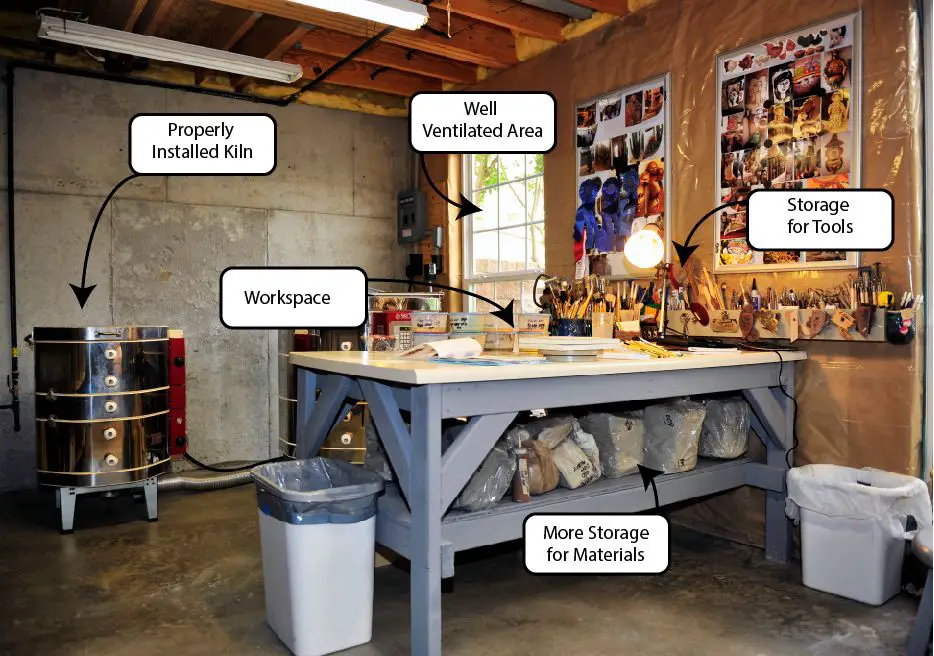
Setting up a pottery studio at home requires some planning and preparation. The main components you’ll need are adequate space, proper ventilation, storage solutions, and the right equipment like a pottery wheel and tools.

Make sure to allocate enough room for a pottery wheel, workspace for handbuilding, and storage for clay, finished pieces, tools, glazes, etc. Many basement areas, garages, spare bedrooms, or even a large walk-in closet can work.
Proper ventilation is critical when working with clay dust and fumes. Open windows, fans, and even installing vents can help circulate fresh air. You may also consider wearing a respirator while working.
Storage can utilize shelves, bins, and cabinets for organizing supplies. Dedicated clay storage helps regulate moisture levels. A slab roller, extruder, or other tools can be set up as needed.
Setting up the wheel is important – make sure it’s level and anchored. Position it near an electrical outlet and drainage, like a utility sink. Protect the floor from water and clay stain.
For more on designing a home studio see this guide and video.
Firing and Glazing at Home
Firing pottery is an essential step to harden and complete your creations. While having your own kiln at home would be ideal, there are other effective options for firing without a kiln that can produce successful results.
Some methods for firing pottery at home without a kiln include:
- Pit firing – Burying pottery in a pit with flammable materials and firing to high temperatures from above.
- Raku firing – A fast firing process originating in Japan that involves taking red-hot pottery from the kiln and placing it into containers with combustible materials to create unique effects.
- Using a grill – Carefully firing pottery on a gas or charcoal grill by controlling the temperature and using aluminum foil tenting for protection.
For any firing method without a kiln, the key steps involve slowly increasing the temperature, holding at max temperature, then cooling gradually to avoid cracks and breakage. Using protective materials like sand or foil can help shield pottery from direct flames during amateur firings. Monitor temperatures carefully with pyrometers and aim for around 1,800-2,200°F for stoneware clays.
Glazing is another important finishing technique to make pottery non-porous, shiny, and colorful. At home without a kiln, simple ceramic glazes can be applied with brushes or dips after bisque firing pottery. Allow thorough drying before a second firing to melt and adhere the glaze. Food-safe glazes are recommended for functional ware. Raku firing involves glazing after removal from the kiln when the pottery is red hot for unique effects.
With the right techniques, firing and glazing pottery at home without a kiln can produce beautiful results. Just be sure to follow safety precautions and experiment in small batches as you learn. Helpful resources include: https://www.kilncrafts.co.uk/blogs/news/fire-pottery-without-a-kiln
Online Resources for Self-Teaching
Thanks to the internet, there are numerous online resources available to help teach yourself pottery from home. Popular options include:
YouTube channels like Halette Atelier, Hsinchuen Lin, and Ceramics Art Network offer a wealth of free video tutorials on foundational pottery techniques, using the wheel, handbuilding, decorating, glazing, and more.
Websites like Ceramic Arts Network and Ceramic Arts Daily provide a huge library of articles, how-to guides, and downloadable eBooks to teach yourself key skills.
Online pottery classes through platforms like Cursist, Craftsy, Skillshare, and Udemy allow you to learn from experts at your own pace.
Books like Mastering the Potter’s Wheel by Ben Carter, Handbuilding Ceramics by Miranda Forrest, and The Potter’s Complete Studio Handbook by Jeff Zamek are excellent references.
Joining a Local Class or Studio
While learning pottery at home can be very rewarding, taking a class at a local studio or with an instructor provides additional benefits. Learning alongside others allows you to gain hands-on guidance from experienced potters, get feedback on your techniques, and connect with a creative community. Classes are structured to teach core skills and essential techniques in a progressive sequence (source). Having an instructor available for questions and troubleshooting can accelerate your learning. Studios also provide access to high quality equipment like pottery wheels and kilns that can be expensive to invest in as a beginner. Look for beginner-friendly community studios or continuing education classes through local colleges, arts centers, or recreation departments to get started. Online marketplaces like ClassBento also offer a wide range of live online pottery classes taught by instructors.
Be Patient and Have Fun!
Pottery is a skill that takes a lot of practice and patience to master. The most important thing is to focus on enjoyment of the process rather than perfection right away. As a beginner potter working from home, have realistic expectations for yourself. Very few people are able to make expert-level pieces after only a few months of practice.
Remember that pottery making is a very tactile artform. The feeling of clay in your hands and the ability to shape it into beautiful, functional items is rewarding on its own. Don’t get discouraged if your early attempts don’t turn out like you envisioned. Over time and with regular practice, your skills at centering, shaping, decorating, and glazing will improve dramatically. Enjoy the ride and have fun making each new piece!
Focus on the sense of accomplishment from completing a piece from start to finish. Don’t worry about flaws or mistakes – you can always rework the clay and start again. Embrace creativity and experiment with different techniques. The joy of pottery comes from the process so make sure you stop to appreciate each step along the way. With patience and persistence, you’ll be amazed at the skills you can teach yourself and the lovely ceramic pieces you’ll create.


