Can You Make A Wooden Stamp?
A wooden stamp is a carved design made out of wood that can be used to imprint designs onto various surfaces. The process of making a wooden stamp involves selecting and preparing the wood, transferring a design, carving out the design, sanding and smoothing the stamp, applying a finish, mounting it, and inking and using it.
The main steps in creating a wooden stamp are:
- Choosing the right type of wood, such as basswood or pine.
- Transferring a design onto the wood using methods like tracing paper or carbon paper.
- Carving out the design using chisels, knives, or other carving tools.
- Smoothing and sanding the carved stamp.
- Applying a finish like oil, varnish or paint.
- Mounting the finished stamp onto a handle or base.
- Inking the stamp and pressing it onto paper or fabric to imprint the design.
With some basic tools and materials, it is possible to make customized wooden stamps at home to create handmade cards, gift wraps, wall art, scrapbook pages, and more.
Tools Needed
Making wooden stamps requires just a few essential wood carving tools. According to Best Wood Carving Tools for Beginners, the basic tools for beginners are chisels, sandpaper, a carving knife, and a mallet.
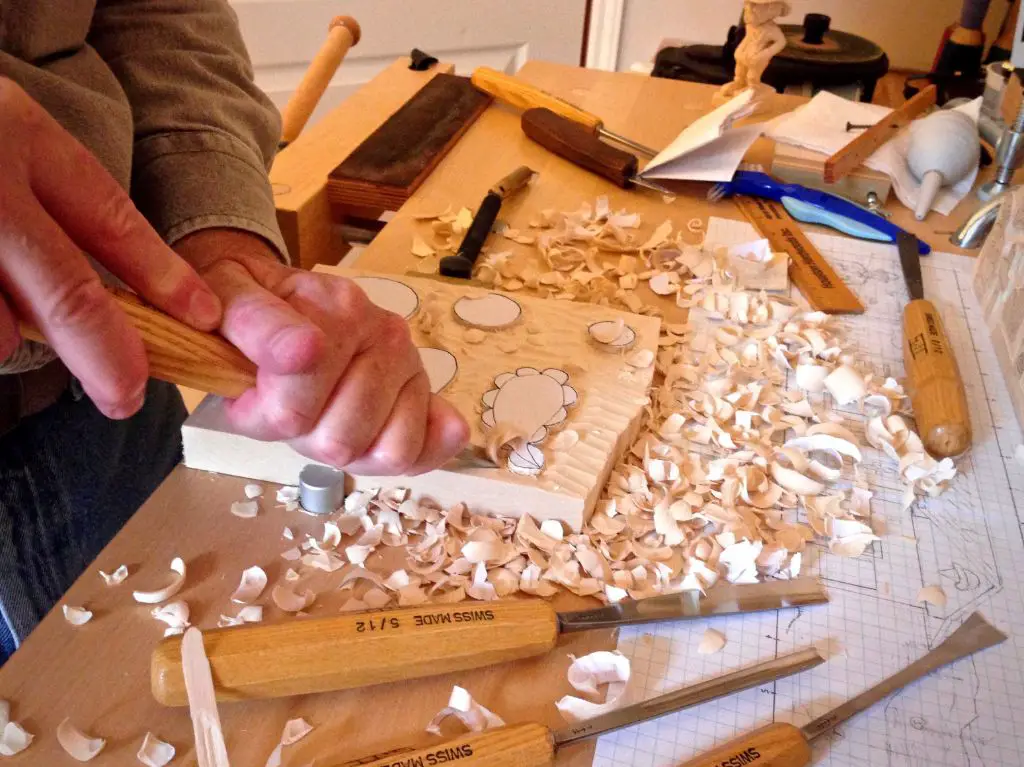
Chisels come in different shapes and sizes and are used to remove wood and carve out details. Beginners should start with just a few basic chisels like a 1/2″ straight chisel. As skills improve, more specialized chisels can be added.
Sandpaper is essential for smoothing and finishing the carved stamp. Start with a coarse grit like 80 for removing material, then switch to finer 120 and 220 grits for smoothing. Finish with 400 grit for polishing.
A sharp carving knife is key for detailing work. Look for a knife with a thin, curved blade. Use the knife to define edges and cut fine details into the stamp design.
Mallets help drive chisels and gouges into the wood. Choose a wooden mallet sized for comfort and control. Softer mallets will not damage chisel handles.
Selecting Wood
When choosing wood for handcarved stamps, you’ll want to select a hardwood rather than a softwood. Hardwoods like maple, cherry, walnut, oak, and birch are denser and will hold finer details better. Softwoods like pine are more prone to splintering when carved.
Pay attention to the grain direction of the wood. For the stamp design to show up clearly, you’ll want wood with a tight, straight grain running parallel to the carving surface. Wood with wild, swirling grains will make it harder to cleanly carve fine lines and details.
The moisture content of the wood is also important. Wood that is freshly cut or still wet will shrink and crack as it dries out. Let wood blanks dry out and acclimate to your indoor humidity levels before carving so the finished stamps remain stable.
Transferring the Design
There are a few common techniques for transferring a design onto the wood before carving a stamp:
Using carbon paper – Place the carbon paper between your design and the wood block. Use a stylus to trace the lines, transferring the image onto the wood. The carbon paper leaves behind a light mark that you can then carve over. This is a simple method but can result in weak line transfer if you don’t apply enough pressure.
Direct drawing – You can draw the image directly onto the wood block using a pencil. Make sure to use light, even lines and include any important details. Too dark of lines may show through even after carving. Alternatively, use a water soluble marker that will wash off when complete. Direct drawing allows precision but requires artistic skill.
Using a template – For intricate designs, make a template out of thin plastic or cardstock that you can trace onto the wood. Cut out any open areas in the design so you can hold the template flush to the block while tracing. Templates are reusable and allow for consistency across multiple wood stamp blocks. You’ll need access to a cutting tool like an x-acto knife to create the template. [1]
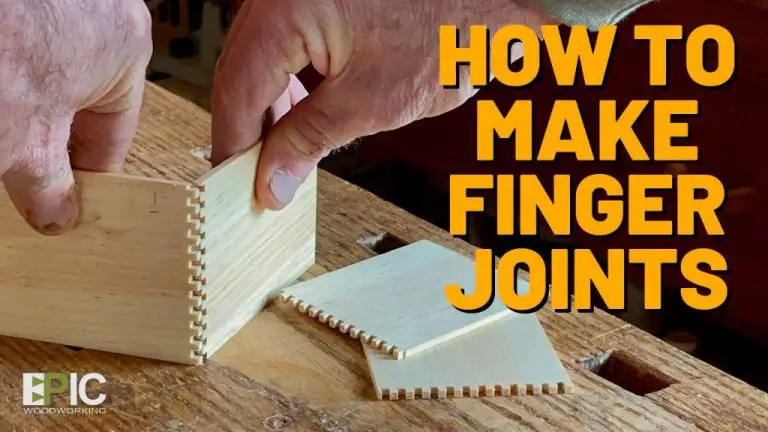
Carving the Stamp
Once the design is transferred, it’s time to start carving out the stamp. This involves removing the wood around the design to create the raised stamp image. There are a few key techniques to keep in mind during the carving process:
Roughing out the design – Start by using larger gouges and chisels to remove the bulk of the excess wood around the design. Take off thin slices of wood working from the outer edges in towards the design.[1]
Using chisels and carving knives – Switch to smaller tools like v-tools, u-gouges, and curved knives to refine the design shape. Make clean cuts following the flow of the grain.[2]
Following the grain – Always slice or pare the wood by cutting in the same direction as the grain. Never cut across the grain as this can cause splintering.[3]
Take your time removing wood little by little. Don’t try to remove too much at once. Work methodically around the design until the stamp image stands out in relief.
Sanding and Smoothing
Sanding is an important step for smoothing out the carved surface of the wood stamp. Using gradually finer grit sandpaper helps remove larger scratches before polishing the surface.
Start with a coarse grit sandpaper like 80 or 100 to aggressively smooth out tool marks and deeper carvings. Then progressively use finer grits like 150, 220, and 320 to refine the surface. The final sanding can be done with 400 or 600 grit paper.
Be sure to round and soften any sharp edges on the stamp by carefully sanding those areas. This helps prevent the stamp from leaving impressions with hard edges. Sand lightly across the edges until they have a smooth, rounded profile.
Always sand in the direction of the wood grain to achieve the best results. Sanding against the grain can create tiny scratches that cause splintering.
Take your time with sanding to remove all visible tool marks and create a perfectly smooth finish. Proper sanding and polishing is essential for creating a quality hand-carved stamp that will print cleanly and last for many impressions.
Applying a Finish
The finish for a wood stamp serves two important purposes: protecting the stamp and bringing out the natural beauty of the wood. There are several options for finishing wood stamps:
According to woodcarving enthusiasts on Reddit, varnish like polyurethane is a good option for sealing and protecting wood stamps. Multiple coats of varnish will protect the stamp from wear and provide a smooth, consistent stamping surface.
Another popular choice is lacquer. As shared by a printmaking Redditor, multiple coats of brush-on lacquer (around 15 coats) sanded to a high grit will yield excellent protection and a beautiful finish.
Oils like tung or linseed can also be used to finish wood stamps. Oils penetrate the wood grain to protect the stamp and bring out the natural color and pattern of the wood. Multiple thin coats are recommended for the best result.
Beeswax and carnauba wax can provide a smooth, protective finish for wood stamps. The wax coats the pores of the wood and gives the stamp’s surface a velvety feel.
No matter the finish, proper preparation (sanding to a high grit) and adequate dry time between coats is essential. With the right finish, a wood stamp will be protected, sealed, and ready for stamping.
Mounting the Stamp
After the stamp is carved and finished, it needs to be mounted to a base so it can be easily handled and inked. The simplest option is to glue the stamp directly to a piece of wood, acrylic, or other rigid material using craft glue or epoxy. Be sure the base is larger than the stamp so you have plenty of surface to hold on to. Apply a layer of glue to the back of the stamp and press it firmly onto the center of the base. Allow the glue to dry completely before using the stamp.
For a more finished look, you can attach a handle to the base. A decorative drawer or cabinet pull [1] makes an attractive handle option that gives you something easy to grip when inking and stamping. Use wood glue or epoxy to adhere the handle securely to the center back of the base. Position the handle so it aligns with the middle of the stamp design. Let the glue fully cure before pulling on the handle or using your new stamp.
Inking and Using Your Wood Stamp
Properly inking your wood stamp is important for getting a clean, crisp imprint. Select an ink pad suited for the surface you’ll be stamping – water-based ink for porous surfaces like paper, and oil-based ink for nonporous surfaces like glass or metal. Avoid over-inking, as too much ink can result in blurry edges and bleeding.
To get the best imprint, apply firm even pressure straight down on the stamp as you press it against the surface. Don’t rock or twist the stamp. Lift straight up; twisting can distort the image. Always re-ink between each impression for consistent results. Check your printed image and re-ink as needed to maintain good coverage.
Test your image on scrap materials first until you get the technique right. The results can depend on factors like the stamp design, wood hardness, surface texture, and ink selection. Be prepared to experiment a bit at first to perfect your inking and stamping process.
Caring for Wood Stamps
Properly caring for your wood stamps will help them last longer and perform better over time. Two key aspects of stamp care are cleaning and storage.
For cleaning wood stamps, it’s best to use a specialized stamp cleaner designed for the type of ink you are using, whether dye-based or pigment-based. Lightly moisten a lint-free cloth with the cleaner and gently wipe the stamp surface to remove excess ink buildup. Avoid using too much moisture, as wood can warp if soaked. You can also use a dry cleaning pad or brush to brush debris off the stamp. Let the stamp dry fully before storing. According to Simply Stamps, you should clean wood stamps after each use for best results.
For storage, keep wood stamps in a cool, dry place away from direct sunlight. Storing stamps mounted on blocks helps maintain their shape. You can store the stamps in shallow open trays or boxes, using a foam pad or rice to cushion the stamps and prevent jostling. Avoid stacking stamps directly on top of each other. Keeping stamps properly stored while not in use will help maximize their lifespan.