Can You Texture Drywall With A Roller?
Texturing drywall is the process of applying a textured finish to drywall surfaces to create a decorative look. Common texturing techniques include knockdown, orange peel, popcorn, and skip trowel finishes. These textures help hide imperfections in drywall and create visual interest on walls and ceilings.
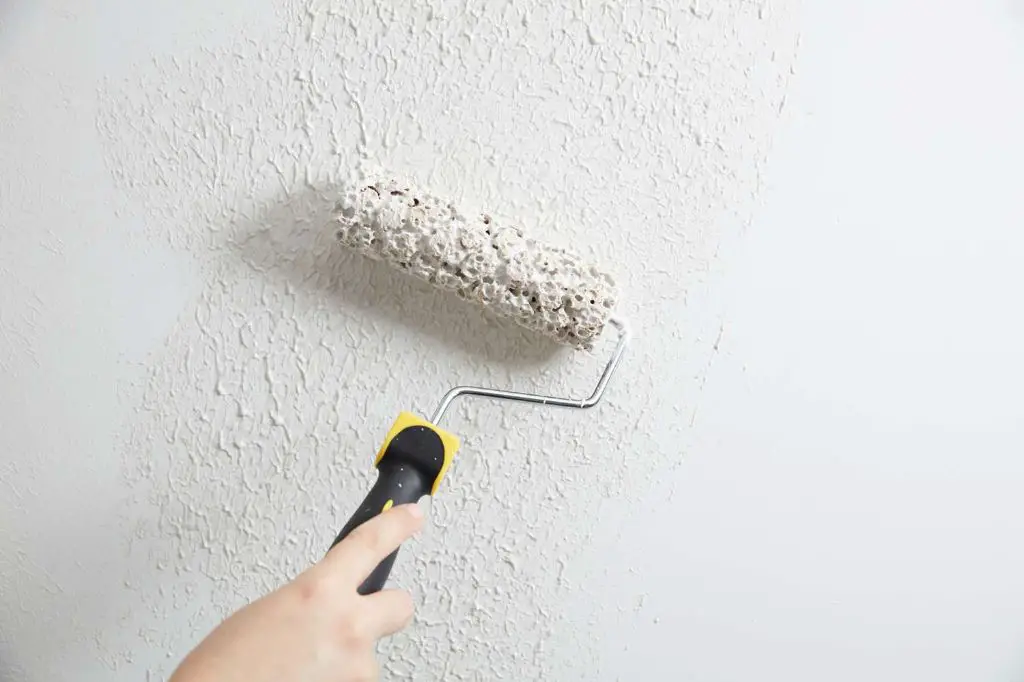
While texturing products are traditionally applied with a trowel or spray gun, it is possible to create textures on drywall using a standard paint roller. The main advantage of using a roller is that it allows DIYers to achieve textured finishes without investing in special tools. A roller can mimic knockdown and orange peel textures fairly well. However, heavily stippled textures like popcorn are difficult to recreate with a roller.
This article provides an overview of how to prepare drywall, choose supplies, and use a paint roller to apply high-quality textures to drywall. With some practice and technique, impressive textured finishes can be achieved with simple painting tools.
Pros of Using a Roller
Using a roller to apply texture to drywall offers several advantages over spraying texture:

Rollers provide more control than spray texture. You can achieve a uniform look by applying even coats and avoid over-texturing areas. With a sprayer, it’s easier to apply too much texture accidentally.
Applying texture with a roller is also less messy than spraying. There’s less overspray and drips to clean up afterwards when using a roller. You can contain the mess to just the walls you’re texturing.
In addition, cleanup is easier with a roller. Simply rinse out the roller covers and tray when done rather than having to clean a spray gun and hose. Rollers are also reusable for future projects.
Finally, rollers allow you to cover large wall areas quickly. You can apply texture compound efficiently across an entire wall without having to stop to refill a sprayer tank.
Cons of Using a Roller
While using a roller to apply texture to drywall offers some advantages, there are also some downsides to consider:
It takes practice and experimentation to achieve the desired texture (source). Unlike spraying texture, rolling it on involves some trial and error to get the look you want. It may take a few tries before you perfect the technique.
Textures applied with a roller often won’t match sprayed textures (source). If you need to patch a section of wall, the texture from a roller will likely appear different than the surrounding sprayed texture. This can make the repair obvious.
Only a limited range of textures can be achieved with a roller (source). Techniques like knockdown and orange peel are difficult to replicate with a standard paint roller. The textures tend to turn out thicker and less uniform than sprayed textures.
Preparing the Drywall
Before texturing drywall with a roller, it’s important to ensure the drywall is properly installed and prepped. According to this guide, drywall should be hung horizontally with staggered vertical seams. All seams and screw holes should be covered with joint compound and allowed to fully dry. Sand any remaining ridges until smooth. Using a sanding sponge can help sand difficult corners and angles.
Once the drywall is smooth, prime all surfaces before applying texture. Priming will allow the texture to adhere properly. Be sure to use a high quality primer designed for drywall. Apply two coats of primer and let fully dry before moving onto the texturing step.
Choosing a Roller
When choosing a roller for drywall texturing, opt for one with a thicker nap, usually 1/2″-3/4″, to create more pronounced textures. The nap refers to the fuzzy surface of the roller. A thicker nap holds more texture compound, allowing you to create deeper textures.
Consider the size of the area you’ll be texturing. For larger walls and ceilings, choose a wider roller, such as 9″ or 18″ to cover more surface area efficiently. For smaller areas or detail work, use a narrower 4″ roller.
You can use a high-quality reusable roller, but disposable rollers are a good option for texturing since the texture material can be difficult to fully clean off a roller. Disposable rollers also avoid transferring any dried bits of texture compound back to the wall (source).
Choosing a Texture Compound
When choosing a texture compound to apply with a roller, you’ll need to decide between premixed and powder options. Premixed compounds offer convenience but have a shorter shelf life. Powder compounds require mixing with water but may be more cost effective for larger jobs. The texture consistency you need will also determine whether you need a fine or coarse aggregate compound. Fine aggregates like sand create a smooth finish, while coarse aggregates like perlite give more texture. If matching existing textures, pay close attention to the aggregate size and compound thickness used originally.
According to Amazon, premixed compounds like Homax ceiling texture are convenient for small drywall texture projects. For matching knockdown textures, a coarse drywall mud containing perlite aggregate can create the desired finish when applied with a texture roller. Always do a test patch first when matching existing texture styles.
Applying the Texture
When applying a textured roller finish, it’s important to load the roller evenly, keep a wet edge, and work in small sections for best results.
Start by pouring some of the premixed texture compound into a paint tray. Load the roller by rolling it back and forth in the tray until the texture material is distributed evenly over the entire surface of the roller. You want a moderate amount of texture on the roller – not too thick and not too thin.
Apply the texture to the wall using overlapping “M” or “W” strokes. Maintain a wet edge by keeping a wet line of texture as you work. If the texture starts to dry within a section, it could create an unwanted lap mark. Working in smaller 3-4 feet sections helps prevent lap marks and allows you to fully cover an area before moving on.
Roll the texture on with light to medium pressure. Pressing too hard can flatten the texture, while rolling too lightly may not fully adhere it. Find the right amount of pressure to evenly transfer the material without altering the texture.1
Maintain a consistent motion and overlap each stroke to achieve an even look. If any sections look uneven after drying, you can apply a bit more texture to blend it.
Achieving Different Textures
You can achieve a variety of textures by varying the nap thickness of the roller and the type of texture compound used. Thicker naps and heavier compounds will produce deeper, more pronounced textures. To create knockdown or orange peel textures, use a roller with a 1/2″ or thicker nap. For a finer texture, choose a roller with a 1/4″ or thinner nap.
Overlap your strokes as you roll and work in different directions. Rolling in just one direction can create noticeable streaks. Working in an X, V, or N shape and feathering the edges where strokes meet will help blend the texture. Apply even pressure as you roll to maintain a consistent depth. Go over the area several times, allowing the texture to partially dry between coats.
For a very smooth texture, dilute the compound slightly with water and use a thin 3/8″ nap roller. Apply multiple light coats rather than one heavy coat, feathering each coat to merge smoothly into the last.
Experiment on test boards first when aiming for a particular finish. The precise nap thickness, compound type, application technique, and number of coats will take some trial and error to perfect. But with a little practice, you can achieve a wide array of textures matching your vision using just a roller.
Source: https://www.thespruce.com/hide-flaws-with-stipple-texture-4121027
Protecting Surfaces
If you’re only texturing one room at a time, it’s important to protect any surfaces that aren’t being textured. This will ensure a neat finish and prevent damage to other areas.
Before starting, cover the floors with drop cloths, plastic sheeting, or heavy paper 1. Cover as much floor area as possible, extending the covering out past the walls. Any texture compound that drips or splatters can then be easily cleaned up afterwards.
Mask off baseboards, crown molding, electrical outlets, light switches and any adjascent walls using painter’s tape. Apply the tape neatly and press down firmly. This will protect these surfaces from getting texture on them that is difficult to clean off.
For doors and windows, tape plastic sheeting over the entire unit. Make sure the plastic is secured well around all the edges. This will protect the window glass and any door hardware from getting splattered with texture material.
Taking the time to properly cover and mask everything will make the texturing process cleaner and easier. It will also prevent having to spend a lot of time later trying to clean texture compound off surfaces that shouldn’t have any.
Conclusion
In summary, using a roller to texture drywall has both advantages and disadvantages. On the plus side, rollers allow you to easily achieve a uniform texture across large surface areas. They are also inexpensive and reusable compared to other texturing tools. However, rollers may not create as dramatic or varied textures as specialized tools like trowels or sprayers. They also require diligent prep work to protect surfaces and achieve the desired finish.
For simple, subtle textures like knockdown or orange peel, a roller can deliver great results efficiently. But for more pronounced textures like heavy splatter or skip trowel, you may get better outcomes using a texturing trowel or hopper gun. Ultimately, the type of texture and your experience level should determine whether a roller is the right tool for the job. With proper prep and technique, rollers can add beautiful interest to walls and ceilings.


