Clay Modeling For Beginners: Getting Creative
Clay modeling is a fun and creative hobby that allows you to make 3D sculptures and figures using clay. Working with clay offers a number of benefits as a hobby. It provides an outlet for creativity and self-expression. The feel of the clay in your hands can also be relaxing and therapeutic. Studies show creative hobbies like sculpting with clay can reduce stress, improve mental health, and strengthen neural connections in the brain (source). Clay modeling requires minimal supplies to get started. With just some clay, basic sculpting tools, and an oven or kiln for firing pieces, you can begin making your own clay creations. This hobby allows you to start small and simple, then build your skills over time. Overall, clay modeling is an accessible and rewarding creative pursuit that engages your imagination and lets you bring your artistic visions to life in 3D form.
Types of Clay
There are several main types of clay used for modeling and sculpting. The most common types include:
Polymer Clay – Made from PVC, polymer clays like Sculpey and Fimo are very popular for modeling. They are oil-based, do not require firing, and cure at low temperatures in the oven. Polymer clays come in a wide range of colors and are easy to condition and bake. They are versatile for sculpting detailed objects. (Source: https://www.hndmd.com/articles/what-are-different-types-of-modeling-clay/)
Air-Dry Clay – Made from natural materials like cellulose or paper, air-dry clays dry and cure at room temperature. They are water-based, easy to work with, and do not require baking. Popular brands like Crayola Model Magic are lightweight and ideal for decorative objects. Air-dry clays are affordable but delicate. (Source: https://www.sculptureatelier.com/blog/what-clay-should-i-use-to-start-sculpting)
Porcelain – Made from kaolin clay, porcelain is very pure, fine, and smooth. It fires to a strong, durable ceramic at high temperatures. Porcelain is commonly used for pottery and sculpture. It has excellent sculpting properties but requires more skill to work with than polymer or air-dry clays.
Basic Tools
Some of the most essential tools for working with clay include:
- Sculpting knives – These are used for cutting, scraping and smoothing the clay. Sculpting knives come in various shapes and sizes, with different types of blades for different purposes (https://www.amazon.com/clay-sculpting-tools/s?k=clay+sculpting+tools).
- Loop tools – These have looped wire ends and are used to smooth curves and refine details in the clay (https://fireflyart.supplies/blogs/news/10-must-have-tools-for-molding-clay).
- Sponges – Damp sponges can be used to blend and smooth areas of the clay model.
- Rolling pin – Used to roll out slabs of even thickness when handbuilding with clay.
- Cutting wire – Sturdy wire for cutting slabs of clay.
- Ribs and shapers – These tools have blunt edges and are used for smoothing clay without removing material.
Having a variety of basic sculpting tools on hand gives you more options for working the clay and achieving different effects and textures.
Shaping Techniques
There are three main techniques used for shaping clay: pinch, coil, and slab. Each technique has its own advantages and is better suited for certain projects over others.
The pinch technique involves squeezing and pinching the clay with your fingers and hands to form basic shapes. It allows you to make freeform, organic shapes and is great for making bowls, cups, pots, and sculptural forms. Pinching is intuitive and direct but can be tricky for larger projects.
Coiling involves rolling out long snakes of clay and stacking or joining them together to build up height. This technique is perfect for making vases, jars, and cylindrical shapes. Coils can easily be smoothed together to hide the seams. Coiling enables excellent control over the final form.
The slab technique requires rolling out flat, even sheets of clay and cutting shapes to assemble into a sculpture. This is useful for making flat surfaces like tiles or plaques. Slabs allow precision and uniform thickness. For complex shapes, templates can be used. Slab construction is also strong and stable.
Knowing when to use each technique comes with practice. Simple bowls and cups are often pinched or coiled. For more angular and geometric forms, slabs may work better. Large or tall vessels are easier built with coils versus pinch or slab. Consider the final form and level of detail needed when deciding on a shaping method.
Source: https://www.domestika.org/en/blog/11125-8-must-know-clay-modeling-techniques
Texturing Methods
There are many techniques for adding texture to clay sculptures and pottery. Some common texturing methods include:
Impressing – Using tools or objects to press patterns into the surface of the clay. Bottle caps, lace, coins, and textured rolling pins are examples of items that can create imprinted textures.
Carving – Using metal loop tools, skewers or knives to scratch, etch, or cut away areas of the clay’s surface. This creates lines, grooves and patterns for visual interest. Carving can be done on leather-hard or bisque fired clay.
Adding clay slip – Applying liquid clay slip onto the surface with a brush or sponge can create color variations and textured effects as it dries. The slip will shrink slightly differently than the underlying clay body.
Stamps and stencils – Pressing clay stamps into the surface leaves patterned imprints. Clay stencils allow creating repetitive designs by spraying slip through the openings. Prefabricated texture mats are also available.
Some other options are attaching textured materials like lace, pressing in textured sheets, or impressing rubber stamps. The possibilities for achieving unique clay textures are endless.
Baking and Firing
Properly baking or firing clay is an essential step in the clay modeling process. Firing refers to heating the clay at high temperatures which causes chemical changes that permanently harden and strengthen the clay. There are generally three stages of firing clay: bisque firing, glazing, and the final glaze firing.
Bisque firing is the first time the clay is fired in a kiln. It slowly heats the clay to around 1000-1100°F which evaporates any water remaining in the clay and makes it easier to handle and apply surface decorations. Bisque firing by itself will not make the clay watertight. The clay must later go through a glaze firing to become impervious to liquids.
Glazes are special glass-like coatings that are applied to the bisque fired clay before the final firing. The glaze melts during the hotter glaze firing, creating a glossy surface that makes the clay non-porous and water-resistant. Glaze firing takes place around 2000°F depending on the type of clay and glaze used. Different clays undergo changes at varying temperatures so it’s important to follow the recommended firing schedule.
There are safety considerations when dealing with the high temperatures needed for firing clay. Kilns should be operated in a well-ventilated area since firing produces gases. It’s also essential to allow sufficient cooling time and wear protective gear when unloading finished pieces from a hot kiln.
Painting and Finishing
After the clay has been baked or fired, many sculptors like to paint and finish their pieces to add color and extra visual interest. There are a few main types of paint that work well on polymer and ceramic clays:
Acrylic paint – Acrylics are a versatile paint that come in a wide range of colors. They can be thinned with water and cleaned up with soap and water. Acrylics work well on cured polymer clays. [1]
Oil-based enamels – These paints are durable, high-gloss, and provide excellent coverage. They work well on porcelain and fired ceramic clays. Enamels require mineral spirits for thinning and clean up.
Modeling paints – Specialty modeling paints are made specifically for painting cured polymer clays. They have good adhesion and come in many bright, rich colors.
Glazes – Ceramic glazes provide a glass-like translucent finish when fired in a kiln. They come in liquid and powder form. Glazes allow the natural clay color to show through while adding new effects.
Clear finishes like varnishes, polishes, and waxes can be used to seal and protect painted polymer clay sculptures. A final coating gives the surface a uniform gloss and prevents chipping or fading over time. Waxes add a soft luster.
Basic painting techniques involve using soft brushes to apply thin layers of paint evenly over the surface. Allowing proper drying time between coats prevents running or muddiness. More advanced techniques include washes, dry brushing, sponging, stippling, blending, texturing, and distressing to achieve unique effects.
With the right clay, paints, and finishing techniques, beginners can create beautiful, vibrant sculptural pieces.
[1] “The BEST Painting Techniques for Polymer Clay Sculptures! + …” https://www.youtube.com/watch?v=htPnztqKG_U
Beginner Project Ideas
Here are some fun and easy clay projects for beginners to get you started:
Miniature Animals
Sculpt cute little animals like dogs, cats, bunnies, turtles, etc. Keep the shapes simple and add basic details like eyes and ears. Let the clay air dry or bake according to package directions. Paint with acrylics and seal with varnish. (Source)
Food Charms
Make tiny food charms like cupcakes, doughnuts, pizza slices, etc. Use cookie cutters or hand shape the clay. Add fun details like sprinkles or chocolate chips, then bake and paint. Turn into jewelry or ornaments. (Source)
Thumbprint Magnets
Press your thumb into soft clay to make a thumbprint. Write your name using a toothpick or clay tool. Bake, then glue on a magnet back. Make them as gifts for friends and family.
Initial Pendants
Roll out a slab of clay and use letter cutters to cut out your initial. Use an eye pin to turn into a pendant, baking and painting as desired. String on cord to make a monogram necklace.
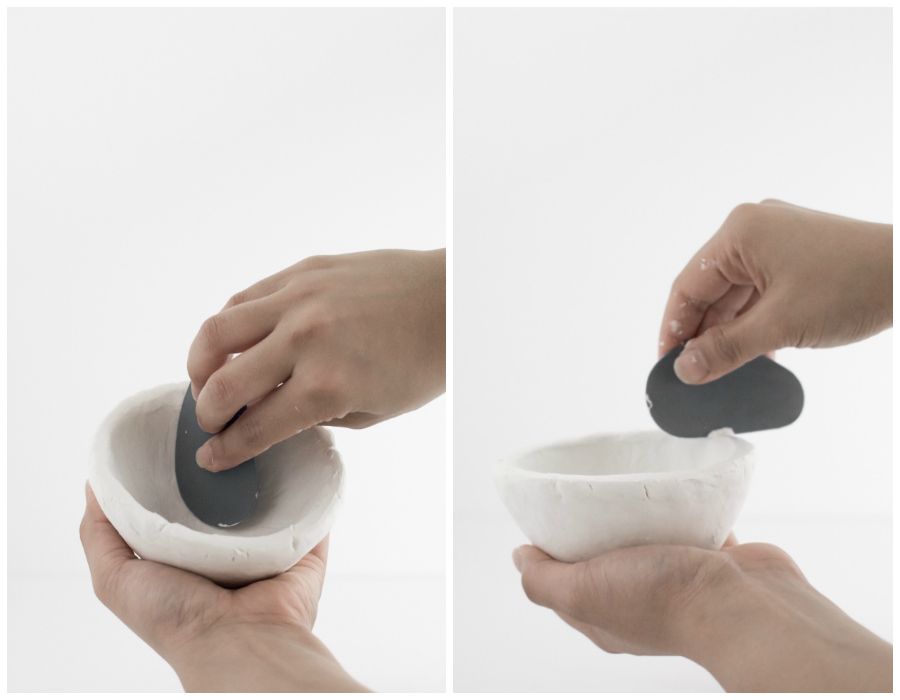
Mini Bowls
Hand shape or press clay into a small bowl or dishes. Add details like lines, dots, or other textures. Bake and paint in vibrant colors. Use for trinkets, jewelry, or to hold office supplies.
Advanced Techniques
Once you feel comfortable with the basics of clay modeling, there are many more advanced techniques to explore. Some techniques to try as you advance include:
Using armatures – Building an armature or framework underneath the clay can allow for larger, more intricate sculptures. The armature provides structural support so clay limbs and appendages don’t droop or fall off.
Modeling from life – Sculpting a live model or still life set up is excellent practice for developing observation skills and learning to accurately portray 3D forms. Having a subject to observe helps train the eye to see and recreate subtle contours and proportions.
Wheel throwing – While clay modeling is a handbuilding technique, learning wheel throwing allows combining thrown vessel forms with hand sculpted parts. Thrown pieces can be cut, altered and joined with coils, slabs, and pinch pots.
Continuing to practice and refine the basics, while slowly introducing advanced techniques will lead to growth and mastery as a clay modeler.
Conclusion
In summary, clay modeling is a rewarding hobby for beginners that offers a host of benefits. Manipulating clay improves hand-eye coordination, fine motor skills, and sensory development, while also allowing for creative expression (source). For adults and children alike, working with clay can reduce stress and anxiety. It provides an outlet for imagination in a tactile medium.
We covered the basics from choosing clay and tools, to sculpting techniques, baking/firing, and finishing touches. With some practice, you can progress from simple projects to more advanced and realistic sculptures. To learn more, check out online tutorials, take a class at a local arts center, or connect with clay modeling communities (source). Clay modeling is fun for all ages and a great way to express creativity through art.