The Art Of Slip Trailing In Clay Pottery
Slip trailing is a decorating technique used in pottery and ceramics where liquid clay slip is applied to leather-hard clay surfaces to create designs, patterns, and textures. The clay slip has a similar consistency to heavy cream or paint, and can be precisely applied using a slip trailer bottle or other tools.
Slip trailing originated several thousand years ago, with some of the earliest examples found on ancient Chinese and Greek pottery. The technique became popular in Europe during the 16th-18th centuries. British slipware from the 1600s-1700s is especially known for its rich slip trailing designs 1.
The benefits of slip trailing include the ability to create intricate, flowing designs not easily achieved with other decorating methods. It allows the artist to draw directly on the clay surface. The color contrast between the slip and the clay body can produce beautiful visual effects. Slip trailing adds aesthetic interest, texture, and dimension to pottery.
Tools and Materials Needed
The main tools and materials needed for slip trailing include:
- Clay body – For slip trailing, a smooth, fine clay body like porcelain works best. Prepare the clay according to manufacturer’s instructions.
- Slip – Slip is a mixture of clay and water to a creamy consistency. Different colored slips can be made by using colored clay powders or ceramic stains. Make sure the clay and slip are compatible with minimal shrinkage differences. (Baileypottery.com)
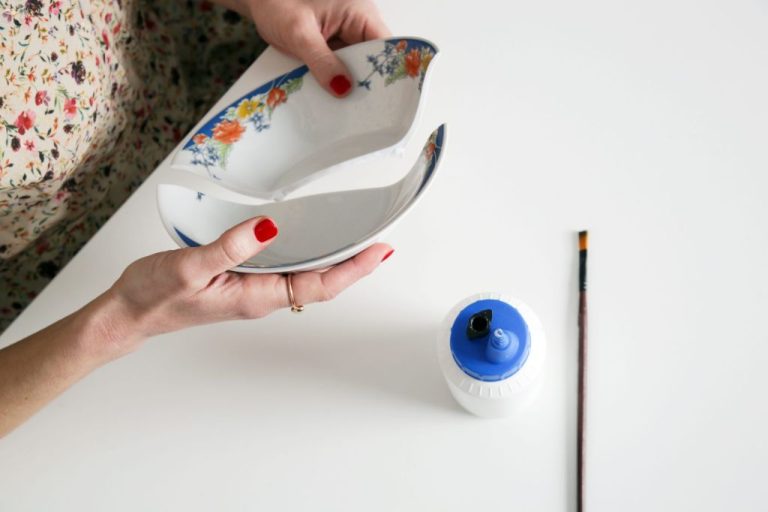
- Slip trailing bottle – Special bottles allow controlled pouring of slip. Bottles come in various shapes and tips like precision tip, needle tip, or nozzle tip. (Theceramicshop.com)
- Ribs and sponges – Use these tools to smooth the clay surface and remove excess slip.
- Brushes – Small brushes help refine designs and clean up edges.
The slip and prepared clay body are the two main ingredients. Having the right applicator bottles for trailing the slip is also important for control and precision. Sponges, ribs, and brushes help during cleanup and refining the finished design.
Slip Recipe and Mixing
The basic slip recipe calls for a mixture of clay and water. The standard ratio is 1 part dry clay to 1-2 parts water by weight or volume. For example, mix 1 pound of dry clay powder with 1-2 cups of water (https://thepotterywheel.com/how-to-make-slip-for-clay/).
For slip trailing, a thinner consistency is best. Use a 1:2 ratio of clay to water. For covering larger areas, a thicker slip with a 1:1 ratio works better. Adding a few drops of vinegar or Epsom salts can help prevent mold growth (https://cabinceramics.co.uk/how-to-make-clay-slip/).
Mix the ingredients thoroughly until the clay is fully dispersed in the water. Allow the slip to sit for a few hours so the clay can hydrate before use. Store unused slip in a sealed container to prevent drying.
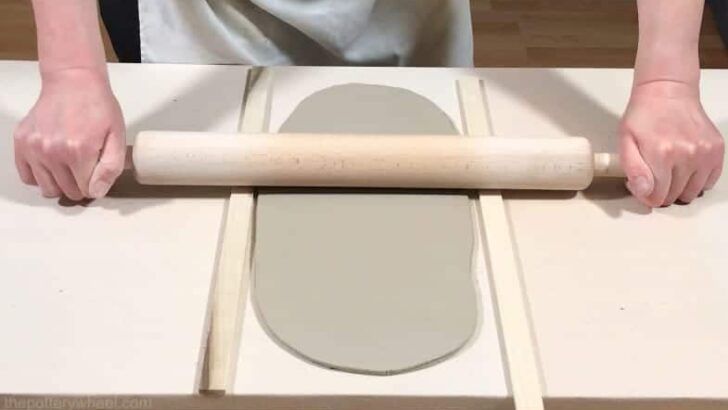
Preparing the Pottery Piece
Proper preparation of the pottery surface is crucial for successful slip trailing results. The clay must be leather hard – not too wet or dry. According to https://ceramicartsnetwork.org/daily/article/Slip-Trailing-for-Beginners-A-Primer-on-a-Great-Ceramics-Decorating-Technique, the moisture level allows the slip to adhere without being absorbed into the body. Letting clay dry to this stage before decorating prevents cracking and uneven absorption.
You can slip trail on either bisqueware or greenware, depending on the desired effect. Bisqueware provides an absorbent surface that takes on a matte look when fired. Greenware results in a more blended, satiny appearance. Smooth any seams or imperfections with a damp sponge before starting. Wipe dust off the surface so the slip adheres cleanly.
It’s also important to apply a wax resist to areas you want to keep slip-free. Common resist options are wax, latex, and masking tape. As noted in https://potterymakinginfo.com/pottery-making/slip-trailing/, avoid getting resist material on areas to be decorated. Let the resist dry fully before slip trailing.
Slip Trailing Techniques
There are several basic slip trailing techniques that allow you to create different effects on your pottery (Source).
Feathering involves gently pulling the slip trail nozzle along the surface to create delicate, feather-like lines. This gives a very fine, detailed effect.
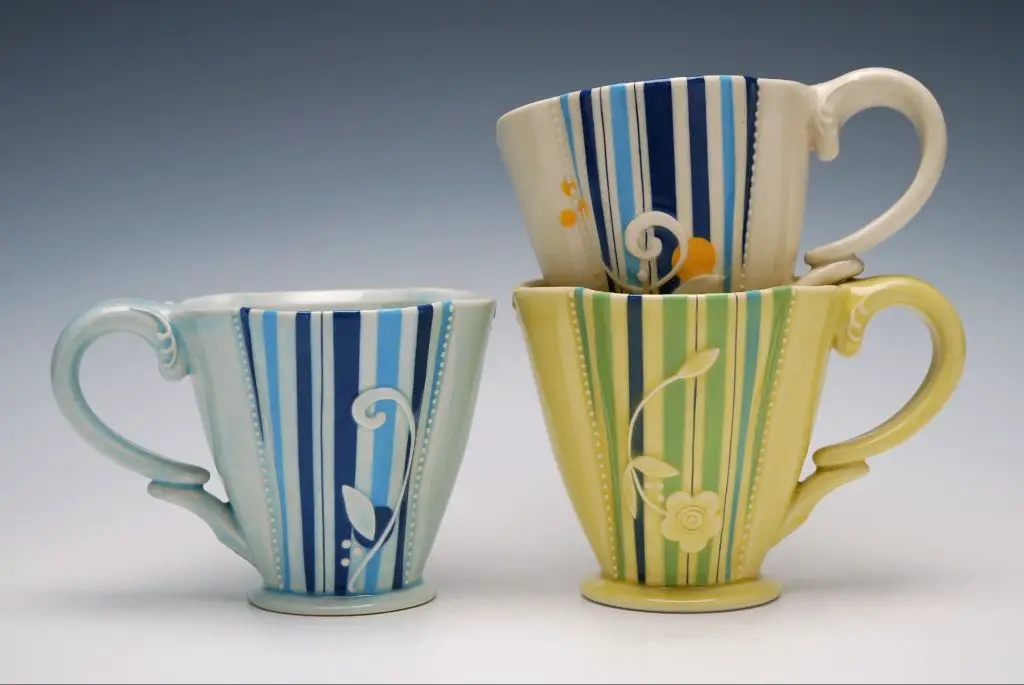
Ribboning creates wider trails by squeezing more slip out of the nozzle as you trail. The ribbon lines can be straight, wavy, or folded.
Comma strokes are small comma or c-shaped trails made by squeezing the bag and then releasing quickly. These add nice accents and texture.
You can also create basic shapes like dots, lines, curves, borders, and lace-like effects. Dots are made by quickly squeezing then releasing the bag. Lines can be straight or wavy. Borders outline edges and shapes. Lace effects result from making many close, intricate trails.
Combining techniques allows you to build up beautiful patterns. For example, start with a ribbon border, fill it in with feathered lines, and add comma accents. The options are endless!
Creating Designs and Patterns
When creating designs for slip trailing, it’s important to plan out the layout and balance of elements. Here are some tips:
- Make some initial sketches to map out the placement of key design elements. Consider the overall composition and visual weight.
- Keep in mind the size and shape of the pottery piece. Wrap-around designs can work nicely on vases and cylinders.
- Balance areas of intricate detail with negative space. Too many elements can look cluttered.
- Build repeating patterns through motif and variation. Motifs like flowers, dots, waves, etc. can repeat and evolve across the surface.
- Vary line thickness, add layers, or change scale of elements to create interest.
- Consider rhythm, movement, and flow – guide the eye across the piece.
It often helps to look at examples of slip trailing for inspiration on balancing designs. Start simple until you get comfortable with the process. Remember that imperfections and irregularities can make a handmade piece unique.
For more on planning decorative layouts on clay, see this resource: https://www.pinterest.com/pin/222576406570495184/
Adding Texture and Dimension
Slip trailing can be used to create the visual appearance of textures and dimensionality. One technique is to imprint textures directly into the slip trail. This can be done by using various objects while the slip is still wet. Items like leaves, lace, or burlap can be pressed lightly into the slip, leaving behind their distinctive patterns and textures. For a more organic effect, rolling objects like seashells, rocks, or wood can gently brush through the trailing, giving a natural and artistic feel.
Another avenue for adding texture is by layering multiple trailing lines. Varying the width, spacing, and color of the lines can result in the appearance of depth and 3D patterns. For example, alternating wider bright slip trails with thin darker trails can create a striped or woven aesthetic. Trailing lighter colors over dark colors also leads to illusion of form. When allowed to dry partially between layers, the overlapping lines will stand out in slight relief from the surface.
By utilizing impressed textures and layered trailing, potters can add incredible visual interest. The patterns can range from subtle and refined, to bold and graphic. This versatility allows for slip trailing to enhance decorative ware as well as artistic statement pieces. With a little creativity and practice, the techniques for adding texture and dimension can help potters explore the limitless possibilities of slip trailing designs.
Common Problems and Solutions
As with any ceramic technique, slip trailing can run into issues like cracking, pitting, and bleeding colors. Here are some common problems and solutions for beginners to troubleshoot:
Cracking
Cracking can occur during drying or firing if the slip and clay body have mismatched shrinkage rates. To avoid this, test your slip recipe on a sample piece first or use commercially prepared slips intended for your clay body according to package directions [1].
Pitting
If the slip is too thin or the piece is underfired, pitting can happen where the slip flakes off during firing. Using the right consistency of slip and proper firing schedule for the clay body can prevent pitting [2].
Bleeding Colors
When colored slips run together, it’s called bleeding. Letting each layer dry thoroughly before adding another color prevents bleeding. Adding a small amount of gum solution to the slip can also help colors stay put.
Troubleshooting slip trailing takes some trial and error. Keep notes on what works to replicate successful results. Reference troubleshooting guides for specific issues. With practice, you’ll learn how your clay, slips, tools, and studio environment interact for beautiful slip trailed finishes.
Drying and Firing Considerations
After slip trailing, it’s important to dry slipped pieces slowly to prevent flaws like cracking or peeling. Allow pieces to air dry completely before bisque firing. Drying too quickly can cause moisture to become trapped under the slip and lead to peeling or bubbling.
Bisque fire to cone 04-06 with a slow ramp speed, no faster than 200 degrees per hour. Slow ramps prevent flaws like pinholes or bubbles from forming in the slip. Use kiln wash or stilts to minimize contact between slipped areas and kiln shelves during firing. Excess contact can make slip stick and peel off kiln shelves.
When glaze firing, continue using slow ramps, no faster than 400 degrees per hour. Choose glazes that mature at a similar temperature as the clay body and slips. Make sure to follow the manufacturer’s recommendations for firing. Glaze can stick to areas with slip decoration, so use kiln wash or stilts again if needed.
Firing too fast or to the wrong temperature can cause slip to bubble, peel, or become discolored. Taking extra precautions when drying and firing will help preserve beautiful slip trailing on finished pottery pieces.
Inspiring Examples of Slip Trailing
Slip trailing has been used for centuries to create beautiful decorative effects on pottery. Many renowned ceramic artists have mastered this technique to produce stunning works of art. Here are some great examples of slip trailed pieces and the artists’ unique approaches.
Kristen Kieffer is known for her precise and intricate slip trailing designs. She uses fine lines and repetitive patterns like spirals and circles to create visually captivating surfaces on her functional pottery forms (source). Her color combinations of white slip on red clay produce a striking graphic quality.
Japanese potter Shoji Hamada used slip trailing along with sgraffito techniques to produce traditional pottery with elegantly simple, flowing designs. His trailing was done with great control to delicately accentuate the pottery form (source).
The ceramic work of Santa Rosa, California artist Sandi Pierantozzi has colorful, fluid slip trailing that gives a water-like rippling effect reminiscent of tie-dye. She lets the trailing interact organically with the clay surface for lovely, impressionistic designs (source).
These examples showcase the wide creative possibilities of slip trailing. Whether producing geometric patterns, lyrical organic designs, or bold colorful effects, slip trailing allows artists to make their pottery truly unique.