Clay Pottery Coil Building Techniques: Step-By-Step Guide
Clay coil pottery is one of the oldest pottery techniques, with artifacts dating back thousands of years. Coiling likely originated in Central America and spread north into what is now the Southwestern United States. Some of the earliest examples come from native tribes like the Anasazi, who created coil pots from local clays.
The coil technique involves rolling out ropes or snakes of clay and stacking them on top of each other to build up the vessel shape. Coil building allows for freeform shapes and designs. It also provides flexibility if the clay is going to be dried slowly, reducing cracking and breakage. This beginner’s guide will walk through the entire coil pottery process step-by-step.
To make coil pots, you’ll need the following materials:
- Clay (stoneware or earthenware)
- Canvas or plastic to work on
- Wood or rubber rib
- Loop tools
- Sponge
- Scraper
- Rolling pin
- Water in a spray bottle
Prepare the Clay
Proper clay preparation is essential for a successful coil pot. Start by wedging or kneading the clay to remove any air bubbles trapped inside that could cause cracking or exploding during firing. Repeatedly cut the clay in half, slam it down, and press it back together to force out air pockets. According to Lakeside Pottery, wedging also blends the moisture evenly throughout the clay.
Next, assess the clay’s moisture content. The clay should feel cool, smooth, flexible, and pliable, but not sticky. If it’s too wet, the coils won’t hold their shape. If it’s too dry, the clay can crack during coiling. Knead in small amounts of water or allow clay to air dry slightly to achieve the optimal consistency before beginning to coil.
Make the Base
The base for a coil pot can be made in several ways. Some options include:
- Rolling out a slab of clay using a rolling pin or slab roller, then cutting it to desired dimensions (https://www.lakesidepottery.com/Pages/Pottery-tips/Making-a-clay-coiled-pot-Lakeside-Pottery-Tutorial.htm). The slab should be approximately 1/4″ thick.
- Throwing a base on the wheel, then allowing it to stiffen to leather hard consistency before beginning to add coils.
- Starting with a small coiled base and gradually increasing its size.
Once the base is made, it’s important to securely attach it to a work surface before adding coils. This provides stability and prevents the piece from shifting during construction. Some options for adhering include scoring and slipping the bottom, using ceramic drywall screws, or using clay slurry.
Roll Out Snakes
Once you have prepared your clay and made the base shape, the next step is to roll the clay into long, even “snakes” or coils that will be assembled to build up the sides of your pottery piece.
To make the coils, take a ball of clay in your palms and roll it back and forth under your hands on a flat surface. Apply even pressure as you roll to create a long, tapered coil that is consistent in width and thickness along its length. The coils should be approximately 1/4-1/2 inch thick. Make the coils as long as possible, at least 6 inches or longer.
The consistency of the clay is important here – if it is too wet and sticky it will be difficult to roll out even coils. The clay should be moist enough to be pliable, but firm enough to hold its shape when rolled. Prepare your clay accordingly by wedging or conditioning it before attempting to make the coil snakes.
Roll out several clay coils in advance so you have a stock ready before assembling your pottery form. Keep the coils covered with plastic wrap or a damp towel when not in use so they do not dry out.
Even, consistent clay coils are crucial for creating a symmetrical pot with smooth sides. Take care in rolling the snakes uniformly. The thickness and length of the coils will impact the final size and shape of your piece.
Attach the First Coil
The first coil will be attached to the base, creating the initial walls of the pot. Be sure the coil is the same thickness as the base. Push the coil firmly into the slab, securing it well. Use your fingers or a wooden modeling tool to smooth the seam where the coil meets the base, blending the two pieces together (see Making a Coil Pot Step-by-Step). Cut away any excess clay and scrape the bottom of the coil at an angle to ensure it sits flat on the work surface.
Take care to get the bottom coil as close to circular as possible, as this will determine the symmetry of the final piece. Work slowly and methodically to attach this first coil.
Add Successive Coils
After attaching the first coil, you can begin adding successive coils in a spiral pattern around the form. Make sure to slightly overlap each new coil over the previous one for stability. Apply slip generously between each coil as you attach it.
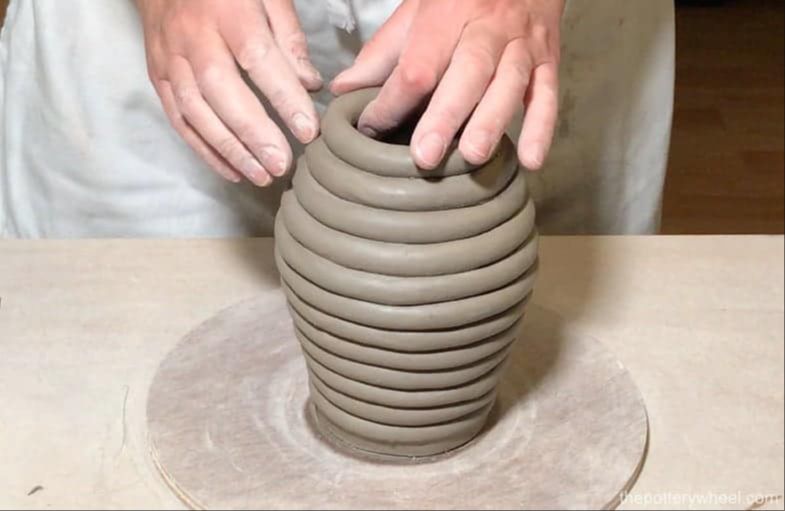
As you build up the wall, aim to keep the thickness even throughout. Use your fingers to gently smooth the seams between each coil, blending them together into one solid form. Don’t press too hard initially or the coils may become misshapen. According to the source, keeping an even wall thickness as you build is key for the structural integrity of coil pots.
Continue adding coils using a spiral technique until you reach your desired height. The rim can be finished by adding an extra coil that folds over to complete the form. Make sure to compress this final coil well for stability. Let the pot firm up adequately before final smoothing.
For more tips on attaching coils, see the step-by-step guide at https://www.lakesidepottery.com/Pages/Pottery-tips/Making-a-clay-coiled-pot-Lakeside-Pottery-Tutorial.htm.
Shape the Form
As you add each coil to build up the form, it is important to shape the pottery as you go to maintain symmetry and achieve the desired shape. Use your fingers, wood tools, and rib tools to gently compress each coil into the previous coil and blend them together. Focus on creating smooth, even surfaces without thin spots or cracks. Check the overall form frequently from all angles to ensure it is symmetrical and has no irregular bulges or dips.
Maintaining an even wall thickness is key to avoiding cracks and explosions during the drying and firing stages. Target an appropriate thickness based on the overall size of your project – taller pieces may need thicker walls, while smaller forms can have thinner walls. As you shape, compress the coils more at the rim to taper the walls slightly thinner toward the top.
Be patient and work slowly to prevent cracking the clay. Let your hands rest periodically to avoid distorting the form through overworking an area. If needed, moisten areas that start to dry out faster than others. Pay extra attention to blending the coil attachments smoothly on the inside as well as the outside.
Creating symmetry takes practice. If the form starts to lean or bulge to one side, gently push from the opposite side to correct it. Be prepared to adjust areas that are off-center by pinching in or gently pressing out. Aim to maintain formal integrity from start to finish for the most professional results.
For inspiration on techniques for gracefully shaping coil built pottery as you build, see this excellent video tutorial: Coil Building Basics with 15 Decorative Coil Techniques!
Refine the Surface
Once the entire form is built up with coils, the next step is to refine the surface to create a smooth, visually appealing piece. This involves blending the seams between each coil so they are no longer visible. According to the pottery experts at The Pottery Wheel [1], you can use a few different tools for this process:
- A rounded rib can compress and smooth the coils.
- Metal scrapers help shear off excess clay and blend the coils.
- Sponges soften surfaces and round over edges.
Work systematically around the form, blending each coil into the ones beside it. Apply even pressure and work at a consistent pace. Let the clay firm up slightly between smoothing to prevent distorting the overall shape. Continue refining until all coils have merged seamlessly. According to ceramicist Lindsay Oesterritter’s coil vase tutorial [2], finding the balance between patience and persistence is key for getting a smooth surface.
Once satisfied with the form’s smoothness, the surface can be textured or decorated as desired. Consider impressing patterns with textured materials, incising lines or designs, or adding decorative elements like pulled handles. The options are unlimited for personalizing coil-built pieces.
Dry Slowly
After completing the clay coil pot, it’s important to allow it to dry slowly to prevent cracking. As clay dries, it shrinks. If some areas dry faster than others, it can create stresses in the clay that lead to cracks. Covering the pot with plastic is a good way to slow down drying. Replace any wet rags or paper towels under the plastic periodically as they absorb moisture. According to https://ceramicartsnetwork.org/daily/article/Protecting-Your-Pottery-and-Ceramic-Sculpture-Hints-for-Even-Drying the plastic cover traps condensation, creating a humid environment that keeps the clay moist.
Another option is slow oven drying. Place the pot in a cold oven, then gradually increase the temperature to about 150-200°F. Leave the door propped open slightly to allow moisture to escape. Drying the pot slowly over 6-12 hours can help prevent cracking. Just make sure not to rush the drying process, as fast drying creates internal stresses.
Fire the Pottery
Once the pottery has dried completely, it needs to go through two firings in a kiln to finish the process. The first firing is called bisque firing. This gradually heats the pottery to over 1000°F to harden the clay body and make it durable.
It’s important to bisque fire slowly, over 8-12 hours, to allow any remaining moisture to evaporate from the clay without cracking it. Ramping up the temperature too quickly can cause defects. The bisque firing prepares the clay for the application of glazes.
The next step is glaze firing. Glazes are mixtures of minerals that melt and form a glassy coating at high temperatures. Applying a glaze makes the pottery nonporous and watertight. The pottery is dipped or painted with glaze and fired again around 1900-2200°F. The glaze melts and fuses to the clay body during this firing.
It’s crucial to match the clay body and glaze formulations when choosing a glaze. The expansion and melting rates must be compatible to avoid defects like crazing or shivering. Once fired, the glazed pottery is fully vitrified and ready to use.