Exploring Clay: A Beginner’S Journey
Clay is a type of fine-grained natural soil that has plastic properties when wet and can be molded, shaped and fired into hardened durable forms. Clay deposits are found in many parts of the world and have been used for pottery and art for thousands of years across many cultures.
There are several different types of clays that have varying properties when wet or fired at high temperatures, making them suitable for specific uses in pottery and sculptures. The most common types include earthenware, stoneware, porcelain, and terracotta. Earthenware clay is more porous and fragile after firing, while stoneware clays are denser and form a waterproof product when fired. Porcelain clays are very fine and create a smooth white finish when fired to high temperatures. Terracotta clay can be left unglazed and is known for its red-orange color after firing.
Today, clay remains an extremely versatile material for art and craft. From functional pottery and dishware to intricate sculptures and jewelry, working with clay allows artists to shape and transform this raw natural material into beautiful finished objects. The popularity of working with clay endures as artists continue exploring new techniques and styles using this fundamental medium.
Clay Origins and History
Clay is formed from the gradual chemical weathering of rocks over long periods of time. The decomposition of granite forms kaolinite, whereas basalt forms montmorillonite. According to Wikipedia, “Pottery is one of the oldest human inventions, originating before the Neolithic period, with ceramic objects such as the Gravettian culture Venus of Dolní Věstonice figurine discovered in the Czech Republic dating back to 29,000–25,000 BC.”
Some of the earliest known uses of clay were during the Neolithic period for creating figurines and pottery. Clay allowed early civilizations to store and transport food and water in ceramic vessels. Ancient Mesopotamian and Egyptian societies used clay to make bricks, tiles, and containers. The Venus of Dolni Vestonice clay figurine dated to around 29,000-25,000 BCE is one of the earliest known ceramic artworks.
Over time, clay continued to be an important material for making functional and artistic objects in nearly every early civilization. From ancient Greek pottery to Chinese porcelain, clay has long allowed human creativity to flourish and civilizations to advance.
Getting Started with Clay
Getting started with clay as a beginner can feel overwhelming at first. Here are some tips for beginners on the basic tools you’ll need, setting up your workspace, and staying safe while working with clay.
Some essential beginner clay tools include a pottery wheel, clay sculpting tools, a kiln, and modeling tools like rib bones, loop tools, sponges, wire cutters, and needles. Having a basic set of tools allows you to learn to center clay, sculpt shapes, smooth surfaces, cut excess clay, and attach pieces. Consider purchasing a pre-packaged set for beginners to get started.
Setting up your workspace is also important. Make sure you have an area with good ventilation, as clay dust can build up. Cover your work surface with canvas or plastic for protection. You’ll also need adequate lighting and access to water. Organize tools, clay, and supplies so they’re easily reachable as you work. Some people find a rotating turntable helpful for sculpting.
Take safety precautions too. Wear an apron to keep clothes clean, and don’t wear loose sleeves or jewelry that could catch. Use slip or cream to keep hands from drying out. Clay contains silica dust, so wear a mask and keep your workspace clean. When using a pottery wheel, keep hands away from moving parts. Handle clay tools with care to avoid cuts. Work carefully to prevent eyestrain and muscle fatigue.
Having the proper beginner tools, setup, and safety approach allows you to start exploring the creativity of clay!
Clay Types and Properties
There are three main types of clay that are commonly used by beginner potters – earthenware, stoneware, and porcelain. Each type has different properties and is fired at different temperatures.
Earthenware is a low-fire clay that matures at lower temperatures, usually between Cone 04 and Cone 2 (1757-2102°F). It can be fired in an electric kiln. Earthenware has high absorption which makes the finished pieces more porous. Glazes are required for liquid and food containment. Common earthenware clays include red and brown clays. According to Pottery for Beginners: The 4 Main Types of Clay, earthenware clays are easiest to work with and good for handbuilding and wheel throwing techniques.
Stoneware clays are mid-range fire clays, maturing between Cone 4 and Cone 10 (2165-2381°F). They can be fired in electric and gas kilns. Stoneware is less porous than earthenware, allowing it to hold water without leaking. Glazes are still required for containers. Common stoneware clays are grey and brown. As explained in Best Pottery Clay for Beginners, stoneware clays are versatile for handbuilding and throwing, making them a popular choice for beginners.
Porcelain is a high-fire clay, maturing between Cone 6 and Cone 10 (2232-2381°F). It requires a gas kiln to reach the high temperatures needed. Porcelain clay is very non-porous and can be left unglazed. It has high plasticity but can be prone to cracking and chipping. According to Pottery for Beginners: The 4 Main Types of Clay, porcelain can be challenging for beginners to work with.
Basic Clay Techniques
Before starting any clay project, it’s important to learn some fundamental techniques. Three of the most common handbuilding techniques used with clay are wedging, slab building, and coil building.
Wedging is the process of kneading and working the clay to make it more pliable and remove any air bubbles. It helps improve the consistency and workability of the clay (“Handbuilding Pottery 101: Hand Building Techniques & Projects”, https://www.thecrucible.org/guides/ceramics/handbuilding/). Wedging involves slamming and folding the clay repeatedly on a flat surface.
Slab building involves rolling out flat, even sheets or “slabs” of clay and then joining them together. This technique can be used to create boxes, trays, plaques, and other objects with flat surfaces and straight edges. Slabs can be cut into shapes and decorated using textures, stamping, or carving (“Handbuilding Techniques”, https://ceramicartsnetwork.org/daily/handbuilding-techniques).
Coil building uses rolled coils or ropes of clay stacked on top of each other and blended together to form the desired shape. This technique is often used for making pots and vases. The coils can be arranged in various patterns for decorative effects.
Pinch pots are a beginner-friendly technique made by pinching and shaping solid balls of clay, often into simple bowl forms. Pinching clay is an intuitive and direct way of manipulating the material to create functional or decorative objects.
Surface Techniques
There are many ways to add color, texture, and design to the surface of clay pieces. Some of the most common surface techniques include glazing, staining, burnishing, stamping, incising, and slip trailing.
Glazing involves applying a glass-like coating over the clay that melts during firing to create a glossy surface. Glazes come in endless colors and effects. Popular glaze techniques include pouring, dipping, brushing, and spraying the glaze onto the ware. Glazes can completely cover a piece or be applied selectively.
Stains are ceramic colors made from metal oxides that penetrate and color the clay surface. Common staining techniques involve applying stains directly to bare clay or on top of glazes using brushes, sponges, and rags. Stains create mottled, textured effects.
Burnishing is a technique where leather-hard unfired clay is rubbed with a smooth tool to compress the surface and create a shiny, polished effect. Burnishing smooths the surface and enhances the color of natural clays.
Stamping involves impressing designs into soft clay using wood, rubber, or clay stamps. Stamped patterns can be geometric shapes, plants, animals, letters, and more. Stamping adds quick texture and decoration to pottery.
Incising involves using sharp tools to scratch delicate lines and patterns into leather-hard clay. Incising creates elegant, flowing decorative effects.
Slip trailing involves trailing liquid clay slip from a bottle or bag to draw fine lines and designs onto pottery. Slip trailing allows precise decoration and is often done in layers with different colored slips.
Sculpting with Clay
Clay is a versatile material for sculpting that allows artists to create both realistic representations as well as abstract sculptures. Some of the main sculpting techniques with clay include modeling, carving, and casting.
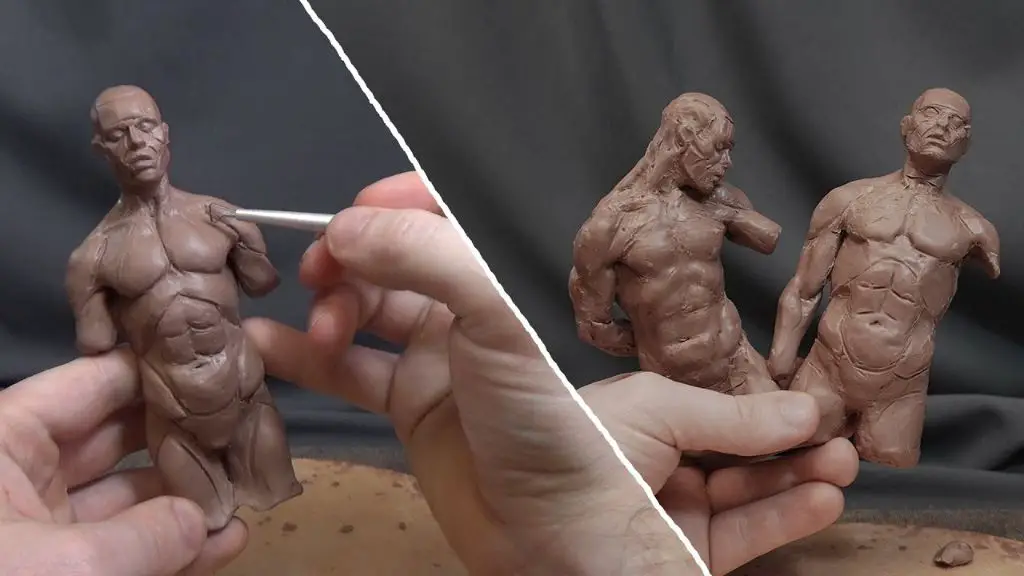
Figure sculpture refers to sculpting the human form and capturing detailed anatomical features. This takes patience and careful observation to accurately portray the proportions and gestures of the body. Many figure sculptors work from live models so they can closely study the way light hits the forms. According to this guide, some key skills for figure sculpting include developing an armature, sculpting major muscle groups, and refining details.
Abstract sculpture allows more freedom of expression, as the work does not attempt to represent anything recognizable. The sculptor experiments with organic, geometric, or other forms to create innovative compositions. Abstraction focuses on concepts like shape, mass, texture, space, and balance rather than replicating the natural world. The clay medium enables sculptors to intuitively shape and modify abstract forms.
Clay modeling involves shaping clay by hand into any form, from utilitarian pots and bowls to expressive sculptures. Basic clay modeling techniques include pinching, coiling, slab building, and sculpting solid forms. As a beginner modeler gains experience, they can create progressively more complex clay models with finer details.
Functional Ware
Functional ware refers to pottery and ceramics designed to serve a practical purpose rather than for purely decorative reasons. Some of the most common types of functional ware are items like bowls, plates, mugs, vases, and jars. Making functional pieces with clay allows you to create handmade versions of utilitarian objects you use every day.
Bowls and plates are two of the most versatile and fundamental functional ware pieces. Clay bowls can be sculpted in numerous sizes and shapes for serving food, holding trinkets, or displaying decorative items. The bowls can have simple smoothed walls or more intricate patterns and textures. Plates provide a surface for serving and eating food off of. They can be round or square and have creative decorative detailing like carvings or painted designs. Both bowls and plates need to be thick and sturdy enough to hold items without cracking.
Clay mugs are excellent beginner functional pieces to craft. The basic cylinder shape makes them easy to throw on a pottery wheel or hand build. Mugs can then be customized with details like handles, spouts, sculpted textures, brushed designs, or stamping. Clay mugs should be able to withstand daily use and the high temperatures of dishwashers and microwaves when fired properly.
Vases are one of the most popular functional ceramics to create. They can be hand built or thrown in many different shapes and sizes to hold floral arrangements. Consider making pinched, coiled, or slab constructed vases for more freeform asymmetrical silhouettes. Add interest to the surface with carvings, pressing designs, or using colored slips and underglazes.
Jars are useful vessels for storing and displaying food items, bath salts, makeup brushes, and more. The basic cylindrical form makes them easy to master. Use paddle and anvil techniques to shape wider belly shapes or wheels to make taller designs. Decorate the outside with colorful glazes or keep the surface neutral to showcase the contents inside.
Experimenting with making different functional ware pieces will expand your pottery skills immensely. The possibilities for creative interpretation are endless while still crafting useful objects you’ll love using every day.
Firing and Finishing
Firing is a crucial part of clay work that sets the clay permanently, creating a ceramic vessel. There are a few main types of firing techniques that beginners can explore:
Kiln Firing
Firing clay in a kiln is the most common method. A kiln allows precise control over the firing temperature and conditions to ensure proper vitrification of the clay body. Kiln firing occurs in several stages, typically bisque firing first to harden the clay, followed by glaze firing to melt and adhere the glaze coating [1]. Kiln firing requires specific kiln equipment but provides the best results.
Pit Firing
Pit firing involves placing vessels in a fire pit outdoors. The pots are covered with combustible materials like sawdust or leaves and fired by burning wood. Pit firing yields more organic, natural effects but can be more unpredictable. It is accessible for beginners without a kiln [2].
Raku Firing
Raku is a specialized firing technique originating in Japan. The clay piece is fired in a hot kiln, then immediately removed and cooled rapidly to yield distinctive crackled glazes. Raku firing requires specific raku glazes and fuels but can create beautiful, unique finishes.
After firing, clay pieces may require additional finishing like sanding rough areas or sealing the surface. Proper firing and finishing ensures the clay work is durable, water-safe, and ready for use.
Next Steps
Once you have mastered the basics of working with clay, there are many intermediate techniques you can try to take your skills to the next level:
Joining and attaching – Learn methods like slip and score to join clay pieces and parts. This allows you to make multi-part and more complex projects.
Surface decoration – Try out techniques like sgraffito, mishima, stamping, texture mats, and image transfers to further embellish the surface of your clay creations.
Sculpting – Advance your sculpting by learning anatomical sculpting of figures, heads, and busts. Try sculpting animals, mythical creatures, and abstract sculptural forms.
Mold making – Make press molds, slip molds, or two part molds to achieve consistent results when producing multiples of an original sculpted piece.
Consider joining a clay studio or collective if there is one in your area. Studio memberships provide access to wheels, kilns, glazes, and specialty tools while also giving you a creative community. You can get feedback on your work and new inspiration from fellow ceramic artists.
Once you’ve expanded your skills, you may want to consider selling your finished clay creations through local art fairs, consignment at galleries or gift shops, or online on sites like Etsy. Be sure to calculate costs and price your work fairly to cover materials and time.
As a beginner, focus on improving your techniques and developing your artistic voice. With practice and perseverance, you’ll be ready to take your clay journey to the next level.