Creative Clay Fun: Art Projects For Kids
Clay is a fun, creative, and educational art medium for kids of all ages. Playing with clay provides a range of developmental benefits for children. It is an open-ended material that allows kids to express themselves and build fine motor skills. There are many types of clay that can be used for creative projects at home.
Working with clay is a multisensory experience. Kneading, pounding, rolling, and manipulating clay engages the sense of touch while allowing kids to be creative. Clay stimulates development across multiple domains including cognitive, physical, sensory, and emotional. Many child development experts believe that playing with clay is beneficial for a child’s overall growth.
Clay is available in many forms including natural clay dug from the earth as well as commercially produced modeling compounds. Air-dry clay, polymer clay, and homemade salt dough or playdough are common choices for children’s crafts. With adult supervision, kids can explore which types of clay suit different projects best.
Basic Clay Manipulation
There are a few basic techniques that are important for kids to learn when starting to work with clay (source). These include rolling, pinching, coiling, and scoring.
Rolling involves using the palms of the hands to roll the clay into balls or coils. This takes practice to apply even pressure. Pinching is done using the fingers and thumbs to manipulate the clay into different shapes. Young kids may start with simple pinch pots.
Coiling involves rolling pieces of clay into long coils or ropes that can then be used to build bowls and other shapes. Scoring creates indents in the clay that helps different pieces stick together. A butter knife or other tool can be used for scoring.
There are also a variety of tools that can be used to create different textures in clay. These include paintbrushes, plastic forks, rolling pins, clay tools, and more. Pressing objects into the clay makes imprints. Kids can experiment with making patterns using different household objects (source).
Clay Sculptures
One of the best parts of using clay with kids is that it allows for open-ended, imaginative sculpting. With just their hands, kids can mold and shape clay however they wish, creating unique 3D art. Here are some tips for sculpting with clay:
Free Sculpting
Simply provide kids with a lump of clay and let them sculpt whatever they imagine. They may create animals, imaginary creatures, vehicles, foods, landscapes – anything goes! Allow them to experiment with different techniques like rolling, pinching, smoothing, imprinting, etc. Free sculpting taps into creativity and problem solving.
For structured free sculpting, you can provide prompts like “Sculpt your dream house” or “Make a sculpture of your family”. Let kids plan their sculpture before diving into the clay. Talk about shapes, textures, size, and details to include.
Using Armatures
For more complex sculptures, create an armature by tightly wrapping aluminum foil around a ball of newspaper or cardboard. This provides an internal framework for sculpting around. Sculpt details on top of the armature, like clothes on a person or scales on an animal. Armatures allow for bigger, stronger sculptures. Wrap foil around cardboard or newspaper to make an armature.
Let kids’ imaginations run wild with free clay sculpting. Add structure and support with armatures inside the clay. Clay offers unlimited sculpting potential for creative fun!
Clay Handprints
Capturing your child’s handprint in clay can create special keepsakes that will last a lifetime. There are a few different methods for making handprint imprints in clay:
– Press your child’s hand gently into the clay to make an imprint. Consider pressing their palm, fingers, or entire hand to create different effects. Let the clay harden before removing their hand so the imprint holds its shape.
– Coat your child’s hand in petroleum jelly before pressing it into the clay. This will help prevent the clay from sticking and allow you to make a cleaner handprint.
– For a 3D handprint, press your child’s hand into the clay, then build up clay around the imprint to create a hand sculpture.
Once you have made the handprint in clay, there are many ways to turn it into art. You can:
– Paint the clay handprint with acrylics or glazes before firing. Consider adding patterns, textures, or designs.
– Imprint objects like leaves or seashells next to the handprint to create a nature-themed design.
– Write your child’s name and age into the clay beside the print.
– Display the finished handprint on a plaque, picture frame, or keepsake box.
Clay handprints make treasured mementos representing a child’s unique hand at a particular age. With so many creative ways to decorate and display them, you’re sure to find a method that captures the perfect handprint keepsake.
Clay Animals
Kids love making animals out of clay. Start with simple shapes like snakes and worms by rolling clay into long tubes. For turtles, flatten a ball of clay into an oval for the shell, and attach legs and a head.
More complex animals like dogs, cats, and dinosaurs start with basic shapes like balls and tubes too. For a dog, roll a tubular body, ball head, and tubular legs and tail. Use tools to add eyes, ears, nose and other details. Dinosaurs can be made very simply from cones, balls and tubes. Let your child’s imagination run wild!
Some tips for clay animals:
- Work on a flat surface like a table or cardboard.
- Secure parts together by blending and smoothing clay with fingers.
- Let dry fully before painting.
- Bake according to clay package instructions.
With practice, kids can create an entire clay zoo. For inspiration and step-by-step guidance, see this helpful source: Easy Clay Animals for Kids.
Clay Foods
Kids love making realistic-looking fake foods out of clay. Sculpting clay fruits, vegetables, and other food items allows kids to practice their modeling skills. With practice, kids can create food sculptures that look good enough to eat! Some fun clay food ideas include:
- Sculpting a colorful fruit bowl with clay bananas, oranges, apples, and more.
- Making clay hamburgers and French fries for a diner scene.
- Crafting a clay pizza with various clay toppings like pepperoni, mushrooms, and olives.
- Forming clay cookies, cakes, doughnuts, and other sweet treats.
- Shaping clay noodles, dumplings, sushi, and dim sum for Asian cuisine.
- Modeling clay tacos, enchiladas, tamales, and more for Mexican food.
Kids can also make food charms from clay by sculpting tiny food items and poking a hole before baking so it can slide onto a necklace or bracelet. Cute ideas include clay French fries, cookies, slices of cake or pie, fruits like strawberries, and more. Let their creativity run wild!
(Source: https://www.pinterest.com/hopechella84/clay-food-sculpture/)
Clay Jewelry
Kids can make all sorts of jewelry pieces out of clay like beads, pendants, and charms. Making clay jewelry is a fun creative project that allows kids to express their own personal style.
Some ideas for clay jewelry include:
– Clay bead necklaces or bracelets – Roll pieces of clay into balls or custom shapes for beads. Use a toothpick to pierce a hole before baking. String onto cord or elastic when done.
– Clay charm bracelets – Make little charms in fun shapes like hearts, stars, animals. Attach to a bracelet.
– Clay pendants – Cut clay into a circle or custom shape using cookie cutters. Add a bail or loop at the top to turn into a pendant.
To make the jewelry pieces extra special, kids can texture the clay using items like rolling pins, forks, or toothpicks. They can also paint designs on baked clay pieces with acrylic paints.
Let kids get creative with clay jewelry! With simple beads and pendants, they can make their own stylish accessories to wear. Refer to this Pinterest board for inspiration.
Christmas Ornaments
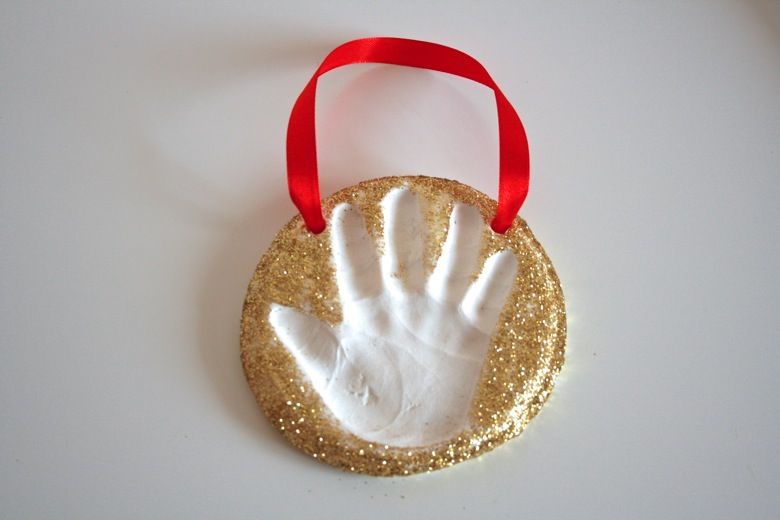
Making Christmas ornaments with clay is a fun holiday tradition that kids love. Handprint ornaments
are a simple way to preserve your child’s artwork. Roll out a flatten piece of air-dry clay about 1/4 inch thick. Have your child press their hand into the clay, fingers spread wide, to leave an impression. Carefully lift their hand up and allow the clay to dry fully, which could take 1-2 days. Write your child’s name and year on the back before threading a ribbon through the top to hang on the tree.
Kids can also sculpt 3D ornaments out of clay, such as cute snowmen. Roll balls of clay for the body and head, adding stick arms, decorative buttons down the front, and an orange clay carrot nose. Let the sculpted ornaments dry completely before painting and adding finishing touches like glitter, sequins, or pom poms with glue. Refer to https://jennakateathome.com/diy-christmas-ornaments-for-kids/ for step-by-step instructions and photos of adorable handprint and sculpted clay Christmas ornaments.
Clay Monsters
Sculpting fantastical creatures out of clay can spark a child’s imagination. Let them run wild creating their own original monsters or sculpting favorites from books, movies, and TV. This is a great creative project for Halloween or anytime kids want to design creepy, silly, or magical monsters.
Start with a basic monster shape using balls and coils of clay. Add details like horns, spikes, scales, or fur with additional clay pieces. Googly eyes, pompoms, and fabric scraps make fun monster features too. Encourage kids to make monsters that are scary, cute, or somewhere in between. Give their creatures fun names and backstories to bring them to life.
Younger kids may need help attaching clay parts together. Score and slip areas to be joined, then press firmly together. Bake clay monsters according to package directions so they last. Add a layer of finish like glaze or polyurethane for extra durability. Display completed monster creations in a monster parade or monster museum for lots of creative clay fun.
Some fun monster ideas include:
– Silly monsters with multiple eyes or mouths
– Mythical beasts like dragons, griffins, or chimeras
– Cute versions of traditionally scary monsters
– Monsters inspired by kids’ favorite fictional characters
Let your child’s imagination run wild to create unique clay monster art. Their creative creatures, scary or sweet, will delight.
Tips and Tricks
When working with clay, there are some useful tips and tricks to know that will help make the experience smoother and lead to better final results.
Baking and Painting Clay
After sculpting with clay, pieces need to be baked to harden them. Bake pieces according to package instructions, usually at 225°F – 275°F for 15 – 30 minutes. Let cool completely before painting. Acrylic paints work best for painting hardened clay. Apply a sealant like Mod Podge over paint to protect it. Source
Storing Leftover Clay
To keep leftover clay soft and usable, store it in an airtight container or plastic bag. Flatten clay into a pancake shape before storing to minimize air pockets. Adding a damp paper towel on top can help keep clay from drying out. Clay can be stored this way for weeks or months. Source
Troubleshooting Issues
If clay is too sticky, sprinkle some cornstarch on hands and work surface. If clay cracks easily, knead in some water. If pieces warp or crack after baking, the oven temperature was too high. Let clay come to room temperature before baking to prevent cracking.