Unleash Your Creativity: Clay Art Inspirations And Ideas
Clay art has experienced a surge in popularity in recent years. According to market research, worldwide sales of polymer clay increased 2.6% to reach ~US$ 29 million in 2019, up from ~US$ 28 million in 2018 (Source). The modelling clay market has also seen steady growth due to its popularity among children and hobbyists (Source). With its versatility, accessibility, and therapeutic benefits, it’s no wonder clay art has captured the hearts and imaginations of so many.
Brief History of Clay Art
Clay has been used as an artistic medium for thousands of years. Evidence of early clay pottery dates back over 20,000 years to ancient cultures in Asia, the Middle East, and Africa. Clay was likely discovered accidentally as early humans encountered deposits of clay near bodies of water. They realized the malleable properties allowed them to mold it into shapes and forms. Firing techniques were later developed to harden the clay.
Some of the earliest known clay art includes Venus figurines and pottery discovered from Paleolithic cultures. Highly sophisticated pottery and ceramic art was being produced in China over 10,000 years ago during the Neolithic period. Ancient Egyptian and Mesopotamian civilizations also developed advanced pottery techniques as early as 4,000 BCE.
In ancient Greece, pottery was elevated to an art form. Distinct styles emerged such as the iconic Attic black-figure and red-figure pottery. Elaborate vases, jars, bowls, and other vessels were produced featuring intricate painted scenes. The Romans also became known for their pottery which was mass produced and traded throughout the empire.
Through the Middle Ages in Europe, pottery became more utilitarian and was used for food storage and serving. Porcelain techniques later arrived from China during the Renaissance, spurring new innovations in ceramic art. The Arts and Crafts movement of the 19th century revived interest in traditional handmade pottery and sculpture.
Today, clay remains one of the most ubiquitous and versatile media for artistic expression. Both functional and purely decorative works of art continue to be crafted from clay. Contemporary ceramic artists are pushing the boundaries of what can be created using this elemental medium.
Clay Art Techniques
Clay art utilizes a variety of handbuilding techniques to sculpt and form artistic creations out of clay. Three of the most common handbuilding techniques used by clay artists are pinching, coiling, and slab building.
Pinching is one of the most basic and intuitive clay handbuilding techniques. It involves taking a ball of clay and using the fingers and thumbs to pinch, pull, and shape the clay into the desired form. Pinch pots are a classic beginner project to learn this technique. Pinching allows artists to make freeform shapes and textures (The Crucible).
Coil building involves rolling out and stacking coils of clay on top of each other to build up forms. The coils can be fused together by smoothing and blending the seams. Coiling enables artists to create taller vessels and sculptural forms that would be difficult with pinch or slab techniques. Coils can be arranged in various patterns for texture and design (Ceramic Arts Network).
Slab building uses flat, rolled out sheets or “slabs” of clay that can be cut, layered, shaped, and joined. Slab pieces allow for flatter, geometric, or angular forms. Textures can be impressed into slabs before forming the final sculpture. Slab construction is great for making relief sculptures, containers, and designing complex shapes.
Clay Sculpting Techniques
Sculpting with clay allows artists to create three-dimensional works of art. There are two main techniques used in clay sculpture: additive and subtractive methods.
In the additive method, clay is gradually built up to create the desired form. This involves starting with a solid base, then adding pieces and shapes on top of it. Coils of clay, slabs, and small pieces can be added and joined together with slip. Additive sculpture allows the artist to gradually develop the work and make changes as they build it up.
The subtractive method involves beginning with a larger block or form, then removing clay to reveal the shape within. The sculpture is revealed by cutting, carving and scraping away excess clay. Subtractive techniques require seeing and planning the end result contained within the starting block. As clay is removed, the emerging forms are refined by smoothing and blending the surfaces. Subtractive sculpture can capture fine details and allow creating concave shapes.
Clay sculpting uses both additive and subtractive processes. The two methods can be combined, starting with a rough shape created additively, then refining it using subtractive techniques. Understanding these core techniques gives clay sculptors flexibility in their creative process.
Clay Pottery Techniques
There are three main techniques used in creating clay pottery:
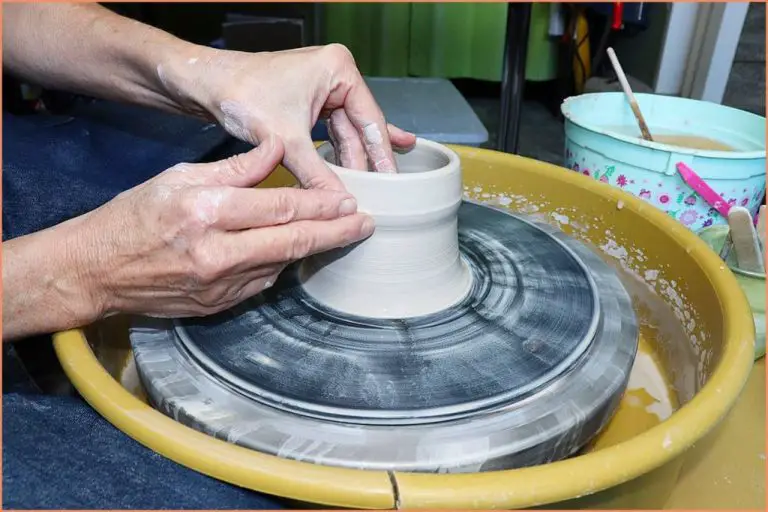
Throwing
Throwing is done on a potter’s wheel and involves centering a lump of clay on the wheel and using your hands to shape it into a pot by pulling up the sides as the wheel spins (Learn Some Basic Pottery Techniques). Throwing takes practice to master but allows for symmetry and uniform wall thickness when making pottery.
Slipcasting
Slipcasting involves pouring liquid clay slip into a plaster mold. As the slip touches the porous mold, water gets absorbed into the plaster and the clay particles get deposited on the mold surface to form the shape. Once the desired thickness is reached, excess slip is poured out and the cast piece is left to dry before being removed from the mold (Handbuilding Pottery 101: Hand Building Techniques & Projects).
Handbuilding
Handbuilding techniques include pinching, coiling, and slab building. Pinching involves squeezing and pulling the clay into shape. Coiling uses rolled out “snakes” of clay stacked and smoothed together. Slab building uses flat clay slabs joined together. Handbuilding allows creativity and custom shapes not possible on the wheel.
Clay Firing and Glazing
Firing clay is an essential step in the ceramic process. Clay must be fired at high temperatures in a kiln to harden and finish the ceramic piece. There are several types of kiln firings:
Bisque Firing
Bisque firing refers to the first firing of greenware or unfired clay pieces. This initial firing converts the clay into a ceramic material by hardening it and making it less porous. Bisque firing usually occurs between 1500°F-2200°F. After bisque firing, the piece can be decorated with underglazes, glazes, and stains before a final firing.[1]
Glaze Firing
Glaze firing, also called glost firing, is the final firing to melt and fuse glazes onto bisqueware. Glaze firing occurs between 2200°F-2400°F. The glaze melts into a glassy coating that is waterproof and adds color and effects to the finished piece.[2]
Raku Firing
Raku is a specialized firing technique originating from Japan. Pieces are quickly fired up to 1800°F then removed from the hot kiln and exposed to smoke to create unique crackled glaze effects. Raku firing allows potters to achieve colorful iridescent finishes.[3]
Inspirational Clay Artists
Clay art has been shaped by many talented and creative artists over the centuries. Here are some of the most inspirational and influential ceramic artists to know.
Edmund de Waal
Edmund de Waal is a contemporary British ceramic artist best known for his porcelain installations. He is revered for his delicate porcelain vessels and minimalist aesthetic. His installation Signs & Wonders at the Frick Collection in New York featured over 2,000 porcelain pots suspended in a rhythmic pattern (Source).
Betty Woodman
American sculptor Betty Woodman is considered a pioneer of postmodern ceramic art. She is known for her colorful, decorative pots and tile murals that push the boundaries of traditional pottery. Her work combines painting, sculpture, and industrial design in innovative ways.
Grayson Perry
British ceramicist Grayson Perry is recognized for his imaginative painted pots and vases depicting satirical scenes of modern life. He often incorporates bright colors, text, and found objects into his ceramics. Perry was awarded the Turner Prize in 2003 for his ceramics and tapestries.
Clare Twomey
Contemporary British artist Clare Twomey creates monumental participatory installations with ceramics. Her piece Trophy comprised over 4,000 imperfectly handcrafted ceramic vessels and invited viewers to take one home as a gift (Source).
Roberto Lugo
American ceramicist Roberto Lugo combines decorative traditions with social justice themes in his work. His porcelain vases feature portraits of civil rights icons and illustrations of inequality and oppression in society.
Ideas for Clay Art Projects
Whether you’re new to clay or have some experience, there are a multitude of art project ideas that can help unleash your creativity. Here are suggestions for beginner, intermediate, and advanced clay artists.
Beginner Clay Projects
If you’re just starting out with clay, focus on simple projects to learn basic techniques. Some ideas include:
- Coil pots – Roll clay into long coils, then stack into a pot shape
- Pinch pots – Pinch and shape a ball of clay into a small pot or bowl
- Clay beads – Roll balls of clay into bead shapes and poke holes before firing
- Mini animals – Pinch and shape clay into simple animal figures
- Texture tiles – Press objects into clay slabs to make patterned tiles
- Fingerprint bowls – Press fingerprints into the inside and outside of a clay bowl
These introductory projects allow you to practice fundamental skills like rolling coils, smoothing seams, texturing, and shaping clay. Focus on learning the basics before moving onto more complex creations. Sources like Pinterest offer plenty of beginner inspiration.
Intermediate Projects
Once you have a handle on clay fundamentals, try slightly more advanced techniques and projects like:
- Slab construction – Score, slip, and join clay slabs into boxes, picture frames, and plaques
- Clay sculpture – Sculpt 3D animal, human, abstract, or architectural forms
- Molds – Press clay into molds to make reproductions and custom keychains, magnets, and ornaments
- Extruder clay art – Use an extruder tool to create long strands for vases, baskets, and more
Focus on learning specialized skills like balancing weight in sculptures, achieving clean slab joins, and mastering an extruder. Pay attention to timing as some intermediate projects require multiple stages over several days.
Advanced Clay Projects
Once you’ve honed your skills, take on these challenging clay projects:
- Large sculptures – Sculpt large, multipart installations and figures
- Intricate details – Incorporate tiny, elaborate textures and components
- Sets – Design cohesive dishes, vases, tiles, and other sets with unifying style
- Life molds – Create molds directly from the human body and other organic objects
- Murals – Design storytelling visual narratives across multiple handbuilt tile slabs
Advanced projects allow you to showcase technical mastery, artistic vision, and creative problem solving. Consider factors like structural support, firing needs, assembly, and surface treatments like glazing. Let your imagination run wild within the possibilities of the clay medium.
Setting Up a Clay Studio
Setting up your own clay studio at home can be an exciting and rewarding endeavor for any aspiring potter or ceramic artist. With some planning and preparation, you can create a functional and inspiring space to unleash your creativity.
First, you’ll need to consider the basic equipment and tools needed. An electric or kick wheel is essential for throwing pots on the wheel. Choose a wheel with variable speed control for versatility [1]. You’ll also need clay working tools like ribs, trimming tools, cutting wires, and modeling tools. Basic handbuilding tools like rolling pins, sculpting loops, and ceramic knives are a must as well.
For finishing and decorating, you’ll want slip trailers, brushes, sponges, stamps, and carving tools. A kiln is necessary for firing your finished pieces. Even a small countertop kiln can work well. You’ll also need safety equipment like a ventilation mask, apron, and gloves.
Beyond equipment, allow room for wedging and working tables, storage for clay, shelves for tools and supplies, and an area for glazing. Sufficient lighting and ventilation are also key. With thoughtful planning and setup, you’ll have an organized studio primed for unleashing your creativity!
Conclusion
Clay art is a rewarding and creative hobby that allows you to express your imagination and connect more deeply with the material world. As we’ve explored, clay can be sculpted, molded, carved, and shaped into beautiful works of art using a variety of techniques. From ancient pottery to modern sculptures, clay art has a rich history across many cultures. With the right inspiration, tools, and skills, anyone can unleash their creativity through this wonderful medium.
In this article, we looked at the long history of clay as an artistic material, the many techniques used in clay sculpture and pottery, inspiring clay artists to learn from, and ideas for clay projects you can make at home. Setting up your own clay studio is easier than you think. With some basic equipment and safety precautions, you’ll be ready to get your hands dirty.
Clay art allows for immense creativity. Let your imagination run wild and don’t be afraid to experiment. Work at your own pace, be patient with yourself as you learn new skills, and most importantly, have fun! The sense of satisfaction from creating something with your own two hands is incredibly rewarding. Whether you’re a complete beginner or aspiring professional, we hope this article has sparked inspiration and given you ideas to pursue your own clay art journey.