Mastering Advanced Clay Sculpting Techniques
Clay sculpting has been around for thousands of years, with evidence of clay art dating back as far as 25,000 BCE according to James Cook Sculptures. From early pottery and figurines to elaborate architectural decor, clay has been a popular medium for creative expression across cultures. Beginner techniques often focus on handbuilding and coiling basic forms. However, advanced techniques open up new possibilities for intricate sculpture and refined artistic vision.
In this article, we will explore next-level techniques that take clay sculpture to the height of artistic achievement. You’ll learn advanced methods for sculpting the human form, adding realistic textures, joining complex shapes, and tackling challenging compositions. We’ll also cover troubleshooting common problems and how to finish and display your completed sculptures. With dedication and practice, these advanced approaches will help take your clay sculpting skills to the professional level.
Tools and Materials for Advanced Sculpting
Having the right tools and materials is key for more advanced clay sculpting projects. The types of clay, sculpting tools, armatures, and stands allow maximum creative expression while also ensuring stability and durability of the finished sculptures.
Types of Clay
Clay choice comes down to the planned use for the finished piece, desired working properties, and features like ability to be fired, painted, or sealed. Common options include:
- Oil-based clays – Offer smooth texture and ability to never fully dry out. Best for sculptures focused on process vs. permanent finished product.
- Polymer clays – Already cured so it won’t dry out and doesn’t require firing. Easy to detail and bake to harden. Finished pieces are lightweight and durable.
- Earthenware clays – Fire to a ceramic material. Withstands higher temperatures compared to other clays. Prone to cracking and breakage if walls are too thin.
- Stoneware clays – Very strong after firing and resistant to cracking. Ideal for functional ware in addition to sculpture. Requires highest firing temperatures.
Essential Sculpting Tools
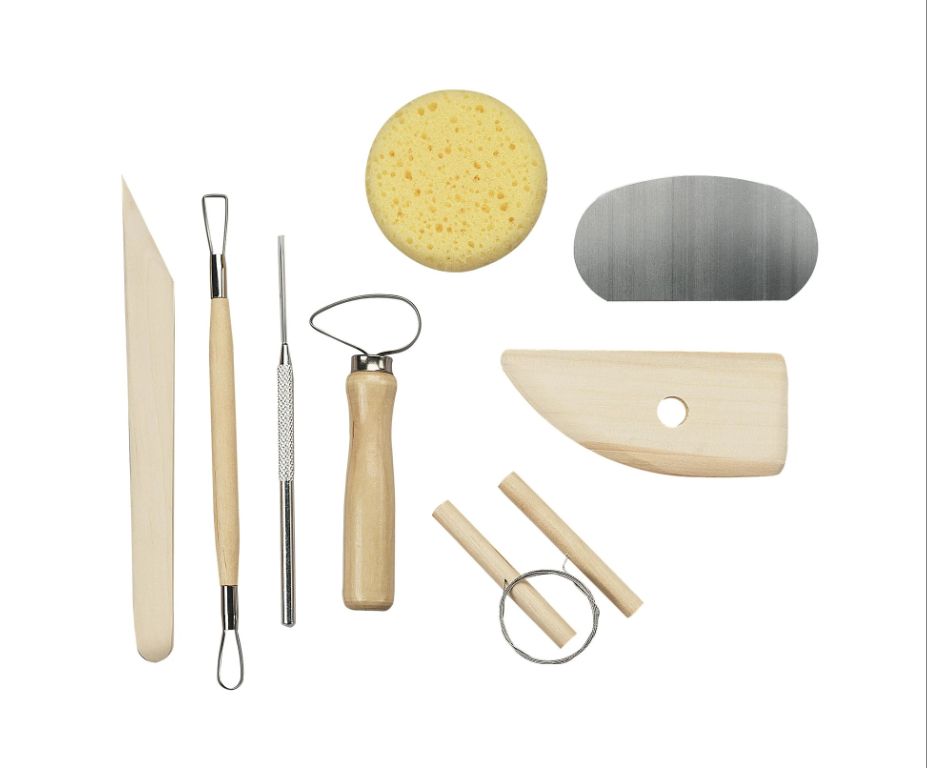
Having a variety of sculpting tools allows working the clay in different ways to create desired shapes and textures. Must-have tools include:
- Loop tools – Shaped in loops, wedges, and points to carve, cut, smooth, scrape, and shape clay
- Ribs – Long, thin metal tools to compress, smooth, scrape, and shape clay
- Cutting wires – Cut through clay to divide sections or remove pieces
- Paddles or knives – Flatten and thin clay; create slabs
- Wooden modeling tools – Shape softer clay; safe for fine details
Texture tools, sculpting stands, water spray bottles, carving tools, calipers, and brass brushes also come in handy for finishing details.
Other Materials
Armatures made from wire, wood, or other materials provide internal support for sculpture stability. Use materials like aluminum wire, wood dowels, twisted wire, or rigid foam insulation. Sculpting stands, foam supports, and display bases also help present finished sculptures.
Sculpting the Human Form
Mastering the sculpting of the human form requires a deep understanding of anatomy and proportion. To accurately capture the human figure, focus on learning about skeletal and muscular structure. Study resources on anatomy to gain a sense of how the bones and muscles create shape and allow for movement.
When sculpting heads and faces, carefully measure the proportions to match real human faces. The eyes are generally halfway between the top of the head and the chin. Study the underlying skull structure to achieve realistic facial features. Pay close attention to the shapes and angles of the nose, eyes, mouth and ears.
Striving for realistic emotion and body language will bring your human sculptures to life. Observe live models or photos to see how different poses communicate movement, emotion and personality. Consider how factors like age, gender and body type impact posture and expression.
Aim to capture subtle details like furrowed brows, pursed lips, clenched fists or a slumped stance. Your meticulous attention to these nuances will allow you to create compelling, lifelike human forms.
Textures and Surface Effects
Creating realistic textures is one of the keys to sculpting figures that look authentic and lifelike. For hair textures, consider using a clay shaper tool to etch in strands and waves. Use different sized loops on the shaper to vary the widths of hair. For smooth textures like skin, roll a round modeling tool over the surface to blend and soften.
Clothing can be textured using a variety of techniques. For a knit sweater, press a balled up piece of aluminum foil into the clay. Try dragging tools like forks or combs across the surface for a woven look. Use square loop tools to create patterns like a button-down shirt.
To add extra dimension, apply liquid clay stains, paints or varnishes. Let them soak in for realistic coloring. Acrylic paints work well for this. Apply layers of varying opacity to create depth. Refer to this source for more ideas on texturing clay.
Joining and Construction
When creating complex and large-scale sculptures, joining pieces of clay together and constructing structural supports becomes crucial. There are several techniques sculptors use for joining clay and building strong, enduring works.
One method is creating an internal structural armature for support. This involves inserting thick wire, wood, foam, or other materials inside the clay sculpture. The armature acts like a skeleton to reinforce the clay’s shape and provide stability. Strategically placed armatures prevent sagging or breakage for sculptures with extended limbs or heavy sections. Some common armature materials are aluminum wire, galvanized wire mesh, wood sticks, carved rigid foam, and even crumpled tinfoil. Securing the clay firmly around the armature is key.
To join solid clay pieces together, moist clay surfaces can be scored or roughed up, then “welded” using slip as glue. Slip is thinned down clay that acts as an adhesive. For stronger joints, clay can be drilled and inserted with thick wire, wooden dowels, or plastic straws before joining. Inserts will bridge and reinforce the sections. Hollow clay pieces can be joined by luting – sealing the seam with additional clay.
Sculptors also decide between hollow or solid construction. Building an armature first allows hollow sections which require less clay, are lighter, and take less time to dry. Solid construction may be needed for certain shapes and textures. Combining solid and hollow areas is common. Planning the internal structure and wall thickness is important if using hollow building.
With good joining techniques and structural supports, clay sculptures can be robust and built to monumental scales. Mastering construction allows more creative freedom.
Sources:
https://ceramicartsnetwork.org/daily/article/A-Couple-of-Cool-Clay-Sculpture-Techniques
Sculpting Wildlife and Animals
Sculpting realistic animals and wildlife in clay requires understanding animal anatomy and how to recreate fur, feathers, scales, and other textures. When sculpting animals, it’s important to carefully study reference photos to understand the unique proportions and poses of different creatures.
To sculpt fur or hair, use various loop, ribbon, and scoring tools to imprint the clay in strokes that follow the direction of hair growth. For shorter fur, make small stab impressions with a rounded sculpting tool. For feathers, thin engraved lines can represent the shaft while broader stroking suggests plumes. Add scales and reptilian skin textures by pressing into the clay with serrated sculpting tools.
Pay close attention to animal facial expressions and poses. Subtle adjustments to ears, eyes, mouth, head tilt, and paw positions can dramatically impact the emotion and attitude you convey. Strive for poses and expressions that feel dynamic yet realistic. You may need an armature for support sculpting animals in action stances.
Reference videos like this sculpting animals compilation can provide inspiration on techniques for sculpting fur, scales, feathers, and realistic animal anatomy. With practice and close observation, clay is an ideal medium for bringing wildlife and animals to life.
Fantasy Sculpting
One of the most imaginative areas of advanced sculpting is creating fantasy characters and otherworldly creatures. This offers the artist unlimited creative freedom to dream up any being they can envision. Fantasy sculpting differs from more realistic work in that artists are not bound by the constraints of anatomy or nature. The goal is to let the imagination run wild.
A few key techniques help bring fantasy sculptures to life:
- Mixing animal and human features – Combining human arms or facial features with an animal body is a classic technique for fantasy characters. Consider the anatomy of various animals and how human elements could be incorporated.
- Developing a unique style – While inspiration can come from mythological and pop culture sources, aim for original and distinctive designs. Don’t just recreate generic stereotypes.
- Focusing on textures – Consider horns, scales, fur, feathers and other textures that lend an organic, exotic quality to fantasy beings.
- Exaggerating proportions – Unlike realism, fantasy offers freedom to exaggerate body shapes and sizes for dramatic effect.
Fantasy sculpting allows complete artistic license. The special charm of fantasy characters is their uniqueness. With practice and imagination, clay artists can create miniature worlds inhabited by extraordinary creatures.
Troubleshooting Common Issues
When working on advanced clay sculptures, there are some common issues that may arise. Knowing how to identify and fix these problems is key to creating a successful finished piece.
Cracking and Breakage
As clay dries, it contracts and can develop cracks or break. To prevent cracking, maintain consistent moisture in the clay by spraying it with water and covering with plastic when not working on it. Avoid overly thin or uneven parts which are prone to cracking. If cracks do form, fill them by mixing slip or damp clay and pressing it into the cracks. Small breaks can also be repaired this way. For larger breaks, drill holes on both sides of the break and use clay slip to glue the pieces back together, inserting clay pegs into the holes to reinforce it (source).
Collapse from Weight
With larger sculptures, the weight can cause parts to droop or collapse. Create structural armatures for support using wire, wood, or other materials. Hollow out any thick parts to reduce weight. Reinforce joints with extra clay. Avoid making extremities like arms and legs too thin or elongated. Add supports beneath heavy areas. Work gradually to maintain structural integrity as you build up the sculpture.
Fixing Mistakes
Don’t be afraid of mistakes – they are part of the process. Scrape or cut away unwanted clay. Use extra clay to rebuild or re-sculpt areas. For minor changes, use sculpting tools to refine forms. Oil or water can smooth rough spots. Make sure any added clay is blended into the existing sculpture. Be careful not to overly handle the clay when making fixes, as it can distort the sculpture. Take photos as you work to use as reference (source). Fixes are all part of bringing your vision to life in clay.
Finishing and Display
After creating and baking your sculpture, finishing touches and display methods can elevate your final piece. Proper polishing protects the clay and brings out its smooth surface (https://www.instructables.com/Finishing-and-Detailing-a-Sculpey-Polymer-Clay-Scu/). Using very fine sandpaper or a clay polishing kit, gently buff the sculpture to remove any rough spots or dust from baking. Work in small sections until glossy. Apply a protective acrylic sealant or varnish for a glass-like sheen.
Mount your sculpture on an appropriate base for stability and display. Custom wood, glass, or metal bases tailored to the sculpture can add dramatic effect (https://www.instructables.com/Finishing-and-Detailing-a-Sculpey-Polymer-Clay-Scu/). Simple clear acrylic rods work for small pieces. Consider the location and desired visual effect when choosing mounting materials and height.
Properly lighting your sculpture helps bring out intricate details and textures. Use spotlights or track lighting to create dramatic shadows and accents. Diffused lighting minimizes glare. Place on a rotating display to showcase from all angles. Avoid direct sunlight which can fade colors over time. Carefully lighting your finished sculpture helps showcase your creative work.
Next Steps and Resources
Once you have gained proficiency in advanced sculpting techniques, there are many ways to continue growing as an artist. Here are some recommended next steps:
Recommended Books and Tutorials
Even masters continue learning. Consider investing in more advanced books and video tutorials to keep expanding your skills. Some recommendations include:
- Sculpting the Figure in Clay by Peter Rubino
- Sculpting from Life by Jackie Sharp
- Mike Hill’s DVD on Animal Sculpting
- Mary Setrakian’s videos on sculpting faces
Joining a Sculptor’s Community
Connecting with other sculptors can provide invaluable feedback, inspiration and camaraderie. Look for local sculptor groups, online forums like Sculpture Community, or social media groups to join.
Entering Competitions and Galleries
Consider entering your work into juried art competitions and applying to show at local galleries. The process will help motivate and challenge you. Be sure to photograph your work professionally and polish your artist statement.