How Can We Make Things From Clay?
Clay is a natural material that has been used for centuries to create pottery, sculpture, and decorative objects. Clay forms from the breakdown of rocks over long periods of time and can be found in many locations worldwide. There are several different types of clay, each with their own characteristics:
– Earthenware clay: Earthenware is clay that has been fired at lower temperatures, typically between 1700°F-2100°F. It is porous and coarse. Earthenware can come in various colors like red, brown, or orange. This clay works well for beginner potters.
– Stoneware clay: Stoneware clay is fired at higher temperatures than earthenware, usually between 2200°F-2400°F. The high firing makes stoneware non-porous and more durable than earthenware. Stoneware has an earthy grey or brown color.
– Porcelain clay: Porcelain is the purest white burning clay that is fired at very high temperatures up to 2652°F. It has very low porosity, making it strong and water resistant. Porcelain can be tricky for beginners to work with.
– Specialty clays: Some clays have special properties added to them, like grog (ground firebrick) to improve texture or paper pulp to allow firing at lower temps. There are also colored clays, oil-based clays, and air-dry clays.
Choosing the right clay depends on factors like the desired finished look, experience level, and available firing temperatures. Many clays can also be mixed together to achieve particular working properties.
Gathering Clay
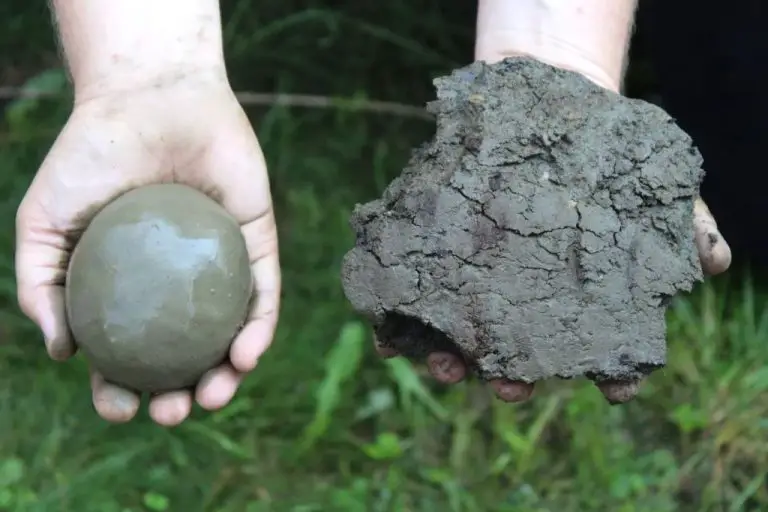
Clay can be gathered from many locations if you know where to look. The best places to find clay are near water sources like rivers, streams, lakes, and oceans. Look for exposed riverbanks or areas where soil has been dug up, which may reveal clay deposits underneath. You can also check land near construction sites where the earth has been disturbed.
To gather clay, bring along some basic tools to dig and collect the clay. A shovel is useful for removing topsoil to reach the clay underneath. Pickaxes or trowels can help break up hard clay chunks. You’ll also want buckets or bags to store the clay you collect. Wear gloves to keep your hands clean while digging and gathering clay.
Look for clay that is smooth and free of debris. Take only what you need and fill your buckets or bags about two-thirds full to leave room for transport. Try digging from a few different spots to find the highest quality clay. When you return home, you’ll want to further process the clay to prepare it for projects.
Preparing the Clay
After gathering clay, an important first step is properly preparing it before beginning any sculpting or modeling. Preparing clay involves cleaning, wedging, kneading, and removing air bubbles to create a uniform material that is ready to be shaped.
Cleaning clay removes any debris, dust or hardened bits from the raw material. It’s important to start with clean clay so impurities don’t affect the sculpting process. Cleaning can be done by picking out visible particles by hand or by soaking clay in water and sieving out debris.
Wedging and kneading are techniques to mix the clay thoroughly and remove air pockets. Wedging involves cutting the clay into chunks and slamming it against a surface to compress it. Kneading is working the clay with hands and fingers, much like kneading bread dough. These actions distribute moisture evenly and remove trapped air bubbles.
Removing air bubbles is critical because they can expand during firing and cause cracks or bursts in the final piece. Along with wedging and kneading, air bubbles can be removed by pounding or poking areas where bubbles are visible. Rolling clay into coils or slabs also compresses it and forces out air pockets.
Once clay has been cleaned, wedged, kneaded and de-aired, it is ready for sculpting and shaping into desired creations.
Shaping and Molding Clay
There are several techniques that can be used to shape and mold clay into creative forms.
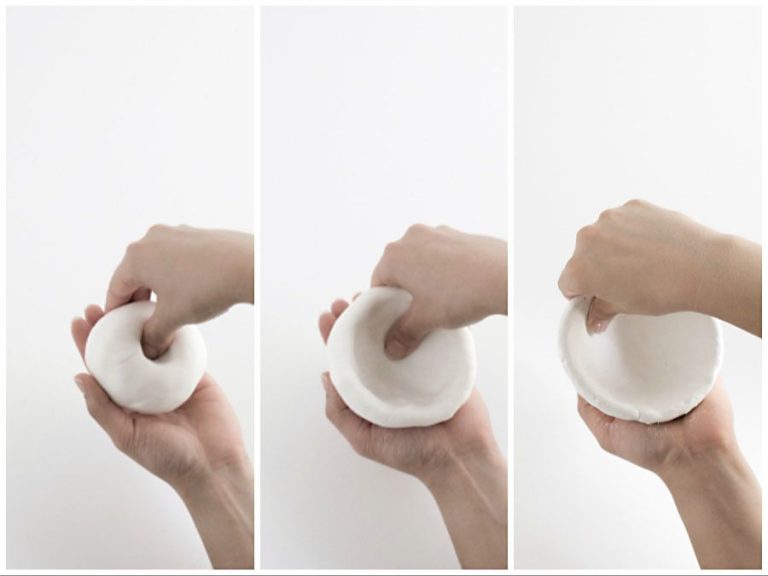
Handbuilding Techniques
Handbuilding involves shaping clay without the use of a pottery wheel. Some common handbuilding techniques include:
- Pinch pots – Forming clay into a basic pot shape by pinching and pulling the clay with your fingers
- Coils – Rolling clay into long coil shapes and stacking them to build up vessel forms
- Slabs – Rolling out flat sheets of clay that can be cut, joined together and molded into shapes
Handbuilding allows for making unique asymmetric shapes and decorative clay objects. It is a very accessible clay shaping method for beginners.
Using Molds
Clay can be pressed into reusable plaster molds to create solid forms. Molds can be used to make consistent shapes and decorative details.
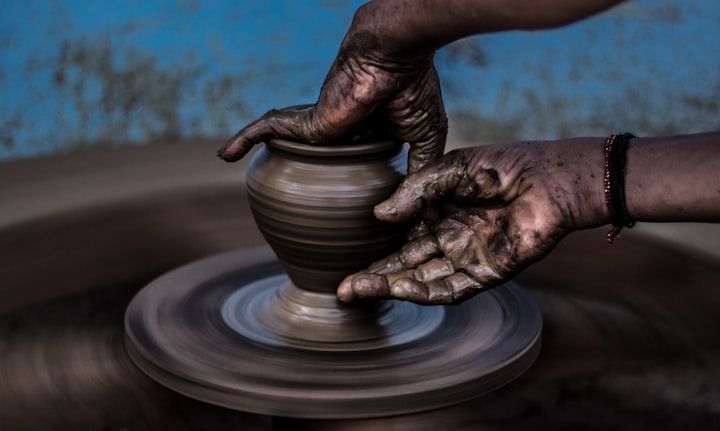
Wheel Throwing
Wheel throwing involves shaping clay on a spinning pottery wheel. It takes practice to center and raise the clay, but allows for symmetry and uniform walled vessels. Clay can be pinched and pulled upward from the base as the wheel spins at a constant speed. Wheel throwing requires an electric or kick pottery wheel, but allows for efficiently shaping quality pottery forms.
Shaping and molding clay employs a diverse range of techniques for both function and artistic expression. The possibilities are endless when working with clay by hand or on the wheel.
Decorating
There are many creative ways to decorate clay pieces to add visual interest, texture, or color. Some popular decorating techniques to try with clay include:
Surface Techniques: These methods add texture, patterns, or designs directly onto the raw clay surface before firing.
Carving involves using tools to scratch or etch designs into the surface. Clay carving tools, popsicle sticks, or even paper clips can create lines, shapes, or texture.
Burnishing is polishing the clay surface by rubbing it with a smooth tool to compact the clay and create a shiny look. Plastic, wood, or metal rib tools work well.
Sgraffito uses a pointed tool to scratch through a top colored slip layer to reveal the clay color underneath in a contrasting pattern.
Coloring: Different coloring products can be applied to raw clay to add permanent color before firing.
Slips are liquid clay mixtures used to coat the surface with color. Natural clay-based slips or homemade slips from clay and water provide earthy tones.
Underglazes are colored products painted onto raw clay that become permanent after firing. They come in many bright and vibrant hues.
Stains contain pigments designed to penetrate and color the raw clay surface. Browns, blues, greens, and earthy hues are common.
Firing Clay
Firing clay is essential for hardening and preserving clay projects. There are two main types of firing – bisque firing and glaze firing. Bisque firing is done before applying any glazes or decorations to harden the clay body. Glaze firing is done after glazes have been applied to melt the glazes onto the clay surface.
There are several types of kilns used for firing:
- Electric kilns – The most common type, these use electricity to generate heat. They are easy to use and control the temperature.
- Gas kilns – Use propane or natural gas for fuel. They can reach higher temperatures but can be more difficult to operate.
- Wood/soda kilns – Fueled by wood, these provide effects from wood ash but can be more labor intensive.
- Raku kilns – Small, inexpensive kilns that allow items to be removed at red heat for special raku glaze effects.
For bisque firing, temperatures typically range from 1652-2102°F (900-1150°C). Glaze firing requires higher temperatures ranging from 2012-2372°F (1100-1300°C) to properly melt the glazes to a glossy finish.
It’s important to follow the temperature guidelines for the specific clay body and glazes used. Careful control of the kiln temperature and firing schedule will help ensure clay items do not crack or become damaged during firing.
Applying Glazes
Glazes are an important finishing technique when working with clay. They come in various types and can be used to color, decorate, and waterproof clay surfaces. When applying glazes, there are a few key techniques to understand.
Glaze Types:
- Transparent – Allow the clay color to show through
- Opaque – Obscure the clay color
- Matte – Dull, non-reflective surface
- Gloss – Shiny, glass-like surface
Using Glazes: Test your glazes first to understand their properties. Choose glazes suitable for your type of clay and intended firing temperature. Mix and blend glazes to achieve unique effects. Apply multiple layers for more depth.
Dipping: Dipping the clay piece fully into glaze allows for an even coat. Hold the piece by the bottom and submerge into the glaze, then lift out slowly and let excess drip off.
Pouring: Hold the clay piece over a basin and slowly pour glaze over all surfaces to coat evenly. Rotate the piece to control where glaze flows.
Brushing: Use a soft brush to apply glaze. Load the brush and apply with even, overlapping strokes. Brushing allows glaze control for detailed effects.
Mixing: Mix water into thick glazes to thin to a creamy consistency. Blend glazes together to make custom colors and textures. Test mixes on glaze test tiles first.
Additional Techniques
One of the more advanced skills when working with clay is learning techniques to attach additional parts and decorations. This allows you to create more complex and intricate pieces. Here are some key methods:
Adding Handles and Spouts
Handles and spouts are very useful additions for making functional pottery like mugs, cups, teapots, and pitchers. To attach a handle, make sure both the clay piece and handle are leather hard. Score the surfaces to be joined by cutting crosshatch marks into the clay. Apply watered down clay slip to the scored areas as “glue”. Then press the handle onto the mug or pitcher, smoothing the seams. Allow to dry completely before firing. Spouts can be added the same way.
Attaching Separate Parts
Sometimes you may want to create clay pieces with separate components attached together. For instance, attaching a hand sculpted creature on a tile, or pieces of decorative clay cutouts on a box. Use the same scoring and slip method. Make sure parts are solidly joined by blending and smoothing where they come together. Allow to dry fully before firing.
Using Armatures
Armatures provide interior structure and support when sculpting figures, allowing you to create things like arms sticking out from the body. Armatures can be made from wire, wood, rolled up newspaper, or other materials. Bend into the desired shape, cover with clay, allowing it to dry. The armature becomes encased within the clay sculpture. This enables creating bolder shapes and overhangs.
Creating Finished Pieces
Completing and finishing clay projects requires some final steps for a professional look. Here are some tips for finishing the bottoms, cleaning, and polishing pieces:
Finishing the Bottom
The bottom of a clay piece is just as important as the top. An unfinished bottom can create instability, prevent the piece from lying flat, or detract from the overall look.
Once the main shaping is complete, take time to finish the bottom. Smooth it out and round any sharp edges. Consider adding a recessed base or attaching felt pads to create stability.
For pieces that will be frequently handled, like mugs, apply a food-safe sealer to the base. This prevents moisture absorption which can weaken the clay over time.
Final Clean Up
Before firing, give the piece a final inspection and gently clean it. Carefully remove any dried clay shards, dust, or debris with a soft brush or damp sponge.
Be very gentle so you don’t unintentionally alter the shape or scratch the surface. Do not submerge unfired clay in water as it can become misshapen.
Polishing
Once fired, you can polish the piece to enhance the finish. Use very fine sandpaper or a polishing cloth to gently buff the surface. This removes any minor imperfections and brings out the clay’s natural luster.
Take extra care when polishing intricate or detailed areas. Work slowly and cautiously to avoid accidental damage.
With some thoughtful finishing steps, you can complete your clay projects with a clean, professional look ready for display.
Troubleshooting Issues
Working with clay can be tricky, and problems often arise even for experienced artists. Here are some common issues that come up, along with tips for avoiding and fixing them:
Cracks
As clay dries, it shrinks and contracts, which can lead to cracks. To prevent cracking:
- Avoid clay that is too wet or too dry
- Wrap your clay securely in plastic when storing it to prevent uneven drying
- Don’t let thin or protruding areas dry too quickly
If cracks do form, they can sometimes be fixed by lightly wetting the clay and massaging the area, then allowing it to dry slowly. For pieces that have already been fired, you may need to fill in cracks with clay slip.
Warping
Clay can become misshapen or warped due to uneven drying. To prevent warping:
- Wedge clay thoroughly to remove air pockets
- Allow wet pieces to dry slowly and evenly
- Avoid making pieces with walls of varying thicknesses
You may be able to correct slight warping before firing by wetting one side of the piece to even out the moisture content. For fired pieces, warping can be difficult to fix.
Glazing Issues
Bubbles, bare spots, dripping, cracking, and peeling are common glaze problems. They can often be prevented by:
- Applying glazes in thin, even coats
- Allowing proper drying time between coats
- Firing at the temperature recommended for the glaze
Some glaze mistakes like bare spots may require redoing the glazing process. Cracks and peeling after firing are harder to correct, but can sometimes be fixed by reglazing.
Avoiding these common issues takes practice and patience. Don’t get discouraged – every piece is a learning opportunity! With time, you’ll gain the skills to create beautiful clay works.