How Can You Tell If Glass Is Fusible?
What is fusible glass?
Fusible glass, also known as kiln-formed glass or warm glass, refers to glass that has been designed to melt and fuse together at relatively low temperatures. Unlike traditional glass, fusible glass is formulated to be compatible for fusing, slumping, or casting in a kiln. The key property of fusible glass is its low melting temperature, usually under 1500°F (815°C).
To make fusible glass compatible for firing at low temperatures, the composition and ingredients are specially designed. Manufacturers carefully control the lime, silica, and other compounds to achieve a glass with a low melting point and coefficient of thermal expansion. This enables pieces of fusible glass to soften and bind together when fired in a kiln without cracking.
The main difference from regular glass is this controlled coefficient of expansion, which allows fusible glass to be kiln-fired. Regular glass is made to withstand high temperatures, so it does not fuse or slump when fired in a kiln. Fusible glass opens up many techniques like fusing, slumping, pâte de verre, and casting, which are not possible with traditional glass.
Identifying fusible glass
There are a few ways to determine if glass is formulated to be compatible for fusing projects. Visually inspecting the glass can provide some clues. Fusible glass tends to have a smooth, bubble-free surface after firing, while non-fusible glass may have bubbles or pits on the surface. Applying a propane torch flame to an edge of the glass can also help identify fusibility. Fusible glass will round out smoothly under the flame. Non-fusible glass may crack or shatter when heated.
Testing compatibility between two or more glasses is also important. A commonly used method is the “fuse-it test” which involves fusing together a known sample of fusible glass with the mystery glass and examining the results. One recommended approach is cutting a 1 1/2″ section of clear glass with a known COE and fusing it with a 3/4″ square of the glass being tested (source). Inspect the fused piece for cracks, bubbles, or other signs of incompatibility.
Coefficient of Expansion
The coefficient of expansion (COE) refers to the rate at which a material expands when heated. When working with glass, it is critical to know and match the COE, as incompatible COEs can lead to cracking or breaking during the firing process.
There are two main COE ratings for fusible glass:
- COE 96 – This glass has a lower softening point and is commonly used for fusing projects. Typical fusible art glass like Spectrum Glass and Bullseye Glass have a COE of 96. According to Slumpy’s, their fusible range T Glass has a COE of 96.
- COE 90 – Higher softening point than 96. Often used for kilncasting. Major manufacturers like Uroboros offer COE 90 glass.
It’s critical to match the COE when combining multiple pieces of glass, as fusing glass with mismatched COEs can lead to cracking from incompatible expansion rates, as noted by Jewelry Making How To.
Labeling and manufacturer information
When working with glass, look for a label indicating the coefficient of expansion (COE) and other specifications. This is usually printed or etched on the glass itself or the packaging it comes in. According to Bullseye Glass, their fusible glass products are labeled with an “F” and the COE, while their standard non-fusible glass is labeled with an “N” (Bullseye Glass).
If the glass you are working with does not have a label, contact the manufacturer directly to inquire about the COE and specifications. It is crucial to know the COE of any glass prior to fusing, as incompatible COEs can lead to cracking or breaking. Checking with the manufacturer helps ensure you have the proper information and can avoid accidents when fusing different types of glass together.
Testing the COE
There are a few methods for testing the COE of your glass to determine if it is compatible for fusing.
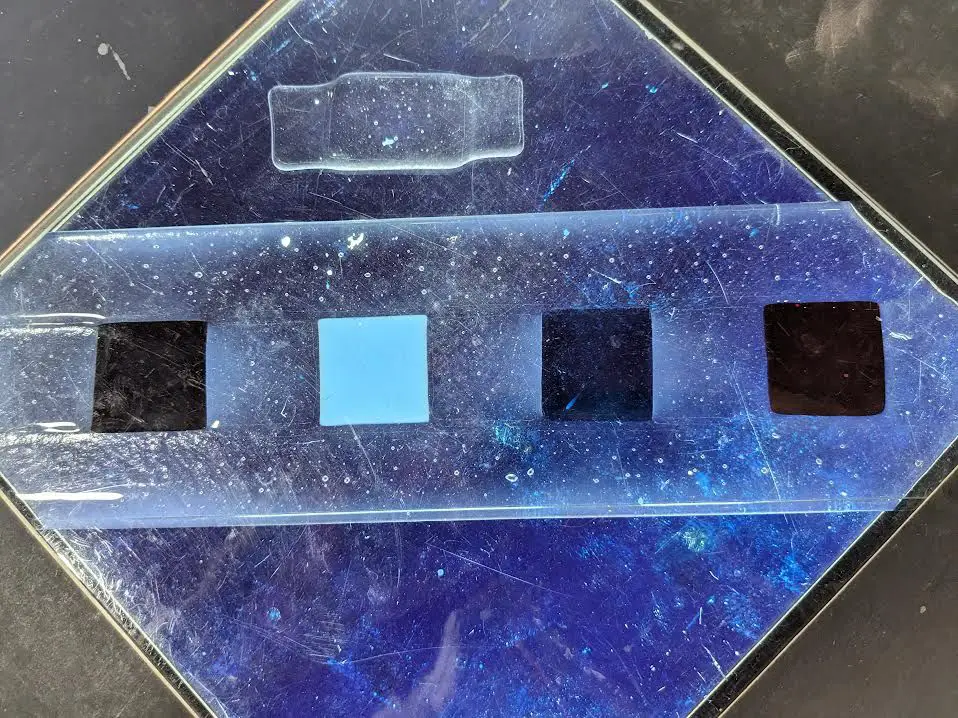
One common method is using a testing card or strip. As explained on the DL Art Glass website, this involves cutting a strip of glass with a known COE and fusing it between two pieces of the glass you want to test. After firing, you inspect the strip to see if it cracked or rounded on the edges. Cracking indicates incompatibility, while smooth rounding suggests the glass is compatible.
Another approach is to make a simple fused glass project using the glass you want to test, along with a compatible glass like 96 COE. As described on Jewelry Making How To, putting the glass between two pieces of polarized film will reveal stress cracks and halos if the COE is incorrect.
Both methods require the same materials – a kiln, known compatible glass, and the glass you want to test. The testing card approach also needs a glass cutter to cut the strip, while the polarized film technique requires the special viewing film.
Annealing considerations
Annealing is the gradual process of slowly cooling hot glass after it has been fired, shaped or worked. It is a critical step that helps remove internal stresses built up in the glass during firing and forming.
Annealing has a significant effect on the fusibility of glass. When glass is heated, it expands. When it is cooled rapidly, the outside surface cools and contracts before the interior. This puts the exterior into compression and the interior into tension. These stresses can cause glass to crack either during the cooling process or later on. Annealing allows the glass to cool slowly so the stresses can relax and dissipate. This helps make the glass more durable and resistant to breakage.
According to FusedGlass.org, proper annealing is critical for fusing glass. An improper annealing schedule can lead to cracks, breakage, or glass dust. Fused glass requires a specific annealing point based on the coefficient of expansion. Annealing temperatures are typically in the 1150-960°F (621-516°C) range.
By properly annealing fused glass, internal stresses are minimized. This helps maximize the stability and fusibility of the glass.
Firing schedule
An important part of working with fusible glass is following the proper firing schedule. The firing schedule refers to the ramp rates (how quickly the temperature increases), target temperatures, and hold times when firing projects in a kiln. Having an optimized firing schedule ensures the glass reaches the ideal temperatures for fusing and prevents cracking or other defects.
For most fusible glass, the target temperature is between 1450-1500°F. This high temperature allows the glass to become soft and tacky so it can fuse together properly. To reach this peak temperature, firing schedules generally have an initial ramp rate of 200-300°F per hour up to around 1000°F. Then the ramp rate increases to 500-600°F per hour until reaching the target temperature 1. The glass then needs to soak at the peak temperature for 15-60 minutes depending on the project. Finally, the kiln undergoes a slow anneal down to around 960°F before turning off 2.
Following the manufacturer’s recommended firing schedule helps ensure proper fusing. Rushing the ramp rates or not reaching the target temperature can lead to poor results.
Signs of unsuccessful fusing
There are a few common signs that indicate your glass fusing was unsuccessful. These include cracking, crazing, and scorching of the glass.
Cracking
Cracks can occur during the glass fusing process for several reasons. If the glass is heated too rapidly, uneven heating or cooling can cause stresses that lead to cracking. Cracking can also occur if incompatible glasses with significantly different COEs are used together, or if the glass is cooled too quickly after fusing. Using an improper firing schedule that does not include a soak period can also contribute to cracking issues.
To reduce cracking, slow down the rate of temperature increase during firing, use compatible glasses, include a sufficient soak time at the fusing temperature, and anneal the glass properly. Refer to the product specifications and COE information from glass manufacturers. According to Fuseworks (https://www.soulceramics.com/pages/glass-fusing-issues), slowing down the firing rate helps control the heat and prevent cracking.
Crazing
Crazing is the formation of fine cracks on the surface of the glass, caused by stresses between the outer and inner areas of the glass. It occurs when glass is cooled too quickly, resulting in different contraction rates between the surface and interior. Using incompatible glasses can also lead to crazing if their COE does not match.
To prevent crazing, cool glass gradually and use compatible glasses with similar COEs. Adding a soak period at the annealing temperature allows stresses to release. Refer to manufacturer specifications for proper annealing schedules based on the thickness and types of glass used.
Scorching
Scorching appears as frosted or matte areas on the glass surface. It is caused by overheating the glass until the surface begins to melt. This often occurs when firing too quickly at higher temperatures. Compatibility between glasses is also a factor, as mismatches in COE make scorching more likely.
To avoid scorching, follow the recommended firing schedule for the type of glass used. According to Troubleshooting for Glass Art (https://www.glasscampus.com/tutorials/pdf/Troubleshoting%20for%20Glass%20Art.pdf), adding a hold time at the fusing temperature allows the glass viscosity to even out, reducing scorching. Using compatible glasses and monitoring the kiln temperature can also help prevent overheating.
Safety considerations
Working with fusible glass requires taking proper safety precautions. Two key areas to focus on are ventilation and handling precautions.
Proper ventilation is critical when firing glass in a kiln. The process of fusing glass can release fumes from the glass, shelf primer, enamels, or other materials used. Always fire glass projects in a well-ventilated area with adequate airflow. Operating kilns in enclosed spaces without ventilation can lead to dangerous buildup of fumes. Refer to kiln manufacturer guidelines for details on proper ventilation requirements (Bullseye Glass Co.).
When handling glass, wear protective eyewear to avoid injury from glass shards or chips. Use proper tongs, gloves, and tools when cutting, grinding, or manipulating glass. Avoid direct contact between skin and broken glass edges which can cause cuts. Work on a stable surface and clean work area to prevent slips or falls. Always handle glass carefully and intentionally to prevent accidents (American Glass Supply).
Example projects
Here are some example fused glass projects that both beginners and advanced artists can try:
Pendants, dishes, and coasters
Great beginner projects include pendants, dishes, plates, and coasters. These smaller items allow you to experiment with glass fusing on a smaller scale. Simple jewelry pendants can be made by fusing glass pieces in a small kiln shelf or firing tray. Dishes and plates involve fusing glass pieces into the desired shape and allowing room for the edges to slump. Coasters can be decorated with fusible glass pieces or intricately patterned using fusible glass powders. Some easy project ideas are shared on sites like Pinterest.
Advanced sculptural art
For advanced glass artists, more complex sculptural art pieces can be created through multiple firings, mold making, and other advanced techniques. These might include bowed vessels, three-dimensional sculptures, or detailed landscapes and scenes made from multiple fused components. The glass art can take on very organic, fluid shapes when fired into custom molds. There are endless possibilities for one-of-a-kind artworks using innovative fusing techniques.