How Do You Apply Decal Paper?
Decal paper, also known as transfer paper, is a specialty paper that allows images and designs to be transferred onto another surface. There are a few main types of decal paper:
- Vinyl decals use adhesive vinyl that sticks onto surfaces.
- Waterslide or slide decals use specially coated paper that allows the image to slide off when wet.
- Inkjet decals are printed using regular inkjet printers before transferring.
People use decal paper for many creative projects and to customize objects. Common uses include decorating mugs, tumblers, laptops, cars, windows, walls, and more. There are also paper decals for crafting and scrapbooking.
The main reasons people use decal paper are:
- To easily apply complex designs, logos, text, and images to surfaces
- For customization and personalization of objects
- To decorate items without permanently altering them
- For DIY crafting and artistic projects
Decal paper allows almost anyone to stylishly decorate objects even without artistic or design skills. Overall, it offers a fun, crafty way to customize items.
Choosing Decal Paper
When choosing decal paper, the first decision is whether to use vinyl or water slide decals. Vinyl decals use a sticky backing that adheres the decal directly to the surface. Water slide decals require sealing with clear coats after application. Vinyls tend to be more convenient while waterslides can provide more detailed designs.1
Consider the surface material when selecting decal paper. Vinyls adhere best to very smooth surfaces like glass, plastic, or metal. Waterslide decals work better on textured surfaces like wood since they form to the details. For long term outdoor use, waterslide decals tend to hold up better over time.
Be sure to choose high quality decal paper designed specifically for inkjet printing. Papers like Oracle 651 vinly or Papilio waterslide decal paper are proven options. Stay away from generic decal paper which may not release properly. Using the right paper avoids issues down the line.
Preparing the Surface
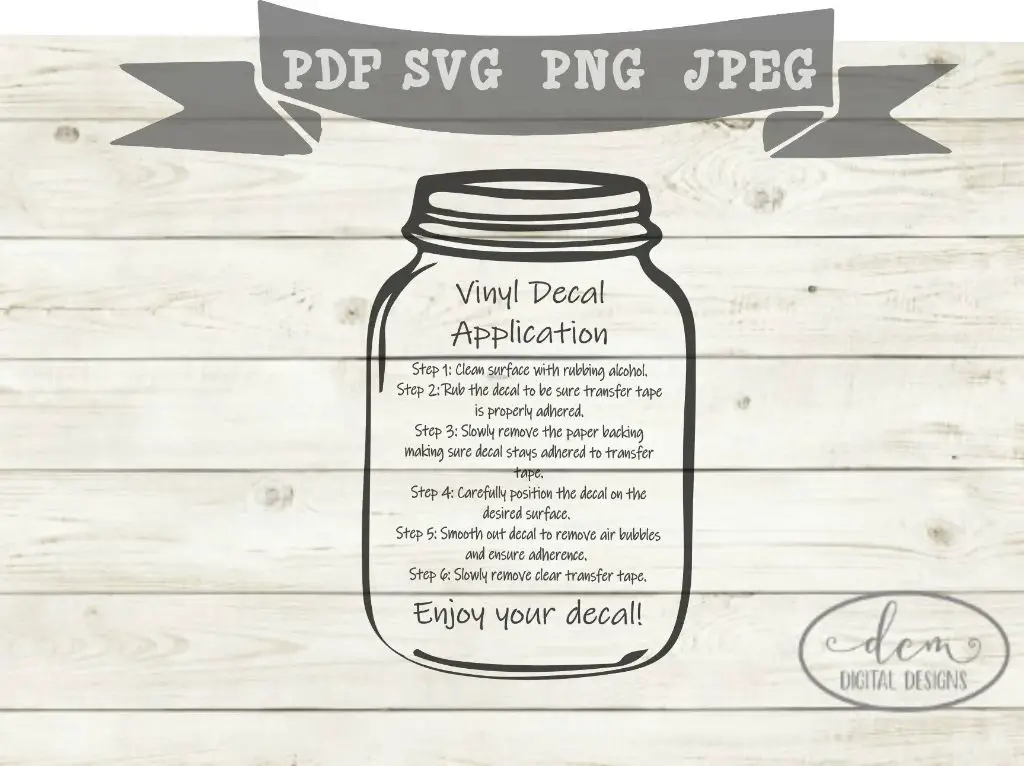
Properly preparing the surface is one of the most important steps before applying decals. The surface needs to be completely clean and free of any contaminants like dirt, grease, or wax for the decal to adhere properly. It’s recommended to clean the surface with isopropyl alcohol which will remove any oils or residue.

For very smooth surfaces like glass, plastic, or metal, an application fluid or primer may need to be applied first. This helps the decal adhesive stick to the slick surface. According to this source, priming or sealing the surface will reduce contamination and allow the decal to be repositioned if needed.
On exterior surfaces like wood or painted walls, a primer or sealer is highly recommended. This seals the porous surface so the decal adhesive bonds properly without air bubbles. Be sure to use an exterior-grade primer for any outdoor applications.
Printing and Cutting Decals
When printing decals at home, it’s crucial to use the proper printer settings and let the ink fully dry before cutting. Most home printers require adjusting the settings to “photo paper” or “glossy photo paper” mode when using decal paper. This prevents too much ink from being deposited on the slick surface. Let printed decals dry for 24-48 hours before cutting to allow ink to fully cure. Rushing the cutting process can lead to decals ripping or edges not releasing cleanly from the backing.
For cutting vinyl and paper decals, use a sharp craft knife and metal ruler. Place the ruler along the cut line to guide your knife for straight edges. Change blades frequently for best results. An electronic cutting machine like the Cricut or Silhouette can also quickly cut printed decals with precision. Weed the cut decal by slowly peeling away excess material. Work carefully during weeding to avoid tearing small decal components like text or detailed graphics. Leaving decals an extra day before weeding allows the ink to further harden and makes weeding easier.https://www.ldproducts.com/blog/8-tips-on-how-to-print-great-stickers-from-home/
Applying Vinyl Decals
Applying vinyl decals takes some care and technique to get a smooth, bubble-free finish. Here are some tips for applying vinyl decals successfully:
Start by slowly removing the backing from the decal. Go slowly and use a squeegee or credit card to smooth the decal as you remove the backing. This prevents the vinyl letters from sticking to themselves and creating folds or wrinkles.
Using a squeegee or plastic applicator card, gently press out any air bubbles or wrinkles. Work from the center outward. Press firmly but not so hard as to stretch or tear the vinyl. The squeegee helps apply even pressure across the whole decal.
If small air bubbles appear, don’t puncture them. Simply press the bubbles firmly towards the edges and they will dissipate. Larger bubbles can be pierced with a pin and pressed outwards.
Avoid overworking any one area when applying the decal as this can stretch the vinyl. Work systematically across the whole surface.
Let the vinyl adhesive cure for 24-48 hours before washing and exposing to the elements. This allows the adhesive to fully bond to the surface.
For tricky areas like bumpers with indentations, consider a vinyl decal installation spray. This helps the decal slide into place and conform to the contours.
With care, patience, and the right tools, applying vinyl decals can result in a smooth, professional finish that adheres securely.
(Source: https://www.nudgeprinting.com/blogs/blog/mistakes-to-avoid-when-applying-a-nudge-printing-car-decal)
Applying Water Slide Decals
Water slide decals require soaking in water before application. According to Wikihow, fill a small bowl or plate with room temperature water and submerge the decal paper for 10-20 seconds until it slides easily off the backing paper.
Position the decal where you want it, then slide the decal off the paper backing onto the surface, using a finger to gently guide it into place. Use a paper towel to soak up any excess water. Let the decal set for 24 hours before sealing according to Rothko and Frost. This allows the decal to fully adhere to the surface before applying clear coat.
Sealing and Finishing
Sealing decals is an important final step to protect them and make them last. Unsealed decals can peel, fade, or degrade over time when exposed to the elements or general wear and tear. A sealant adds a protective layer to guard against moisture, UV rays, and scratching.
The best sealants recommended for decals are clear acrylic sprays like Rustoleum 2X Clear Gloss 1 or Krylon Triple Thick Crystal Clear 2. These aerosol sprays evenly coat the decal with a durable, transparent finish.
It’s important to let the decal cure properly first before sealing, usually 24-48 hours. The sealant should then be allowed to fully dry as directed, often taking a few hours. Applying the sealant too soon or improperly can cause bubbling, wrinkles, or decal damage.
Decal Design Tips
When designing your own decal, there are several elements to consider that will impact the overall look and aesthetic.
Choosing the right color palette is crucial for creating a cohesive and visually appealing decal. Color combinations that are complementary, monochromatic, or triadic tend to look most balanced. Earth tones, pastels, bright primaries, and metallics are popular options. Contrasting light and dark values also helps make elements stand out. Refer to Sticker Trends 2024 predictions for the latest color trends.
Textures add visual interest and dimension to decal designs. Consider layering high-resolution images of woodgrain, marble, concrete, or other textures. Distressed and grunge textures are trending for an edgy, urban vibe. Watercolor-style backgrounds look artistic. Glitter and holographic textures add eye-catching sparkle.
Choosing complementary fonts and typography makes text pop. Sans-serif fonts like Helvetica work well for easy readability. Decorative script fonts add flair. Using all caps or large, bold fonts helps text stand out. Check graphic design trends for font pairings and styles.
Common Decal Uses
Decals can be used for a variety of creative purposes around the home, for events, and on vehicles. Here are some of the most popular ways to use vinyl and water slide decals:
Home Decor:
Decals make great decorative accents for any room in your home. They can be used to personalize furniture, walls, mirrors, vases, and more. Decals allow you to add color, patterns, inspirational quotes, monograms, or kids’ names to add personality throughout the house.
Crafting:
Crafters love using decals to customize handmade gifts and DIY projects. Decals can be applied to wood crafts, ceramics, glassware, candles, jewelry, and a variety of other handmade items as a finishing touch.
Car Decals:
Vinyl decals are extremely popular for customizing cars, trucks, boats, ATVs, and other vehicles. They allow you to add unique designs, racing stripes, names, monograms, or quotes. Decals provide a convenient alternative to painting.
Wall Murals:
Large format decals make stunning wall murals for bedrooms, playrooms, offices, and more. Just print your custom image onto vinyl, apply the wall decal, and create an instant focal wall.
Event Signage:
Decals printed with custom designs, names, or sayings are ideal for weddings, parties, birthdays, baby showers, celebrations and other events. Use them for banners, signs, favors, and decor.
Conclusion
In summary, the key steps to successfully apply decal paper are proper surface preparation, precise printing and cutting of the decals, and following the specific application instructions based on the decal material. Taking the time to clean and prime the surface ensures the decals will adhere smoothly and last a long time. Carefully printing your designs on decal paper and trimming around them prior to application prevents issues like bubbles or peeling. Using the techniques specific to vinyl or waterslide decals allows you to get a flawless finish.
Proper preparation is crucial when working with decals. Any grease, dirt or imperfections under the decal will likely cause problems down the road. Make sure to thoroughly clean, sand and prime the surface to give the decal the smoothest foundation possible. Applying decals to a properly prepped surface will lead to better results and increase their longevity.
Decals allow for creativity and customization on almost any project. They can be used to add unique designs to cars, laptops, murals, models, and more. Take your time, utilize proper methods, and implement decals to make your belongings stand out with a personal touch.


