How Do You Clean Clay Pots After Cooking?
Clay pots are a popular cooking vessel in many cuisines around the world. However, like any cookware, clay pots need to be properly cleaned after use to remove food remnants, avoid bacterial growth, and preserve the pot over time. Cleaning clay pots thoroughly is important for several reasons:
Proper cleaning removes all traces of food that could rotten or grow mold if left in the porous clay material. Thorough cleaning also helps prevent cross-contamination of flavors between different dishes cooked in the same pot.
Disinfecting clay pots kills any harmful bacteria that may have gotten into tiny cracks and crevices during the cooking process. This prevents anyone from getting sick when cooking in the pot again.
Finally, a good cleaning regimen helps maintain the natural clay coating of unglazed pots, preventing the absorption of food odors, stains, and moisture that can damage the clay over time. With proper care, a high-quality clay pot can last for years or even decades.
Cleaning clay pots after cooking generally involves a few simple steps and common household materials like dish soap, vinegar, scrub brushes, and clean towels. The process takes a bit of time and elbow grease but is straightforward enough for any home cook.
Remove Food Remnants
After cooking, it’s important to thoroughly remove any leftover food bits from the clay pot. Allow the pot to cool completely before cleaning to avoid cracking. Then, use a plastic or wooden utensil to gently scrape out all bits of food that may be stuck to the bottom or sides of the pot 1. Take care not to use anything abrasive or sharp that could scratch the clay surface. Remove any visible crumbs, sauce remnants, or pieces of food. Getting rid of all the leftover food debris will make the rest of the cleaning process more effective.
Soak the Pot
After removing any leftover food particles, the next step is to soak the clay pot in warm water. This helps loosen any remaining debris and absorbed oils. Fill the pot with warm water and add a drop of dish soap like Dawn.
Let the pot soak for 10-20 minutes. The dish soap will help cut through grease while the water softens any cooked-on food. According to
this Apartment Therapy guide, ideally you should soak terracotta overnight before use, but 10-20 minutes will work for cleaning purposes.
Scrub the Pot
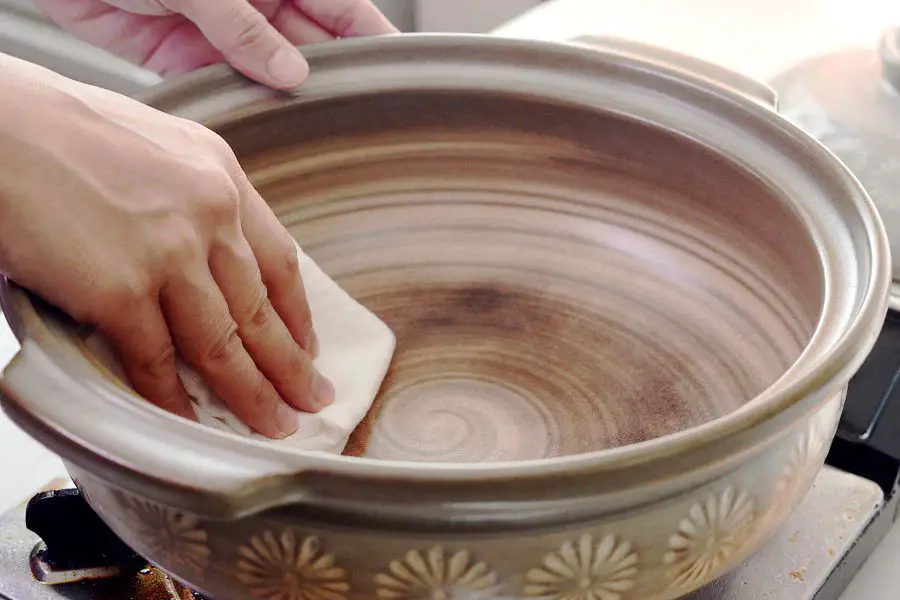
After soaking the clay pot, the next step is to gently scrub the inside and outside to remove any remaining dirt or stains. Use a soft sponge or cloth when scrubbing to avoid damaging the clay surface. Avoid using abrasive scouring pads as they can scratch and wear down the terra cotta over time.
Apply a small amount of dish soap to the sponge or cloth and work it into a lather. Gently scrub the inside of the pot first, making sure to get into the corners and crevices. Rinse thoroughly before moving to the outside. When scrubbing the outside, pay close attention to the bottom and rim where buildup commonly occurs.
Scrub gently in a circular motion. Avoid harsh scrubbing or you may damage the clay. The warm water soak should have loosened most of the dirt, so intensive scrubbing should not be necessary. Rinse and inspect. For stubborn stains, you can spot clean by letting the soap sit on the stain for a few minutes before scrubbing.
Take care not to let the clay pot soak too long, as this can cause the terra cotta to become waterlogged. Work swiftly but gently to remove dirt and stains from the pot’s surface.
Rinse Thoroughly
After scrubbing, it’s important to thoroughly rinse away any remaining soap or cleaning solution from the clay pot. Rinse the pot under warm running water, allowing the water to flow over all surfaces and drain out the bottom. According to sources like this guide, you’ll want to continue rinsing until the water runs clear.
Once you’ve rinsed away the suds, drain the pot again. Tip it upside down over the sink or tub to allow any excess water to drain out. Give it another quick rinse, swirling the pot to dislodge any particles. Drain once more.
Proper rinsing removes all traces of cleaning products that could harm plants. It also washes away dirt and debris to fully refresh the clay pot for reuse.
Disinfect the Pot
It’s important to disinfect clay pots after each use to kill any bacteria that may be lingering. The best way to disinfect a clay pot is to make a diluted bleach solution. Mix 1 part bleach with 9 parts water. Submerse the pot in the solution and let it soak for at least 10 minutes. This will kill any bacteria inside the pot [1].
Alternatively, you can make a disinfecting solution with distilled white vinegar. Fill the pot with undiluted vinegar and let it soak for at least 15 minutes before rinsing. The acidic vinegar will help sanitize the clay.
After soaking in the bleach or vinegar solution, be sure to thoroughly rinse the pot with clean water. Rinse several times until there is no disinfectant residue left inside the pot.
Dry the Pot
After rinsing the clay pot thoroughly, it’s important to dry it completely before storing or using it again. Here are some tips for properly drying clay pots:
Air dry the pot upside down on a drying rack or layered newsprint. Letting it air dry upside down allows moisture to escape through the bottom drainage hole and prevents water from pooling inside the pot (https://ceramicartsnetwork.org/daily/article/Protecting-Your-Pottery-and-Ceramic-Sculpture-Hints-for-Even-Drying). Make sure to place it somewhere with good airflow.
You can also dry the pot with a towel, gently wiping the inside and outside surfaces. Ensure you absorb all moisture and let the pot sit for 10-15 minutes before wiping with the towel again. Keep drying and wiping until the pot feels completely dry to the touch.
It’s important not to leave any moisture in the clay, as trapped moisture could expand and crack the pot when fired. Let the pot air dry upside down for at least 24 hours before considering it fully dry and ready for use or storage.
Condition the Pot
After cleaning the clay pot, it is important to condition it. This helps season and protect the clay over time. According to Sharmi’s Passions, you should periodically apply a thin coat of food-grade mineral oil to the entire inner and outer surfaces of the unglazed clay pot. Allow the mineral oil to soak in for at least an hour or up to 24 hours. Then wipe away any excess oil with a paper towel. The mineral oil will help seal the clay and prevent cracking, crazing, and ware over repeated use and washings.
Store Properly
After cleaning and drying your clay pots, it is important to store them properly to maintain their condition and prevent cracking or damage. Here are some tips for proper storage:
Store in a dry place. Make sure to keep pots in a dry indoor location like a garage, shed, or basement. Moisture can seep into the porous clay and cause cracking when temperatures drop. Avoid storing outside or anywhere damp.1
Avoid extreme temperatures. Do not store pots somewhere that gets extremely cold like an uninsulated garage or shed. Extreme cold can shock the clay and cause cracking. Stick to an indoor area that remains above freezing.2
Place padding between stacked pots. When stacking pots, line them with newspaper, bubble wrap, or other padding to prevent scratches and chips. Stack carefully and not too high to avoid cracking.
Cautions
There are a few important cautions to keep in mind when cleaning clay pots:
Avoid using abrasive materials like steel wool or abrasive cleaners, as these can damage the clay surface over time [1]. Stick to soft sponges, cloths, or gentle scrub brushes.
Don’t soak the pot for too long or use very hot water, as this can cause the clay to expand and contract too much, leading to cracks [2]. Limit soaking time to 30 minutes or less in lukewarm water.
Avoid putting clay pots in the dishwasher, as the high heat and harsh detergents can damage them over time [3]. Always hand wash clay cookware.