How Do You Make A Mug With A Logo?
Adding A Personalized Logo to Your Mug
Custom mugs with logos have become increasingly popular over the years. Many people enjoy having their own personalized mug for daily coffee or tea, or as a fun gift. Mugs with logos can showcase your personality, support a business, or commemorate an event or achievement. There are many benefits to custom logo mugs and several types of mugs that can be customized.
Custom mugs allow you to add any image or logo you’d like. You can include your name, initials, favorite quote, sports team logo, company brand, cartoon character, wedding date – the options are limitless! The result is a one-of-a-kind, meaningful mug. Custom mugs also make great gifts for birthdays, holidays, anniversaries, retirements, graduations, and more. They show you put thought into finding a personal, unique gift.
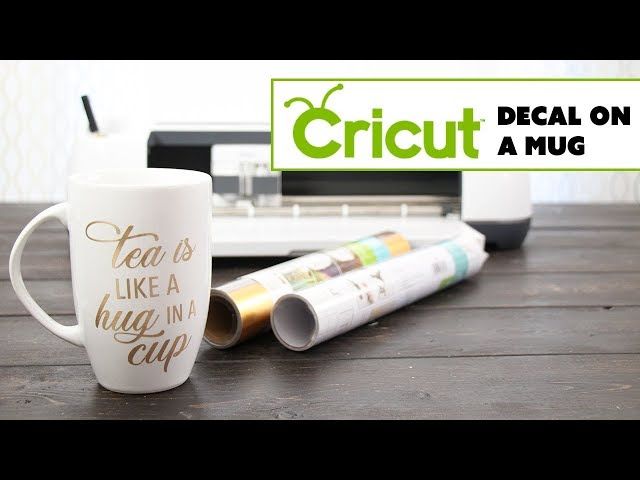
As for mug types, most ceramic mugs can have a vinyl logo or decal added to them. Traditional mugs, oversized mugs, travel mugs, and even stainless steel tumblers can be customized with logos. The smooth surface of these mugs allows vinyl and decals to adhere easily.
Gather Materials
The main materials needed to make a custom mug with a logo are:
- Ceramic mug – This will be the base mug that you apply the vinyl logo to. 11 oz and 15 oz sizes are common. Make sure the mug has a smooth, glossy surface for the vinyl to adhere to.
- Vinyl cutter or Cricut – This machine will precisely cut out the vinyl logo design. Popular options are the Cricut Maker or Cameo 4.
- Heat transfer vinyl – Special vinyl sheets made for heat transfer. Siser EasyWeed and Cricut brand vinyls work well. Get a color that contrasts with your mug color.
- Transfer tape – This tape helps transfer the vinyl logo from the cutting mat to the mug. Use standard transfer tape for vinyl work.
You’ll also need some basic tools like scissors, a weeding tool, and a lint roller. Make sure to have a quality heat press as well. Gather all materials and tools needed before starting the mug designing process.
Design the Logo
The first step in designing your custom logo is choosing a graphic design software. There are many free and paid options available like Adobe Express, Canva, GIMP, and Inkscape. These tools provide features to add text, shapes, images, effects and more to create a unique logo.
When designing the logo, make sure it is sized appropriately for its usage. For example, if placing the logo on a mug, it should be large enough to stand out but not so big that it wraps around the entire mug. Most experts recommend sizing logos between 1-3 inches for mugs and other small promotional items.
It can help to leave a small border around the logo graphic. This gives it a polished look with space separating it from the edge of the mug. Just make sure to account for the border when sizing the logo design.
Take time to explore different fonts, colors, and graphic elements. Good logo design is simple yet memorable. Play around with the layout until you have a clean, balanced logo that represents your brand.
Cut the Vinyl
Once you have your logo designed, the next step is to cut the vinyl. Here are the steps for cutting vinyl:
First, load your vinyl into your cutting machine. For Cricut machines, this involves loading the mat with vinyl into the machine. Make sure the vinyl is loaded facing up or down according to your machine’s requirements.
Next, import your logo design into the cutting software, such as Cricut Design Space. The logo should be sized and formatted properly for cutting.
Then adjust the cut settings in the software. Settings vary by machine and vinyl type. For Cricut machines cutting permanent vinyl, a standard setting is “Custom” material, Standard or Fine point blade, Pressure of More, Multi-cut of 2 passes [1].
Finally, preview and then cut your design. The machine will cut out the vinyl in the shape of your logo.
Carefully remove the vinyl from the mat, making sure none of the pieces lift off. Your vinyl is now ready to apply to your mug!
Apply Vinyl to Mug
Once you have your vinyl logo cut out, you’re ready to apply it to your mug. Here are the steps for properly applying the vinyl:
First, remove the backing from the vinyl. The backing is the clear plastic layer that the vinyl sticks to initially. Peel this off gently.
Next, position your vinyl logo where you want it on the mug. Use the handle of the mug as a guide and align the vinyl so it will look centered when the mug is upright. Apply transfer tape over the vinyl logo.

Then, slowly remove the transfer tape backing, while holding the vinyl logo in place on the mug. This leaves just the vinyl sticker on the mug surface.
Use your finger or a rubber squeegee to smooth out the vinyl and make sure there are no bubbles or wrinkles. Press firmly from the center outward. The vinyl will adhere to the mug surface.
Your vinyl design is now in place and ready to be heat pressed onto the mug.
Heat Press the Mug
Once you have applied the vinyl design to your mug, the next step is to heat press it. This will heat and seal the vinyl onto the mug using a heat press machine.[1] Follow these steps:
- Preheat the heat press according to the instructions on your vinyl. Most heat transfer vinyl requires the press to be preheated to 320-340 degrees Fahrenheit before pressing the mug.
- Place the mug on the heat press, making sure the mug is oriented properly so the design will be straight. Many heat presses have an insert or cradle designed to hold mugs.
- Set the heat press to medium pressure. Too much pressure may crack the mug.
- Close the heat press and apply heat for the time specified on the vinyl instructions, usually 30-60 seconds.
- Open the press and remove the mug carefully using oven mitts or gloves – it will be very hot!
- Allow the mug to cool completely before washing or using.
Following the vinyl manufacturer’s temperature and time recommendations is crucial for the vinyl to properly seal on the mug. Take care not to overheat or the mug may crack. Allowing it to cool completely prevents the vinyl from peeling off.
[1] https://www.practicallyfunctional.com/heat-transfer-vinyl-mug/
Additional Tips
When applying the vinyl, use a credit card or squeegee to smooth out any bubbles for optimal adhesion to the mug surface. Make sure to align the vinyl design and text so it looks visually centered, accounting for the mug handle’s placement.
Be very careful when washing mugs with vinyl designs. It’s best to handwash gently with mild soap and avoid high heat from dishwashers. Prolonged exposure to moisture can cause the vinyl to lift or peel. If needed, you can carefully reapply vinyl sections that have peeled using transfer tape.
For reference, see these guides on caring for vinyl drinkware:
https://www.agirlandagluegun.com/vinyl-cup-care-instructions-free-printables/
Customizing Other Items
Similar to mugs, there are many other items that can be customized with a logo, such as shirts, hats, water bottles, pens, and notebooks. The process is similar, but the specific materials and shapes of the items need to be considered.
For shirts, the vinyl can be heat pressed or screen printed. Heat pressing vinyl allows for more detailed logos. Screen printing is good for simpler logos and works on materials like cotton. The vinyl or ink needs to stretch and flex as the shirt is worn and washed. Applying the vinyl or ink properly based on shirt material and shape is key.
Hats can also have vinyl logos heat pressed on the front. The vinyl needs to be flexible as the hat is worn and adjusts shape. For bottles, options are vinyl, etching, or using shrink wrap material. The location and shape of the bottle impacts the logo placement. For pens or notebooks, options are engraving, debossing, or foil stamping to imprint the logo while considering the surface material.
The shape and small size of promo items like pens means the logo often has to be simplified from the primary brand logo. But the same concepts apply of selecting the right technique and materials for applying logos to customized items.
Source: https://swag.com/blog/how-to-add-a-logo-to-a-product-a-complete-guide
Buying Custom Logo Items
If creating your own custom logo items seems daunting, consider ordering them from a promotional products company instead. There are many online vendors that specialize in custom branded merchandise like mugs, t-shirts, pens, and more. These companies have streamlined the ordering process and often provide fast turnaround times.
When choosing a vendor, be sure to evaluate their product quality, pricing, and production timelines. Quality Logo Products suggests comparing samples from a few top suppliers (link). Pay attention to factors like imprint sharpness, material durability, and overall construction. Opt for a vendor with fair prices that doesn’t compromise on quality. And look for fast turnaround times, often 4-5 business days from order to delivery.
Going through an established promotional product company can take some of the work out of getting custom branded merchandise made. Just provide your logo artwork and order specifics, and they’ll handle the rest. This can be an easier option than trying to DIY, especially for large orders or complex products.
Conclusion
Customizing a mug with a logo using vinyl and a heat press is a popular and easy way to generate promotional items. The main steps covered in this guide are choosing the right materials like a high quality mug and vinyl, designing an appealing logo, applying the vinyl properly, and using the heat press with the right time and temperature settings.
Having the proper tools for cutting and applying vinyl, as well as an effective heat press machine, are essential for getting a clean, professional result. Rushing through the process or using cheap materials is likely to create a product that looks homemade. Taking the time to follow each step carefully will maximize the chances of success.
Promotional mugs lend themselves to creative customization for all kinds of businesses, organizations, and events. The same heat transfer vinyl technique can also be used to decorate t-shirts, tote bags, hats, and more. Experimenting with different colors, fonts, and graphic elements allows you generate memorable and impactful branded items.
Overall, transforming an ordinary mug into a polished branded giveaway is extremely rewarding. With the right approach, the finished product will impress colleagues, clients and event attendees while providing your brand with an affordable yet effective advertising tool.


