How Do You Make A Sculpture Armature?
An armature in sculpture is a framework that supports the sculpture and enables it to hold its shape. The armature provides stability and structure so the sculpture does not collapse under its own weight as the artist works (wikipedia, 2022). The purpose of an armature is to allow the artist to build up a sculpture in materials like clay or plaster that are heavy and prone to sagging or cracking without internal support. An armature acts like the skeleton or bones inside a living figure.
Creating an effective armature requires thoughtful planning and choosing the right materials. Key steps include designing the basic form, adding proportional limb lengths, and incorporating flexible joints for stability. Common armature materials are wire, wood, mesh, cardboard, and recycled or found objects. A well-crafted armature allows maximum freedom in sculpting by enabling the artwork to hold a pose and take on a realistic, dynamic shape.
Sources:
https://en.wikipedia.org/wiki/Armature_(sculpture)
Planning the Armature
The first step in creating a sculpture armature is planning out the overall size, pose, and weight distribution. As the article “How to Create a Balancing Sculpture Armature” on FeltMagnet suggests, it’s helpful to start by making some initial sketches and notes about the armature design and pose.
Consider factors like the sculpture’s dimensions, the center of gravity, and how the weight will be distributed throughout the figure. Making detailed sketches from multiple angles can help visualize how the armature will support the sculpture.
It’s also important to think about the future Clay or sculpture medium, and sketch out major forms and masses. Understanding the final sculpture shape will inform the required underlying armature structure and points of support.
Taking time with planning, sketches, and notes in this initial stage will provide a helpful guide when constructing the armature base and framework.
Materials
There are several common materials used for sculpture armatures, each with their pros and cons:
Wire – Wire like aluminum armature wire or steel wire is very flexible and can be easily bent into different shapes. It’s lightweight and inexpensive. However, it may not provide enough support for larger sculptures. Sources: https://www.sculpey.com/blogs/blog/incorporating-mixed-media-and-armature-into-a-sculpture, https://feltmagnet.com/sculpture/Creating-a-Balancing-Sculpture-Armature
Pipe – Metal and PVC pipe provides good structural support and stability. It can be cut and joined together easily. However, it may be heavier and less flexible than wire. Good for large, free-standing sculptures.
Wood – Basswood, lumber, and dowels are affordable and easy to cut, drill, and shape. Wood provides good support but can warp over time. May require treating or sealing. Avoid using fragile woods.
Other materials like recycled objects, foam, cardboard, plastics, and found items can also be incorporated into an armature. Consider the structural needs of the sculpture when selecting materials.
Basic Structure
The basic structure of a sculpture armature refers to the simplified geometric shapes and skeletal frame that will support your clay. This core framework helps establish the basic proportions and spatial relationships for your artwork.
Start by sketching the basic shape of your planned sculpture, focusing on simple forms like spheres, cubes, cylinders etc. This will act as the blueprint for your armature’s dimensions. Next build the skeleton using sturdy materials like metal wire, wood, plastic pipes, or cardboard stacked and taped into the desired shapes. The armature should include a central support to attach arms, legs and other extensions to. Create an open lattice structure rather than solid mass, allowing space for clay while keeping overall weight manageable.
Consider the main directional forces and how joints can provide stability. Curved wires work better than straight lines for shaping naturalistic forms. Strategically place cross wires, bracing, and additional reinforcements so the foundation is sturdy enough to withstand the weight of clay.
Measure proportions carefully, referring to your initial sketch. The armature serves as the backbone defining the sculpture’s size, pose, and spatial relationships before adding surface detail. A well-planned core structure will lead to a strong, balanced finished piece.
According to Susie Benes, “A solid armature is key to creating a successful air dry clay sculpture” (source). She recommends using heavy gauge wires and additional support pieces like cardboard or wood as needed.
Proportions
Getting the proportions accurate is one of the most important steps in building a strong armature. The proportions will determine the final look and structure of the sculpture. It’s important to plan out the proportions and major forms before starting to build.
Some tips for planning proportions:
– Make sketches of the front, side and back views to map out the basic forms and proportions. Using a model or reference images can help.
– Consider the flow and rhythm of the forms. The head-to-body ratio, width of shoulders to hips, length of limbs etc. should feel natural.
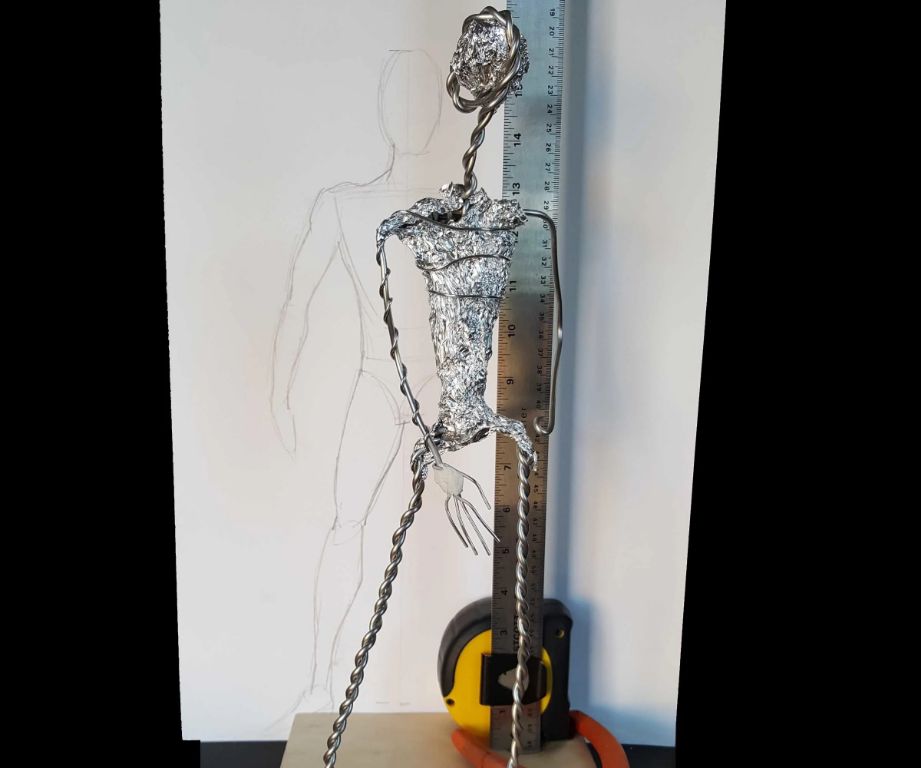
– Use calipers or a ruler to precisely measure key proportions like the head size, distance between joints, hands, feet etc. Accuracy is key.
– Mark the wire lengths with tape before cutting. Double check lengths against your sketch.
When connecting the wires, carefully bend and adjust until the proportions look right. Step back frequently to check and make adjustments. Getting the underlying structure right will make sculpting the anatomy much easier.
Balance and Stability
Achieving proper balance in a sculpture armature is crucial to prevent the finished piece from tipping over or toppling. There are a few key techniques for securing balance:
Mark the spot on your base where you want your sculpture to touch. Drill a hole in the base using a 1/8″ bit. Fill the hole with 2-part epoxy and insert a short length of armature wire into it to anchor the sculpture to the base (source).
Make sure to align the center of gravity over the main point of contact with the base. The center of gravity should fall within the footprint of the base (source).
Use thicker gauge wire for the load-bearing legs and arms that connect to the base. Thinner wire can be used for smaller extremities.
Incorporate triangular shapes and crosses into the armature design for greater stability. Avoid designing poses where the weight distribution is uneven.
Consider adding an internal weight or loose sand into hollow areas of the sculpture to lower the center of gravity.
Joints and Connections
Joining materials securely is crucial when constructing a sculpture armature. The joints need to be strong enough to hold the weight of the clay or other materials without coming apart. There are a few main options for connecting armature components:
Welding – Welding metal pieces together with an arc or spot welder creates very strong and permanent joints. This is a good choice for metal armatures. Be sure to weld in a well-ventilated area and take proper safety precautions.https://feltmagnet.com/sculpture/Creating-a-Balancing-Sculpture-Armature
Wire wrapping – Wrapping wire securely around two pieces where they intersect can create flexible joints for wire armatures. Use pliers to tighten the wire for maximum strength. Wrap multiple times for large sculptures. https://feltmagnet.com/sculpture/Creating-a-Balancing-Sculpture-Armature
Gluing – For materials like wood, gluing joints provides rigid connections. Use wood glue formulated for the purpose. Apply adhesive thoroughly and clamp pieces together as the glue dries.https://feltmagnet.com/sculpture/Creating-a-Balancing-Sculpture-Armature
The joining method can allow some flexibility or complete rigidity depending on the desired structure and movement of the final sculpture. Plan joints carefully during the design process.
Arms and Legs
When sculpting arms and legs for your armature, it’s important to properly support them so they can hold realistic poses. Using thick gauges of aluminum armature wire, like 12 or 14 gauge, will provide rigidity and strength for limbs. Wrap the main structural wire around the torso or hips, then extend out the arms and legs. Softer wires like 16 or 18 gauge can be twisted around the main limbs to add flexibility for joints and smaller details like hands and feet.
For standing figures, the legs should extend into a solid base or platform to provide balance and stability. You may need additional “bones” of thick wire running through upper and lower legs to prevent drooping or sagging. Foam pipe insulation can be used over limb armatures to quickly build up volume. Hollow cardboard tubes also work well as temporary support structures for arms and legs.
When positioning arms away from the body, additional support is needed or they may break off under the weight of clay. Consider using aluminum or wooden rods extending from the torso out to the wrists (cited: https://tryonsculpturearts.com/arms/). This interior framework will make hands less prone to snapping at fragile wrists or elbows.
Head and Neck
The head is one of the most important parts of a sculpture armature. It requires sturdy support to hold the weight of the sculpted head material. Many armature systems use an aluminum wire head armature that attaches to the main armature structure. These ready-made wire heads come in different sizes like 10″, 13″ or 16″ (source: https://shop.sculpt.com/modeling-tools/armatures/heads/).
For the neck, it’s crucial to have an armature that allows you to rotate and tilt the head. This lets you position the head naturally. Some options are using a ball joint made from aluminum, or bendable aluminum tubing that connects the head to the shoulders (source: https://shop.sculpt.com/modeling-tools/armatures/). The neck support should be sturdy but flexible.
When attaching the head and neck armature, make sure it is strongly connected to the main torso structure. Test the head rotation to ensure it moves smoothly without being too loose.
Final Touches
After constructing the armature, it’s important to finish it off properly before adding the sculpting material. Here are some final steps:
Smoothing and sealing the armature helps prepare it. Use fine grit sandpaper, files, or a rotary tool to smooth down any rough edges or wire ends (source). Seal porous armatures like wood with glue or primer so the sculpting material won’t absorb moisture and crack later. A coat of primer also helps the sculpting material adhere.
Check balance and structure one last time before moving forward. Gently rock or turn the armature to ensure proper weight distribution. Reinforce any weak points that seem unstable. The armature should be sturdy enough to withstand the weight and pressure of sculpting without warping or collapsing.
With the armature smoothed, sealed, and balanced, it’s ready for the sculpting medium. Take care preparing the armature, as flaws will transfer to the final sculpture.