How Do You Make A Turkey With Handprints?
Making a turkey handprint craft is a fun Thanksgiving activity that allows kids to get creative and make a decorative piece for the holiday. Handprint turkey crafts are especially popular for preschool and elementary aged children as an easy way to have them create something unique to display at home or give as a gift. The goal is to transform a tracing of the child’s handprint into the shape of a colorful turkey through simple decorating techniques. This provides a hands-on way for kids to make art that represents the turkey, a symbol of Thanksgiving.
I referenced this source for information: https://funhandprintartblog.com/handprint-footprint-turkey-crafts-round-up.html
Materials Needed
The materials needed for making a handprint turkey kid’s craft include:
- Construction paper in various fall colors like brown, orange, yellow, and red (cite: https://www.crayola.com/crafts/handprint-turkey-art-craft/)
- Glue or tape
- Googly eyes
- Scissors
- Crayons, markers, or paint
- Pen or pencil
Make sure to have all materials gathered before starting the craft. Adjust based on the age and number of children participating. For younger kids, supervision is recommended for using scissors and adhesives.
Trace the Handprint
Tracing a child’s handprint onto construction paper is the first step in creating a handprint turkey craft. Have your child place their hand flat on a piece of construction paper or cardstock with their fingers spread apart. Use a pencil to trace around the outside of their handprint onto the paper, making sure to capture all of their fingers. You can encourage them to press down firmly so you can see the outline of their hand clearly. Once you have traced around the entire hand, carefully lift their hand off the paper. Then, take scissors and cut out the handprint tracing from the paper. Make sure to cut just inside the pencil line so the entire traced handprint is cut out. Repeat this process for each child that wants to participate by having them trace their own handprint. Now you will have hand cutouts in the shape of each child’s unique hand to use for the turkey craft.
Source: https://www.pinterest.com/robinzky14/handprinthand-tracing-ideas/
Decorate the Feathers
Once the handprints are traced, it’s time to decorate them into colorful feathers. There are lots of fun ways to personalize the feathers with different materials. Here are some suggestions:
Use markers or crayons to color in the fingers and palms with bright colors like red, yellow, orange, green, blue, and purple. Let kids get creative mixing colors too.
Add patterns to the feathers using dot markers, bingo daubers, or stamps. Polka dots, stripes, zig zags, and swirls all make fun designs.
Glue on solid colored craft feathers, pom poms, or foam shapes to layer on additional texture.
Attach sequins, beads, buttons, googly eyes or other embellishments using craft glue for sparkle.
Spread glitter glue over the palm and fingers or sprinkle glitter over craft glue for shimmer.
Cut colorful tissue paper into small pieces and glue them on for a feathered mosaic effect.
Let kids collage on fabric scraps, rick rack, stickers, or other materials they find interesting.
The options are endless when it comes to decorating the handprint feathers! Encourage kids to let their creativity shine through.
For inspiration, check out the feather decoration ideas at https://www.pinterest.com/none0078/feather-decorations/
Create the Head
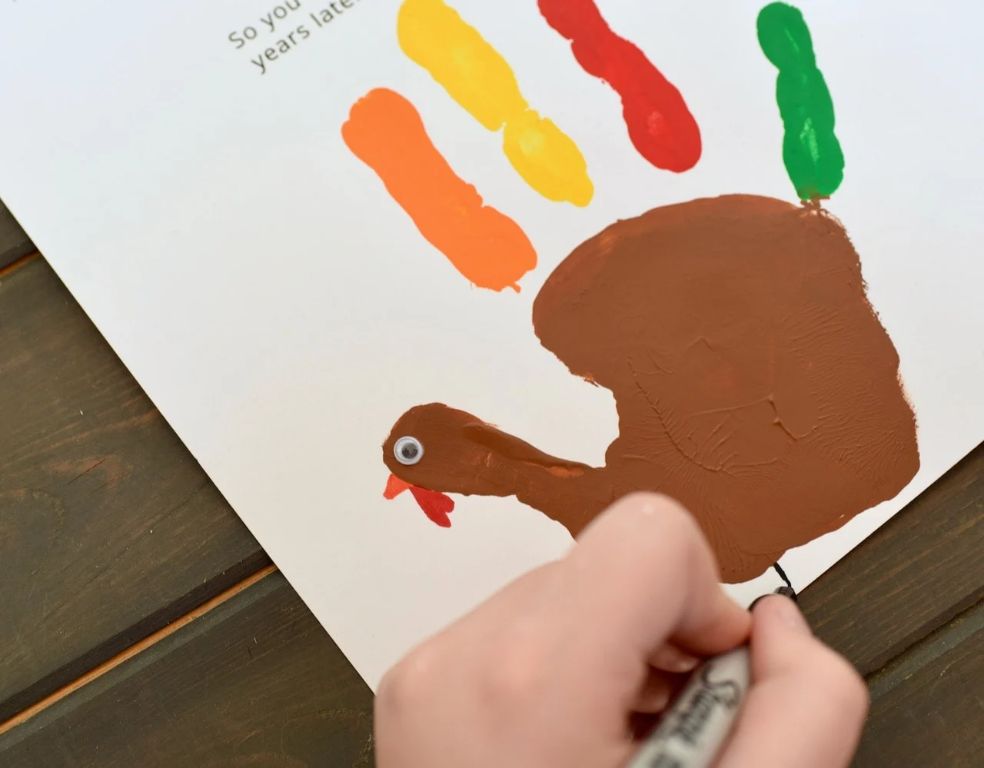
The turkey’s head is made from a separate smaller handprint. Have your child make a fist and place it down on the construction paper, tracing around it with a pencil. Make sure the fist is smaller than the handprint used for the body, about 2/3 the size.
After cutting out the head shape, let your child decorate it however they like. They can add eyes, a beak, wattle, and other facial features with crayons, markers, glitter, googly eyes, pom poms, felt, or other craft materials. Get creative with different turkey head ideas!
Once decorated, glue the head onto the neck portion of the main turkey’s body. Press down firmly so it adheres. The turkey head completes the craft and brings your turkey to life!
Assemble the Turkey
To assemble the turkey, first glue the turkey head to the body. Position the head at the top of the body, in the center. Allow the glue to dry completely before moving on.
Next, glue on the eyes, beak and feet. For the eyes, cut out two small circles from construction paper and glue them above the beak area. Cut an orange triangle for the beak and glue below the eyes. Then, cut out footprint shapes and glue them to the bottom corners for the turkey’s feet (Crayola).
Make sure everything is securely glued before moving on to the next steps. Let the glue dry fully before handling the turkey.
Make it 3D
To give your handprint turkey even more dimension, consider adding a popsicle stick, cardboard fold, or other supporting structure to make it stand up. This will transform your flat paper turkey into a 3D sculpture that can be proudly displayed.
Start by tracing your child’s handprint onto a thick piece of cardboard or cardstock. Cut out the handprint and use it as the turkey’s body. Then cut a flat popsicle stick in half and glue or tape the halves onto the back of the handprint at an angle to form a stand.
You can also cut a triangular fold out of cardboard, attach it to the back of the handprint, and fold it into a tent shape. This cardboard flap glued to the handprint will enable the turkey to stand freely.
Giving the handprint turkey a 3D form not only adds interest, but also allows it to be showcased on tabletops, mantels, shelves, or anywhere else you want to highlight your child’s creativity.
Age Modifications
Modifying this handprint turkey craft for different ages is easy. For younger toddlers, an adult can trace the child’s handprint and cut out the shapes. Let the toddler decorate the feathers with fingerpaints or stickers. For older children, provide child-safe scissors for cutting and encourage them to assemble the turkey independently.
To simplify for young preschoolers, trace their handprint on colored construction paper rather than using paint. Older kids will enjoy cutting out feather shapes from patterned scrapbook paper. For a challenge, let elementary students trace their own hand to form the turkey body.
Teens and adults may enjoy making turkeys with cut out “negative space” in the palm or creating miniature turkeys using just their fingertips. Add googly eyes, pipe cleaners, or a folded paper wattle for all ages. No matter their age, kids love seeing their handprint become a Thanksgiving turkey!
Displaying the Craft
Once the handprint turkey craft is complete, it’s time to showcase your child’s adorable creation. Here are some creative ideas for displaying their turkey artwork:
Hang it on the wall or refrigerator with magnets or tacks. The 3D version will stand out nicely. Clear acrylic floating picture frames also work beautifully to hang the turkey.
For a tabletop display, position the turkey in a basket or tray surrounded by fallen leaves, pinecones, gourds and other autumn objects.Lean the 3D turkey against stacked books for interest.
Mount the turkey on colored construction paper or cardboard to create a frame. Attach a loop of ribbon to hang as art.
For a gratitude tree, hang turkeys from branches along with leaves, garland and other fall or Thanksgiving decor.
Incorporate the turkey into a centerpiece. Surround with flowers, candles, and autumn elements for a lovely table display.
Place multiple turkeys along the table as napkin rings. Write each guest’s name on one.
Turn the turkey into a place card by mounting it on a small stand and writing guests’ names. Position at each table setting.
Let the turkey greet guests by propping it in the entryway or on the front door. Add a name tag speech bubble for fun.
There are many creative ways to proudly display your child’s turkey masterpiece. With a little imagination, you can turn it into the perfect Thanksgiving decoration.
Other Turkey Craft Ideas
There are many other fun and creative turkey crafts you can make with kids beyond the handprint turkey described in this article. Here are some ideas to try:
Footprint turkeys are a cute variation on the handprint turkey. Have kids dip their feet in paint and stamp them onto paper in the shape of a turkey. Add details like googly eyes, a beak, and colorful feathers (source).
Toilet paper roll turkeys are an easy turkey craft. Decorate an empty toilet paper roll with construction paper feathers, eyes, a beak, and waddle. These make fun table decorations or place cards (source).
For a festive and easy craft, have kids decorate paper bag turkey puppets. Start with brown paper lunch bags and add details like feathers, eyes, a beak, and wattle using crayons, markers, or construction paper. Kids can use their turkey puppets to act out a fun Thanksgiving story.