How Do You Use Glaze In Acrylic Paint?
What is Glazing in Acrylic Painting?
Glazing is an acrylic painting technique where thin, transparent layers of paint are applied over an existing dried layer of paint. The glaze allows the color from the underneath layer to show through while also altering the hue and intensity of the colors beneath. Glazes can be used to add depth, richness of color, and luminosity to a painting.
The glazing process involves applying a mixture of acrylic polymer medium and a small amount of paint over areas of a dried painting. The medium allows the paint to flow smoothly and transparently over the surface. Multiple layers can be built up to achieve the desired optical blending and color effects.
Some key benefits of glazing include:
- Deepening colors and adding richness without obscuring details
- Creating luminosity by layering transparent glazes
- Blending and softening colors optically
- Subtly altering hues and intensities of underlying layers
- Adding visual depth and dimension to a painting
Overall, glazing allows artists to build up painterly effects and achieve a unique sense of light and color interaction in acrylic painting.
Why Use Glazes in Acrylic Painting?
Glazes are a useful technique in acrylic painting for a few reasons. They are known for adding depth, luminosity and richness to paintings. By applying thin, transparent layers of paint over existing layers, a glaze allows the colors underneath to show through while also subtly altering them. This creates more visual interest and complexity than a simple flat layer of opaque paint.
Glazes also enable painters to build up colors gradually for a smooth, blended look. Rather than mixing paints directly on the palette to achieve a specific hue, glazing involves layering complementary colors on top of each other. This creates nuanced variations of a color that would be difficult to mix physically. The transparency of acrylic glaze medium facilitates these subtle transitions between colors.
Overall, acrylic glazing introduces luminosity and dimension that makes subjects appear to glow from within. The depth provided by multiple thin layers gives paintings a richer, more luminous quality compared to a thick application of paint. Glazes bring out the best in acrylic paint by harnessing its quick-drying abilities for intricate layered effects.
Types of Glazes
There are a few main types of glazes that can be used in acrylic painting:
Transparent acrylic glazes – These are premixed acrylic mediums designed specifically for glazing that maintain the transparency of the colors layered underneath. They come in different finishes like gloss, satin, and matte. Transparent acrylic glazing liquids help acrylic paint colors flow smoothly and evenly over the surface. Some popular brands are Golden Acrylic Glazing Liquid and Liquitex Professional Gloss Glazing Medium.
Acrylic gels used as glazes – Many acrylic gels can also be used as glazes, such as gloss gel, matte gel, and pumice gel. The thickness of the gel allows the artist to create texture and visual interest. Gels help retain brushstrokes and give the glaze more body.
Custom mixing mediums and acrylics – Artists can mix their own custom glazing mediums by adding acrylic medium to acrylic paints. This allows for control over the transparency, sheen, and thickness of the glaze. Typical mediums used are gloss or matte mediums. The medium is mixed with paint in a ratio of roughly 1:4 (medium to paint).
How to Apply Acrylic Glazes
Applying acrylic glazes takes some practice to master. Here are some key tips for successful acrylic glazing techniques:
The glaze should be very thin and transparent. Mix the glaze medium with a small amount of acrylic paint – about 10% paint to 90% medium (Source: https://willkempartschool.com/how-to-glaze-with-acrylics/). The more medium used, the more transparent the glaze will be.
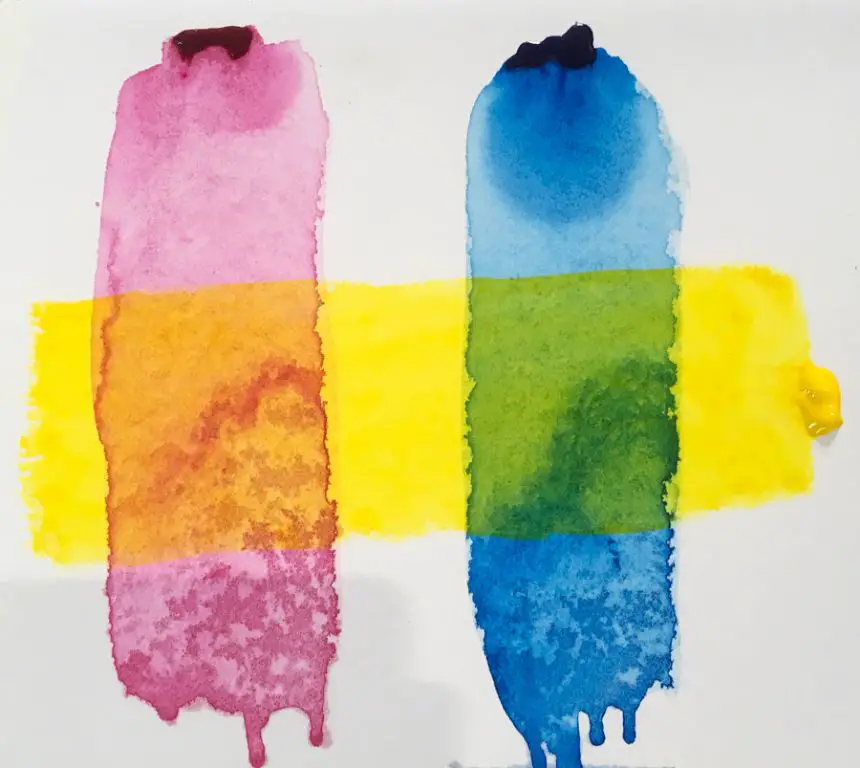
Apply the acrylic glaze in multiple thin layers. It’s better to build up transparent layers than apply one thick layer. Allow each layer to dry fully before adding another glaze layer on top.
Acrylic dries quickly, so working in small sections will prevent the glaze from drying too fast. Use a large soft brush to apply the glaze smoothly and evenly.
Glazing over a dry underpainting is called “glazing wet-on-dry”. This allows more control compared to wet-on-wet glazing. Be careful not to overwork the glaze or disturb the underlying layers.
Glazing Wet-on-Wet vs Wet-on-Dry
Glazing can be done using either a wet-on-wet or wet-on-dry technique. Each approach has its own advantages and disadvantages.
With the wet-on-wet technique, the underlying layer of paint is still wet when the glaze is applied on top. This allows the colors to blend and bleed into each other more easily. Pros of wet-on-wet glazing include:
- Softer, blended effects
- Colors merge seamlessly
- Can create unique textures
However, there are also some downsides to wet-on-wet glazing:
- Less control over the finished result
- Can become muddy if too much blending occurs
- The timing has to be perfect to achieve the desired effect
With wet-on-dry glazing, the initial layer of paint is allowed to dry completely before the glaze is applied. This allows for more precision and control. Benefits of the wet-on-dry approach include:
- Crisp edges and defined shapes
- Can better control the opacity and intensity of the glaze
- Less risk of overblending
The limitations of wet-on-dry glazing include:
- Less blending between layers
- Can appear too precise or mechanical at times
- Requires more patience as each layer needs to dry first
In general, wet-on-wet glazing lends itself to more atmospheric, impressionistic effects while wet-on-dry works better for more precise results. The choice comes down to your desired creative outcome and level of control. Both produce beautiful results when done properly.
Creative Glazing Techniques
With glazing, you can achieve a wide range of creative effects to make your acrylic paintings pop. Here are some techniques to experiment with:
Glazing over textures – Adding thin translucent layers of paint over textured areas creates visual depth and interest. The texture shows through the glaze, interacting with the colors layered on top. Try glazing over modeling paste, gel mediums, or canvas that has been previously textured.
Using retarders for blending – Mixing acrylic retarder medium into your glaze allows more time for blending. With the slower drying time, you can softly blend the edges of a glazed area to create smooth transitions of color. This helps the glaze melt into the underlying layer.1
Scrafitto glazing effects – Apply a dark glaze over a dried light-colored base coat. Before the glaze dries, scrape into it with a sharpened tool to reveal the underlayer. This forms sharp linear designs where the light base coat shows through the dark glaze. It’s a great way to add graphic interest.
Common Glazing Mistakes
When starting out with acrylic glazing, there are a few common mistakes beginners tend to make. Being aware of these issues can help avoid frustration and create better results.
One frequent error is applying glazes that are too thick. Acrylic glazes work best when thin and transparent. Putting down thick, opaque layers prevents the colors underneath from showing through properly. It’s better to apply multiple thin glazes and allow drying time between layers rather than one heavy coat.
Similarly, not letting each glaze layer dry before adding the next is another mistake. Acrylics dry quickly, so patience is key. If glazes are blended while wet, the colors just end up muddy. Allow 10-15 minutes between glaze applications.1
Overblending glazed colors can also cause problems. While it’s fine to softly blend wet glazes, going back and forth excessively mixes the layers too thoroughly. This results in a uniform, lifeless look. Allow the glazes to dry first, then do light blending if needed.
Glazing Tools & Materials
When it comes to tools and materials for acrylic glazing, having the right supplies is key. Here are some of the essentials:
Soft Bristle Brushes
Soft bristle brushes are ideal for applying smooth, even glaze layers. Look for brushes made with soft natural hairs or synthetic bristles. Flat brushes work well for larger areas, while smaller rounds or filberts allow more precise glaze application.
Palette Knives
In addition to brushes, palette knives are great for mixing and applying glazes. The flat, blunt edge makes it easy to spread glaze thinly and evenly over large areas. Just take care not to overwork the paint and disrupt lower layers.
Mediums and Gels
Adding acrylic mediums or gels to your glaze helps adjust the transparency, flow, and thickness. Gels like gloss medium or matte gel add body, while acrylic retarder medium can slow drying time. Experiment with mediums to find what works best for your glazing techniques.
Glazing Tips & Tricks
When glazing with acrylics, it’s often best to start dark and slowly build up transparent layers of color. This allows you to develop depth and complexity in the painting. Using a small foam roller can help smooth out brushstrokes when applying glazes over large areas. Be sure to let each glaze layer dry fully before adding the next one.
Mixing up custom glazes allows endless options for colors and effects. Try adding a touch of matte medium or glazing liquid to thin down heavy-bodied acrylics into a transparent wash. Flow improver is another additive that can help glazes self-level and dry smooth. Keep plenty of glazing medium on hand so you can adjust the transparency as needed while working. Test glaze mixes on a scrap canvas first before applying to your painting.
Some key tips when mixing acrylic glazes:
- Use soft, transparent paint colors like phthalo blues and greens.
- Add just a touch of paint to glazing medium – start sheer and build up.
- Stir thoroughly to fully incorporate the paint pigment.
- Check consistency on a palette – it should be fluid and semi-transparent.
With a combination of strategic layering techniques and custom-mixed glazes, acrylic artists can infuse paintings with luminosity and depth.
(Source: https://www.reddit.com/r/ArtistLounge/comments/14cekcy/acrylic_glazing_tips/)
Glazing Inspiration
When an acrylic is thinned with medium and applied in thin layers, a variety of beautiful visual effects can be achieved. Glazing allows artists to create subtle variations in color, value, and texture across a painting’s surface. Many wonderful artworks feature skilled use of acrylic glazing techniques.
For example, this tutorial features a landscape painting utilizing thin glazes of blue and purple to build up atmospheric perspective in the background hills and mountains. The translucent glazed layers create a sense of haze and distance.
This acrylic painting of a girl with flowers showcases glazing used to subtly shift colors and values. Glazed layers of red and purple unify the background, while delicate glazes over the skin tones give a translucent glow. The flowers contain multiple glazes for dimension.
Glazing can also lend texture, as seen in this seascape. The water contains thin, multi-directional glazes that mimic the look of waves and ripples. Glazes in the sky suggest clouds. Overall, the glazing creates complexity and visual interest.
These examples illustrate the power of acrylic glazing to build depth, add subtlety, and bring life to a painting. When used skillfully by artists, glazes can create breathtaking visual impact.

