How Long Should A Cone 5 Firing Take?
What is Cone 5?
Cone 5 refers to a specific pyrometric cone that indicates when a kiln has reached an approximate temperature range. According to the popular Orton cone chart, cone 5 represents an ideal temperature range of 2165-2232°F (1185-1222°C) when the firing rate is at medium speed (108°F/hour rise). At a faster firing rate of 270°F/hour, cone 5 indicates a temperature of 2205-2264°F (1204-1240°C) (Digitalfire).
This middle temperature range is commonly used for stoneware clays and glazes. Typical cone 5 glazes include recipes with feldspars, dolomite, calcium carbonate, talc, borax, and zinc oxide. These ingredients help the glaze melt and become glossy within the cone 5 temperature span. Popular cone 5 clay bodies are stonewares and porcelain mixes (Clay King). The cone 5 heat work range provides enough heat for the clay to become strong and vitrified.
Importance of Proper Firing Times
Achieving the proper firing time is critical for cone 5 firings to obtain the desired results. Underfiring or overfiring can negatively impact the final ware.
Underfiring occurs when the kiln is shut off before reaching the optimal temperature. This can lead to glazes that are underdeveloped, with poor melt, crazing, or even peeling off the ware. Clay bodies may fail to vitrify properly, leading to weaknesses, excessive porosity, and other defects 1.
Overfiring happens when the kiln exceeds the target temperature. It can cause glazes to become too fluid, resulting in pinholes, bubbling, and crawling. Overfired clay bodies can warp, distort, or bloat. In extreme cases, shelves or kiln furniture may melt 2.
With proper cone 5 firing times, glazes will develop their intended appearance, with good surface quality and minimal defects. Clay bodies will fully vitrify and become strong. The kiln atmosphere will be optimized for the glazes used. Overall, correct firing is essential for predictable, high-quality results when using cone 5.
Factors That Affect Firing Time
There are several key factors that determine the length of time needed for a successful cone 5 firing. The major factors include the kiln type and size, the amount and type of ware, and the programming and controllers.
The size and design of the kiln will impact how quickly it can reach and maintain the high temperatures needed for cone 5 firings. Smaller kilns generally require less time compared to large production kilns. Top loading kilns also tend to fire faster than front loading kilns.
The amount of pieces being fired and the type of clay body, glazes used will also affect firing times. More thermal mass from a fully loaded kiln or thicker, heavier clay pieces will require more time for the heat to properly penetrate the ware.
The programming and type of controllers used on the kiln impacts the ramp up and cool down rates. More sophisticated digital controllers allow for very precise heating schedules tailored to the specifics of that kiln. Easy-fire controllers offer preset programs that estimate firing times.
Recommended Firing Times
The general recommended firing time range for cone 5 is between 8-10 hours. However, firing times can vary considerably based on the specific kiln model and the size/type of load being fired. Smaller electric kilns with lighter loads may fire to cone 5 in 6-8 hours, while larger gas kilns with heavy loads can take 12 hours or longer (Digital Fire).
It’s important to test your individual kiln to determine the optimal firing times. Keep detailed notes on firing times under different load conditions to figure out what works best for your kiln. As a general guideline, firings in small to medium electric kilns tend to range from 8-10 hours. Large electric or gas kilns are often 10-12 hours. Very heavy loads in large kilns may need even longer (Ceramic Arts Daily).
The firing schedule also impacts time. Faster bisque firings often reach cone 5 more quickly compared to slower glaze firing schedules. Slower ramps and holds at critical points allow the entire load to heat evenly and prevent defects (Clay Share). Monitoring cone packs placed throughout the kiln is the best way to confirm when cone 5 temperatures have been reached.
Tips for Achieving Proper Cone 5 Fires
There are a few key things to keep in mind when firing to cone 5 in order to achieve proper results:
Use cone packs or test rings – Placing cone packs or test rings in the kiln allows you to visually confirm when cone 5 has been reached. Monitor these carefully during firing and shut off the kiln when they bend properly. See this guide for how to use witness cones.
Load the kiln evenly – An evenly loaded kiln allows for uniform heat circulation. Avoid loading one section much heavier than others. Balance weight across shelves. See tips for even loading.
Perform regular kiln maintenance – Damaged elements and worn thermocouples can lead to uneven firing. Inspect elements, cords, and thermocouples regularly and replace as needed. See kiln maintenance tips.
Program carefully – Use a controlled ramp up and cool down cycle, with a soak time at peak temperature. Allow enough time at peak temp for pieces to mature properly. Refer to manufacturer guidelines for programming.
Keep records – Tracking firings allows you to adjust as needed. Note firing schedule, kiln load, results, and any adjustments made.
Firing Schedule Example
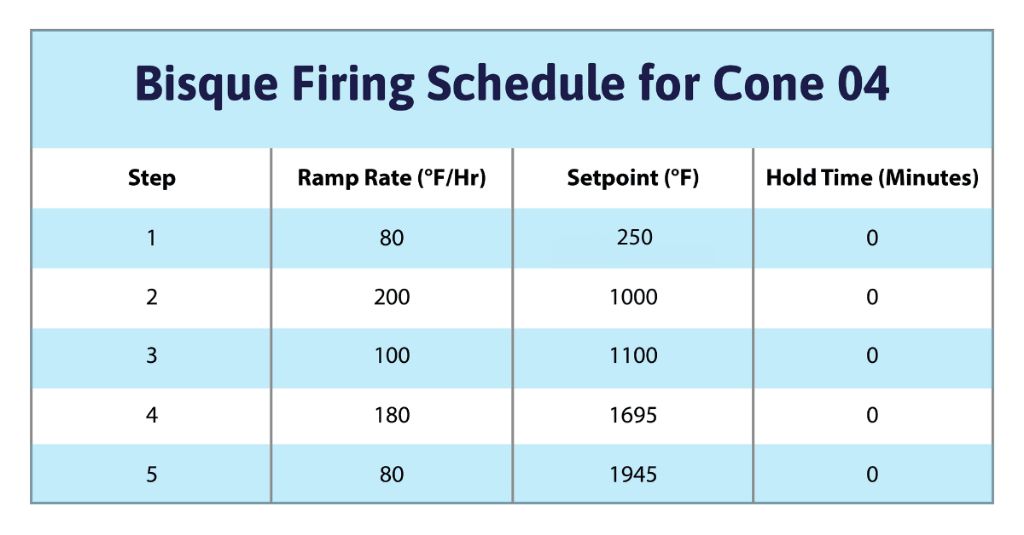
Here is a sample firing schedule for cone 5:
Ramp up to 200°F at 60°F/hour. Hold for 30 minutes to completely dry the ware.
Then ramp up to 1000°F at 300°F/hour. Hold for 30 minutes for water smoking and binder burnout.
Next, ramp up to 2165°F at 300°F/hour. Hold for 15 minutes for cone bending and glaze melting. According to Ceramic Arts Daily, 2165°F is an optimal cone 5 temperature.
After the hold, turn off the kiln and allow it to cool at its natural rate until it is below 100°F before unloading.
The full firing from start to finish should take around 8-10 hours. This provides sufficient time for the clay and glazes to mature properly at cone 5 temperatures.
When to Adjust Firing Times
There are a few signs that indicate your cone 5 firing time needs to be adjusted:
If the firing was too long, glazes may appear melted, overly glossy, or runny. Bisque ware may be overfired, leading to bloating or distortion. In extreme cases, pieces may slump or warp from excessive heat exposure. This shows the firing time needs to be shortened.
If the firing was too short, glazes will appear underfired – they may be dull, matte, or chalky instead of glossy. Bisque ware may appear paler than expected if firing did not reach higher temperatures. Pieces may not have fully vitrified. This indicates the firing time needs to be lengthened.
To modify the firing time, first assess how much adjustment is needed. If firing was an hour too long, reduce time by 30-60 minutes. If only 10-15 minutes too long, reduce by 5-15 minutes. The degree of modification depends on severity of over- or under-firing. Make incremental changes of 15-30 minutes to hone in on ideal time.
Also consider adjusting hold times at peak temperature, especially for glaze firings. Extend hold if glazes need more time to mature and flow. Shorten hold if glaze is overmelting. Hold times of 10-20 minutes are typical for cone 5.
Be sure to note firing time adjustments and results between tests. Keep adjusting in small increments until the desired cone 5 results are achieved consistently.
Common Cone 5 Glazes
There are many common glazes that are formulated to mature at cone 5 temperatures. Here are some of the most popular cone 5 glazes and the results they can achieve:
Celadon – This transparent glaze has an earthy green color. It can accentuate texture and give pottery an antique look. Celadons develop a warm, deep color at cone 5 temperatures.
Ash Glaze – Natural ash glazes melt beautifully at cone 5. They display a range from beige to dark brown tones depending on the clay body and can give pottery rustic, earthy effects.
Copper Matte – This glaze contains copper carbonate which encourages bubbling and breaking at cone 5 temps. It displays a greenish surface with dark brown matte circles that contrast nicely.
Tenmoku – A classic black glaze that forms a complex pebbly texture at cone 5. Tenmokus can range from warm browns to glossy black depending on factors like clay iron content.
Oatmeal – Usually contains silica, feldspar, and kaolin. At cone 5 it forms a nice crusty light brown surface resembling oatmeal. Works well on textured pottery.
Blue Rutile – Rutile crystal clusters get exposed at cone 5, making blue speckles sparkle on the glaze surface. The clay body affects the overall glaze color.
Cone 5 Clay Bodies
Cone 5 encompasses a range of stoneware, porcelain, and terra cotta clays with varying properties. Some common cone 5 clay bodies include:
- Stoneware clays like B-Mix which is smooth and versatile for handbuilding and wheel throwing.
- Porcelain clays like Laguna’s Babu Porcelain which fires to a bright white and is smooth and translucent.
- Terra cotta clays with more grog like New Mexico Clay’s Terra Cotta, which fires to a rich red-brown.
Cone 5 stoneware clays tend to be less porous than earthenware clays that fire at lower temperatures. The higher firing temperature vitrifies the clay, creating a denser material. Cone 5 porcelain clays create an even more vitreous and glass-like surface.
Cone 5 clays can be used to create functional pottery and ceramic sculpture. The clay is durable enough for frequent use but also responsive for detailed sculpting and throwing thinner vessels. Many potters appreciate cone 5 as a versatile middle-temperature option.
Achieving Desired Results with Cone 5
Achieving the desired results with cone 5 can depend on several key factors including the clay body, glazes, kiln loading, and firing schedule. The cone 5 temperature range provides a good balance between the slightly lower cone 04-6 range and the higher cone 6-10 temperatures. Cone 5 strikes an optimum point for many clays and glazes to vitrify properly without over-firing.
To achieve the best results in cone 5 firing, it’s important to use cone 5 formulated clays and glazes. The clay bodies and glazes are designed to mature and melt well in the 2165°F-2185°F range cone 5 provides. Using lower or higher temperature clays and glazes may not produce the desired effects. Testing your clays and glazes by firing test tiles is recommended to ensure they perform as desired at cone 5 temps.
Proper kiln loading techniques are also important. The placement of pieces in the kiln and adequate air circulation can impact the uniformity of the firing. Loading kilns too tightly can lead to uneven heating. Leaving adequate space between pieces allows heat to circulate properly. Using props like kiln stilts and posts helps prevent pieces from sticking together during firing. Top shelves may be hotter so larger or thicker pieces should go on lower shelves.
An optimized firing schedule is also critical for achieving the ideal results at cone 5. Fast firing rates can cause issues like blistering or cracking. The final cone 5 hold time allows pieces to fully mature. Typical cone 5 firing schedules have a final hold time of 5-15 minutes once cone 5 is down. Adjusting the firing schedule or cone 5 hold times may help reach the desired outcomes.
With the right combination of cone 5 clay, glazes, proper kiln loading, and a customized firing schedule, you can achieve excellent results firing to cone 5. Test and fine-tune the various factors to optimize the firing process.