How To Make A Wooden Bar Stool?
Making a wooden bar stool is a fun project for the beginner carpenter. In this guide, we’ll provide an overview of the project, the tools and materials needed, and tips for beginners.
The main components of a wooden bar stool are the seat, legs, stretchers, and any back/arm rests. We’ll use quality hardwoods like oak or maple to ensure durability and strength. Popular joinery techniques like mortise and tenon joints will be used to connect the stool pieces.
Essential tools needed include a miter or table saw for cutting the wood, a drill for boring holes, chisels for shaping wood, sandpaper for smoothing surfaces, and wood glue and screws for joining. Safety equipment like goggles, dust masks, and ear protection are highly recommended when woodworking.
Some tips for beginners are to start with quality lumber from a reputable supplier, sketch plans with measurements before cutting, cut pieces generously at first then sand or plane down for an exact fit, assemble sub-components separately before final joinery, always pre-drill holes before inserting screws, and apply an appropriate finish like polyurethane for protection.
With proper materials, tools, safety precautions, and some patience, creating a sturdy and stylish wooden bar stool is an achievable project for any beginning woodworker. This guide will walk through the complete process step-by-step.
Selecting the Wood
When selecting wood for a bar stool, you’ll first want to decide between using a hardwood or softwood. Hardwoods like oak, maple, cherry, and walnut are denser and more durable than softwoods like pine, fir, and cedar. Hardwoods are better for furniture projects that need to stand up to frequent use. The hardness and tight grain of hardwood makes it resistant to dents, scratches, and warping.
Oak is one of the most popular woods for furniture. It has an attractive grain and is very strong. Maple and cherry are other commonly used hardwoods that work well for bar stools. Maple has a fine, uniform grain that takes stain very evenly. Cherry has a beautiful reddish-brown color. For a rustic look, walnut can be a good choice. It has a deep, dark finish when stained.
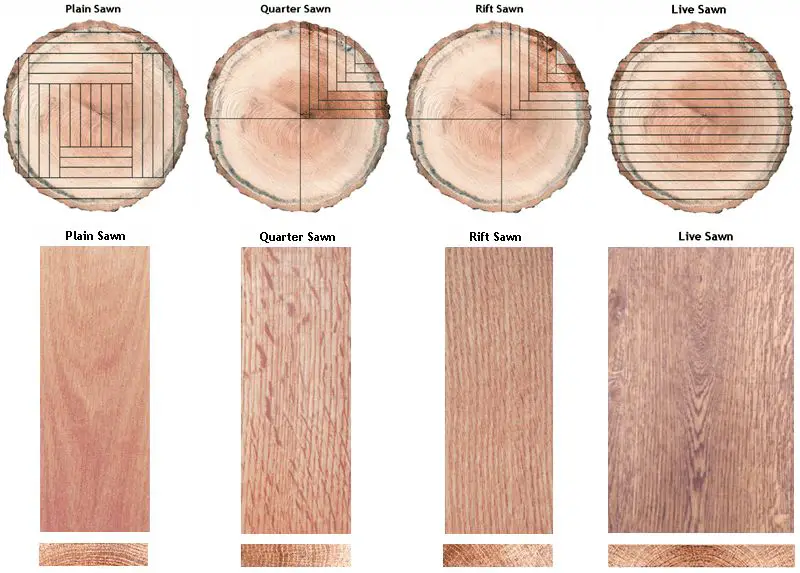
When examining boards, look for wood that has a tight, uniform grain without knots and defects. Straight grain without waves, twists, or knots will be the strongest. Knots create weak points, so avoid wood with large or frequent knots. It’s also best to select quarter sawn or rift sawn boards over plain sawn wood. The growth rings in quarter sawn and rift sawn cuts are more vertical, resulting in a tighter grain that’s less prone to seasonal expansion and contraction.
Proper wood selection and careful inspection of grain and quality will go a long way in creating a sturdy bar stool that will last for many years. Hardwoods like oak, maple, and cherry make excellent choices for their strength and workability.
Design and Dimensions
The standard bar stool height is 30 inches, with a seat height between 24-27 inches. This allows enough leg room and comfort for sitting at a bar or counter 1. Counter height is usually 36 inches, with a seat height around 26-29 inches. Bar stool seats generally range from 10-16 inches wide and 12-20 inches deep 2.
When designing your bar stool, consider the height of your counter or bar and the amount of leg room needed. The seat shape and size should provide enough support and comfort. A backrest and footrest can provide additional support. Curve the legs outward slightly for stability. Choose durable and attractive materials that match your decor.
Cutting the Wood
The first step will be to create a cut list that outlines all of the pieces you will need for your bar stool build. Having an organized cut list ensures you cut all of your pieces to the proper dimensions before assembly. According to 5 Common Woodworking Cuts – VCUarts Qatar FabLab, some of the most common cuts for a project like this include cross cuts, miter cuts, and rip cuts.

When cutting your lumber, be sure to follow proper safety precautions. According to Table and Radial Saws, radial arm saws allow for safe and accurate cross cutting while keeping your hands away from the blade. Make sure the material is securely clamped, keep your hands out of the path of the blade, and always use a sharp blade to avoid kickback. Wear safety glasses and hearing protection. When using a miter saw, hold the wood firmly against the fence to ensure straight cuts. Always make sure the blade has stopped fully before adjusting the piece or your stance.
Joinery
Choosing the right joinery techniques is critical for building sturdy and stable bar stools. The two most popular options are mortise and tenon joints and dowels.
Mortise and tenon joints involve cutting a rectangular hole (mortise) in one piece and a corresponding tenon on the end of the other piece. When fitted together, this creates a very strong 90 degree joint ideal for weight-bearing furniture like bar stools. Mortise and tenon joints have been used for centuries in wooden furniture construction.[1]
Dowels are popular because they’re quick and easy to install with just a drill. However, dowels don’t inherently reinforce the joint the way a mortise and tenon does. Dowels rely fully on the glue to hold them in place. For bar stools that will endure weight and movement over time, mortise and tenon joints are the smarter choice.
For the strongest result, the chosen joinery method should always be reinforced with wood glue. The glue helps stabilize the joint and prevent lateral wood movement. Titebond wood glue or Gorilla wood glue are top choices for assembling bar stools and wooden furniture.
[1] https://www.lumberjocks.com/threads/joinery-for-bar-stools.221465/
Shaping the Seat
Once the seat has been cut to the desired dimensions, it’s time to shape it for comfort and aesthetics. Two important parts of the shaping process are choosing the router bit profile and sanding/finishing the wood.
For the router bit, a roundover bit with a 1/4″ radius is a good choice to soften the hard edges of the seat. Running this bit around all the edges creates a nice rounded profile for a comfortable place to sit. An ogee bit is another option that provides a little contour while still allowing the flat center section to remain.
After routing, it’s critical to sand the seat progressively from coarse grit to fine grit to achieve a smooth finish. Start with 80 or 100 grit to remove tool marks and shape the contours. Then work up to 180, 220, 320, and 400 grit sandpaper. Always sand in the direction of the wood grain. Finish sanding should eliminate any visible scratches before applying a protective finish.
For finishing, an oil-based varnish, polyurethane, or tung oil will protect the wood and give it a nice luster. Multiple thin coats should be applied, sanding lightly between each coat. Allow proper drying time between coats. The final finish coats can be buffed out to a smooth, velvety feel.
Constructing the Legs
A critical step in building a wooden bar stool is constructing the legs. This provides the necessary support and stability for the stool. The process involves cutting the leg pieces to the proper length and assembling the stretchers that connect the legs together.
First, cut the leg pieces from your chosen wood stock to the desired height, making sure they are all equal. Typical bar stool leg height is 25-30 inches. Use a miter saw with a stop block to cut all the legs to consistent length. Sand any rough edges.
Next, cut and assemble the stretchers that will join the legs together. Stretchers are horizontal pieces that provide lateral stability and keep the legs from splaying outward. Cut stretchers to size per your plans. Use wood glue and screws to attach each end of the stretchers to the legs.Legs and stretchers must be solidly constructed since they bear the stool’s weight.
Construct two or more leg assemblies this way based on your design. When complete, the leg assemblies will be ready for attaching to the seat in a later step.
Attaching the Seat
One of the most important steps in constructing a wooden bar stool is properly attaching the seat to the legs and stretchers in a way that allows for wood movement. Wood naturally expands and contracts with changes in humidity and temperature. If the seat is rigidly attached, this movement can lead to cracking and structural damage over time. There are a few key techniques to allow for movement and create a sturdy joint.
First, the seat must be centered on the legs and stretchers. Measure the overhang evenly on all sides. Next, drill holes through the seat into the stretchers. These holes should be slightly oversized, at least 1/8″ larger than the bolt diameter. This gap allows the bolt to move within the hole as the wood expands and contracts. Use washers on both sides of the holes to prevent binding.
Another important strategy is to only attach the back or front of the seat, not both. Attaching on one side only permits longitudinal movement. This reddit thread provides excellent examples of how to allow for wood movement when attaching tabletops.
Proper attachment techniques prevent damage and help the stool retain structural integrity over decades of use. Allowing the wood to move prevents cracking and premature failure.
Finishing
Proper finishing is crucial to create a smooth, durable surface and attractive look for your bar stool. After sanding and removing any dust, you’ll need to choose an appropriate finish. Some good options for bar stools include:
Polyurethane – This is a very durable synthetic finish that provides good protection from moisture, heat, and scratching. Oil-based polyurethane forms a thicker coating than water-based. Be sure to apply at least 3 coats following the manufacturer’s instructions for best results. Allow proper drying time between coats.1
Natural oils – Oils like tung or linseed oil accentuate the natural wood grain and provide some protection. Multiple thin coats must be applied to build up protection. Allow proper curing between coats.2
Lacquer – Provides good durability and dries quickly. Can be applied in many thin coats for a smooth finish. Use a spray lacquer for best results. Allow proper drying between coats.
Epoxy – An extremely durable and resistant finish for bars and restaurants. Requires proper preparation and skill to apply correctly. Multiple coats are needed.
Wax – Provides minimal protection but results in a soft luster. Must be reapplied periodically. Often used over other finishes.
Take care when applying your finish of choice using a clean brush or lint-free cloth. Apply in a dust-free area with adequate ventilation. Follow all safety precautions. Allow the finish to fully cure before use.
Conclusion
Let’s review the key steps we took in this project. We started by selecting the appropriate wood, taking into consideration the type of wood, hardness, grain pattern and cost. Once we had the materials, we created a design and determined the dimensions to fit the space and seating height we needed.
With the materials purchased and cut to size, we focused on the joinery using woodworking joints like mortise and tenon or dowels to securely join the pieces. Shaping and smoothing the seat came next before constructing the legs. Finally, we attached the seat and added finish like stain, sealer or paint to protect and decorate the stool.
To keep your wooden stool looking its best, aim to keep it out of direct sunlight which can cause fading and drying over time. Use coasters under drinks to prevent water marks. Every so often, consider adding new stain or sealant to enhance and protect the finish. You can also customize the stool in many ways like painting designs, adding cushions or switching out the legs over time.


