How To Make Diya In Clay For Kids?
A diya is a small earthen lamp that is extensively used during Diwali, the festival of lights celebrated in India. The word “diya” comes from the Sanskrit word “deepa” which means lamp. Diyas hold great significance in Indian culture as a symbol of wisdom, prosperity and luck.
Making diyas is a fun and creative activity for kids. It allows them to get hands-on experience in crafting while learning about an important part of Indian culture. The process of making diyas with clay is easy and engaging for children of all ages. It’s a great way to get them excited about Diwali celebrations and making their own diyas they can proudly display.
Materials Needed
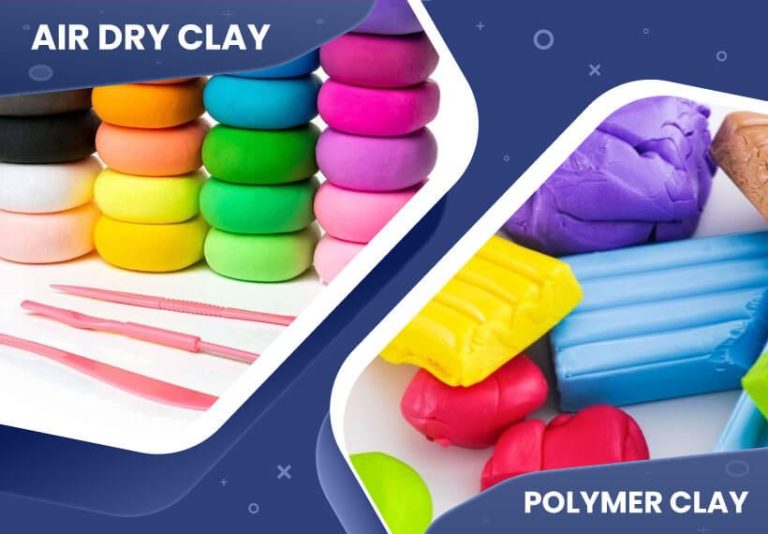
The main material you’ll need for making diyas is clay. There are many types of clay you can use like air-dry clay, polymer clay, or natural pottery clay. Air-dry clay is a good choice for beginners since it doesn’t require baking. You’ll also need some basic sculpting and decorating tools:
- Clay – Air-dry clay or natural pottery clay work best
- Rolling pin – For flattening the clay into a uniform thickness
- Cookie cutters or household items – For cutting shapes out of the rolled clay
- Paints – Acrylic craft paints, poster paints or ceramic glazes
- Paint brushes – Variety of brush sizes for details
Before starting, make sure you have a clean work surface and either an apron or clothes you don’t mind getting messy. Now gather the materials and let the clay making begin!
Prepare the Clay
The first step in making your clay diya is to knead the clay to soften it and make it pliable. Start with an adequate amount of clay and knead it with your hands on a clean, dry surface for a few minutes. Apply even pressure as you knead to work the clay and warm it up with friction from your hands. Knead until the clay is smooth, soft, and free of lumps or air pockets.
Next, dust your work surface lightly with flour. This helps prevent the clay from sticking as you shape it. Use plain white flour and sprinkle just enough to coat the surface. Too much flour can dry out the clay. The floured surface will make rolling and shaping the clay much easier.
Shape the Diya
Once you have prepared your clay, it’s time to shape it into a diya. Start by rolling out the clay into a flat disc using a rolling pin or your hands. Make sure the disc is an even thickness throughout. Then, use a cookie cutter, cup, or other circular object to cut out a circular shape from the clay disc.
After cutting out the circular base, it’s time to mold the clay into the traditional diya shape. Use your fingers to pinch and curve the sides of the clay circle upwards. Create a shallow bowl shape, leaving one side straighter to act as the back of the diya. Make sure the rim is slightly thicker by pinching it inwards. Shape and smooth the clay patiently until you have a symmetrical diya shape.
If the clay cracks or tears, simply pinch the pieces back together. You can also roll scraps into coils to extend the height of your diya as needed. Work slowly and gently to achieve the shape you want.
Add Decorations
Decorating your diya is a fun way to add some extra flair and make it unique. You can use various tools and techniques to imprint designs into the clay. Here are some ideas for decorating your diya:
- Use cookie cutters, popsicle sticks, or other household items to imprint shapes into the clay. Gently press the object into the clay to leave an impression.
- Make dots, lines, or other patterns by pressing a chopstick, skewer, or other pointed tool into the clay.
- Attach extra pieces of clay to add 3D effects. Roll tiny balls of clay and attach them around the diya as beads or decorative elements. Or, cut clay shapes like flowers, stars, or animals and attach them.
- Use a dull knife or edge of a spoon to carve patterns or textures like waves, zigzags, or swirls into the clay.
- Stamp letters or designs using alphabetical pasta, beads, sequins, or buttons. Press them gently into the clay.
Feel free to get creative with different tools and Clay pieces. The decorations will add personality and interest to your homemade diya.
Let Dry
After shaping and decorating your diya, it’s important to allow it to air dry completely before painting or adding any finishing touches. Depending on factors like clay thickness and humidity, drying can take 24-48 hours. Don’t rush this step! If you paint or coat a diya that hasn’t fully dried, the clay can remain damp underneath the paint or sealant. This moisture can become trapped and lead to cracking or damage to your decoration.
Set your unfinished diya in a safe, dry spot out of direct sunlight. Avoid placing it on any surface that could transfer color or patterns to the clay. You’ll know it’s ready for the next steps when the surface feels smooth, dry, and cool to the touch.
Letting the shaped clay dry thoroughly helps lock the form in place so subsequent steps don’t distort or damage your diya. Proper drying also ensures paint and sealants cure evenly for best results. With patience at this stage, your handcrafted diya will come out beautifully!
Paint the Diya
Once the diya has fully dried, it’s time to paint! Acrylic paints work best for painting clay. Allow your child to express their creativity through painting their unique design on the diya.
Set out a variety of acrylic paint colors and paint brushes. Show your child how to dip the brush in water first, then dip in paint. Encourage them to paint whatever fun designs they desire – patterns, shapes, images, their name, etc. Let them experiment and be creative!
Make sure to paint all sides and edges of the diya. Apply multiple coats to get the colors vibrant. If desired, add accents like glitter glue or glitter paint once the acrylic paint has dried.
Painting the diya is an opportunity for kids to showcase their artistic abilities. Praise their painting skills and let their imagination shine!
Add Finishing Touches
Once the diya is fully dry, you can add some finishing touches to make it look extra special. Here are some ideas for finishing off your homemade clay diya:
- Outline designs with black paint. Use a fine paintbrush to trace over any carved or imprinted designs. This will help them stand out more. Outline any decorative shapes, patterns, or figures on your diya.
- Add glitter or other embellishments. Add some sparkle to your diya by sprinkling glitter over the surface while the paint is still wet. Or glue on sequins, beads, buttons, or other embellishments with craft glue or strong hold adhesive.
- Add striping or borders. Paint bands of color around the edges of the diya for a fun pop of brightness.
- Seal with varnish. Once fully dry, apply a coat of decoupage medium or varnish to seal and protect the diya.
Get creative with unique finishing touches to make your homemade diya stand out! The options are endless for personalizing it.
Apply Protective Coating
After your diya is decorated and painted, you will need to seal it with a protective clear coat before use. This helps make the diya more durable and water-resistant.
Use a varnish, glaze, or sealant made for clay, ceramic, or pottery. Follow the product instructions for proper application. Using a brush, apply a thin, even layer over the entire painted surface and edges of the diya.
Make sure to coat the inside as well if your diya will hold water or a candle. Allow the sealant layer to fully dry as directed on the product label before use.
Applying this protective coating is an important final step to help preserve your handmade diya for seasons to come!
Display and Use Your Diya
Once your homemade diya is complete, you can proudly display it around your home and light it to spread the festive spirit. Place the diya on mantles, shelves, tabletops or windowsills and put a tealight candle inside to create a warm, cozy glow. The dancing flame will add a special touch to any room.
Diyas also make thoughtful gifts for friends and family during Diwali. Make a batch and hand them out as presents to spread light and joy. Include a tealight candle with each diya so the recipient can easily light it up right away. You can also decorate the diya with ribbons, beads, sequins or paint to make each one unique before gifting. Seeing your homemade diyas lit up around the houses of loved ones will fill you with satisfaction and happiness.