Is Throwing Clay Messy?
Throwing clay is a method of forming pottery on a potter’s wheel. It is a process that involves centering the clay on the wheel, opening up the ball of clay, raising the walls, and trimming excess clay to refine the final piece. Throwing clay allows potters to create a wide variety of shapes and forms.
The clay throwing process involves multiple steps including preparing the clay, actually throwing on the wheel, trimming and refining, drying, and firing. At first glance, throwing clay may seem like a messy process given the wet clay and turning wheel. However, with proper preparation and technique, throwing clay can be a relatively clean endeavor resulting in beautiful pottery.
This article will provide an overview of the clay throwing process and examine the messiness at each stage – from preparing the clay to the final fired piece. It will show that with care and planning, throwing clay can be managed to minimize mess.
Needed Supplies
To start throwing clay on the potter’s wheel, you’ll need a few basic supplies:
Clay – The type of clay is important. For throwing on the wheel, you’ll want a clay that is plastic enough to bend and shape without cracking, such as stoneware or porcelain. The clay also needs to hold its shape after forming.
Pottery wheel – This is the essential tool for throwing clay. The wheel head spins at various speeds allowing you to center and shape the clay. Pottery wheels can be kick wheels, electric wheels, or pedal wheels.
Tool kit – This includes basic tools like bats, ribs, cut-off wires, trimming tools, and ribs that are needed for centering, shaping, trimming, and smoothing the clay.
Water – Keeping a small bucket or bowl of water nearby is crucial for wetting hands and smoothing clay while throwing on the wheel.
Preparing the Clay
Properly preparing the clay is an essential first step before throwing on the wheel. Two key aspects of clay preparation are wedging and centering.
Wedging involves kneading and working the clay to remove air bubbles and evenly distribute moisture throughout the clay. According to pottery-on-the-wheel.com, “Wedging aligns the clay particles so that the clay becomes one cohesive mass.”1 This prevents air bubbles and cracks when throwing and firing the clay. Wedging can be done manually on a work surface or using a wedging table or machine.
Centering involves securing a lump of wedged clay onto the pottery wheel so it is centered and balanced. The clay should be secured firmly so it does not wobble while throwing. Keeping the clay centered is crucial for having control while throwing to achieve symmetry in the final piece.
Taking the time to properly wedge and center clay before throwing allows for a smooth throwing process and quality final results.
Throwing the Clay
Once you have the clay centered on the wheel, it’s time to actually start throwing the pot. The first step is to begin rotating the wheel. Use your foot to start the wheel spinning at a moderate speed – too fast and the clay will fly off, too slow and you won’t get enough momentum to raise the walls. According to The Crucible’s guide, the ideal speed is “about 1 revolution per second” (https://www.thecrucible.org/guides/ceramics/wheel-throwing/).
With the wheel moving, use your thumbs to open up the ball of clay and form the bottom and sides of your pot. Start by pushing your thumbs into the center to create the bottom. Then, use your fingers on the outside to gently raise the walls up as the wheel spins. As Instructables notes, “Form the bottom first, then slowly pull the walls higher once the bottom takes shape” (https://www.instructables.com/Thowing-a-Pot-101/). Take care not to raise the walls too quickly or make them too thin, which can cause collapse.
Once you’ve reached your desired height, you can further refine the shape using various tools. A rib can smooth the walls, while a chamois can gently finesse curves and refine details. Pay attention to keeping an even thickness throughout the piece. Continue throwing until you achieve the size and shape you envisioned for your pot.
Trimming and Refining
Once the clay has been thrown on the pottery wheel and allowed to harden to a leather-hard state, the next step is trimming and refining the shape.
Trimming involves using various metal scrapers, ribs, and loop tools to refine the shape and smooth the surfaces. As the clay spins on the wheel, the potter carefully scrapes away excess clay and evens out the walls and base of the piece. This helps create a symmetrical form and thinner walls.
The potter may use a metal rib tool to smooth out throwing lines and compress the surface. Loop tools are useful for cleanly defining edges and curves. Trimming requires working slowly and methodically to achieve the desired shape.
The goal is to refine the overall form, contour the walls, carve the foot or base, and eliminate imperfections from throwing. Frequent checks are made from all angles to ensure the piece is symmetrical. Trimming transforms a roughly thrown form into a precisely shaped work.
Proper trimming technique helps create very smooth, professional looking surfaces. It takes practice to master trimming clay to thin, even walls without compromising the form. With specialized trimming tools and patience, potters can achieve truly refined results.
For more details on trimming pottery, see this step-by-step tutorial: https://www.lakesidepottery.com/Pages/Pottery-tips/Trimming-a-pot-Lakeside-Pottery-Tutorial.htm
Mess During Throwing
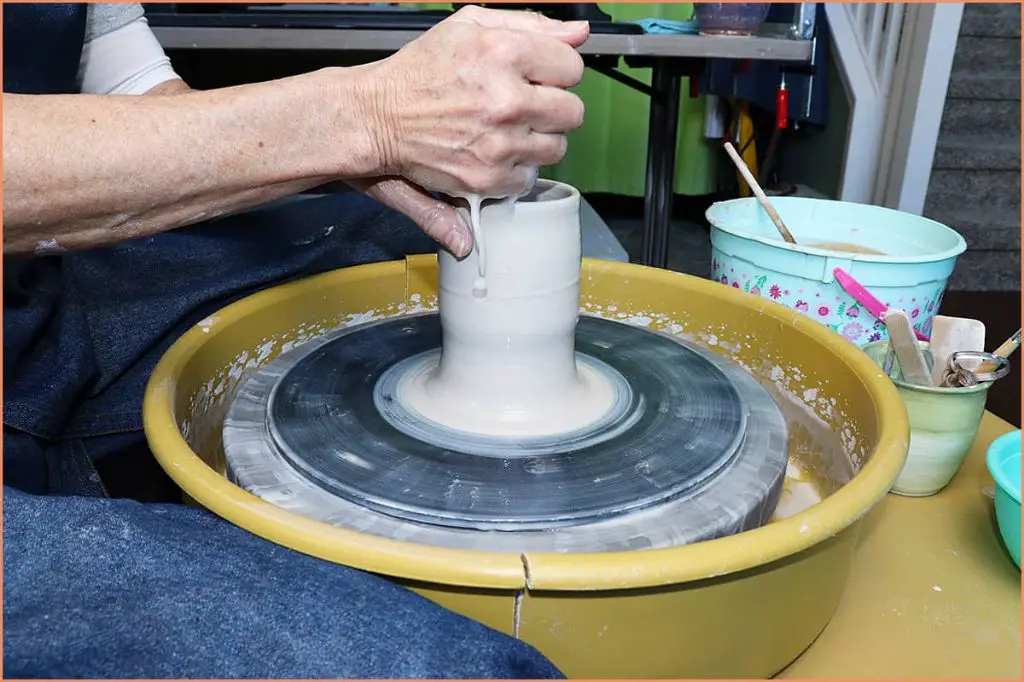
Throwing clay on the pottery wheel can get quite messy during the process. Here are some of the main ways it can create a mess:
Water is an essential part of throwing clay on the wheel. It helps keep the clay moist and workable. However, as you spin the clay on the wheel, water will splash off it. This can get your clothes, the floor, and surrounding surfaces wet. It’s a good idea to wear an apron and have some towels on hand while throwing 1.
Clay will also stick to your hands a lot during throwing. As you shape the clay on the wheel, it smears all over your fingers and palms. This can leave your hands quite messy until you’re able to wash up. Some potters wear latex gloves while throwing to minimize the mess on their hands.
In general, throwing clay on the wheel requires cleaning up afterwards. You’ll need to wipe down any surfaces where water splashed. The wheel and surrounding area will likely have clay splatters that need to be scrubbed off. Any tools used will also need washing. It’s a good idea to protect floors and surfaces near the wheel and have rags on hand for easy clean up 2.

Drying and Firing
After throwing on the wheel, clay pieces must be thoroughly dried before firing in a kiln. Allowing clay work to slowly dry prevents cracking, warping, or exploding in the kiln. Pieces should be dried on racks in a warm (not hot), dry area with steady airflow for between 5-7 days depending on thickness. Larger or thicker pieces may require 2-3 weeks of drying time. Avoid drying clay in direct sunlight or near heating vents as uneven drying can cause cracks. Once bone-dry, clay is ready for the first firing called bisque firing.
Bisque firing further hardens the clay before any glazing. The bisque firing temperature depends on the type of clay used, typically ranging between cone 04 (1116°F/600°C) and cone 6 (2232°F/1220°C). Firing too fast can risk cracking or exploding. After bisque firing, the pottery is ready for glazing and decorating if desired. Glazes come in various colors and finishes that create an impermeable glass surface over the bare clay after firing. The final firing, or glaze firing, happens after applying one or more layers of glaze at temperatures 50-100°F lower than the bisque fire. This melts the glaze into a smooth, glassy finish.
For more information on drying and firing clay, check out this comprehensive guide: https://www.soulceramics.com/pages/how-to-dry-pottery
Mess After Throwing
While throwing clay can be messy during the process, the cleanup continues even after throwing. According to Super Mud Pottery, clay dust is a common issue during the firing process. As the clay pieces fire in the kiln, any loose dry clay can create dust that deposits around the kiln. Regular cleaning and vacuuming around the kiln area is recommended.
The potter’s equipment also requires thorough cleaning after use. Wheels, splash pans, and tools need to be wiped down to remove wet clay and residue, according to comments on Reddit. Allowing clay scraps to dry on equipment can lead to buildup that is more difficult to remove later. Most potters recommend prompt and thorough cleaning of all equipment after throwing.
Finished Product
The end result of throwing clay on the pottery wheel is a smooth clay vessel. When the throwing process is complete, the clay is left to dry before being fired in a kiln. Firing the clay hardens it into a ceramic material. At this stage, the surface is still porous and needs to be glazed before being food safe. A glaze is a glass-like coating that is applied to the bisque fired clay and creates a non-porous surface after a final firing. Quality pottery glazes are specially formulated to be non-toxic. Once fired, a glazed pottery vessel is safe for food contact.
The finished product from throwing on the wheel results in high quality, artisanal ceramic wares like bowls, cups, vases, and plates. The throwing process allows for symmetrical smooth forms that are difficult to produce using handbuilding techniques like coil and slab construction. Experienced potters can create a wide variety of thrown forms beyond simple bowls and cups. The combination of the potter’s skills, the nature of the clay, and firing effects give each finished piece a unique character.
Conclusion
While throwing clay on a wheel can certainly get messy in the process, most potters agree that with proper preparation and clean up afterward, the mess is manageable. During throwing, having plastic laid down and wearing an apron can help contain spilled water and flying clay bits. Once a piece is complete, proper drying and firing techniques ensure the final product comes out smooth and sturdy. While throwing clay requires patience and practice, the satisfaction of creating a beautiful finished piece makes the mess worthwhile. As many experienced potters say, don’t be afraid of a bit of mess – it’s part of the creative process!


