Sculpting Mastery: Advanced Techniques For Clay Artists
The goal of this article is to provide an in-depth look at advanced sculpting techniques for clay artists who want to take their skills to the next level. We will cover key methods and approaches that allow artists to create more realistic, detailed, and expressive sculptures. An overview of techniques we will explore includes using armatures and structures for support and pose, adding rich texture and surface effects, mastering proportion and anatomy, sculpting nuanced facial expressions, refining details, and preparing finished sculptures for display. With diligent practice of these advanced techniques, clay sculptors can gain the mastery needed to realize their artistic visions.
Sculpting with clay allows tremendous creative freedom, but mastery requires moving beyond basic techniques. This guide aims to equip aspiring sculptors with the advanced skills needed to handle clay confidently and execute their ideas with precision (Advanced Sculpting Techniques for 3D Modeling). Both functional pottery and fine art demand careful attention to detail. By diving deep into specialized methods, clay artists can level up their abilities.
Types of Clay
There are several types of clay commonly used for sculpting, each with their own unique properties and characteristics that make them suitable for certain techniques and applications.
Some of the most popular clays for sculpting include:
- Polymer clay – A pliable plastic material that cures when baked. Good for fine details and does not require firing. Brands like Sculpey and Fimo are common. [1]
- Oil-based clay – Made from mineral oil and fillers, stays workable indefinitely. Plastilina is a popular brand. Good for animation and maquettes.
- Water-based clay – Clay that contains water, needs to be kept moist. Available in earthenware, stoneware and porcelain varieties. Requires firing in a kiln.
- Paper clay – Made from paper pulp and clay, lightweight and durable when dry. Does not require firing.
The type of clay chosen depends on factors like the desired finish, level of detail, cost, and whether firing is required. Polymer clays like Sculpey are beginner-friendly and good for sculpting small figures. Water-based clays allow creating ceramic sculptures but require more specialized tools and access to a kiln.
Armatures and Structures
When sculpting complex shapes and figures, using an internal armature provides essential support and stability. Armatures act as the skeleton for the sculpture, enabling more intricate poses and suspended limbs. They are especially important for large or heavy pieces to prevent sagging and collapse of the clay.
Wire, wood, and metal rods are common armature materials. For flexibility, aluminum wire works well to allow posing of armatures before applying clay. Heavier steel or rebar can provide additional strength for very large sculptures. Wooden dowels and rods also offer rigidity when inserted into areas like legs, arms, and necks of figures.
It’s important to firmly secure armatures before adding clay. Affixing the central armature to a base or stand provides stability. Cross pieces and fasteners can then extend the limbs and appendages. Securing clay around the joints creates attachment points.
Simple internal structures like coils, balls, cones and rings added during sculpting can support thin or elongated sections. These shapes give strength while minimizing weight and clay usage. Planning internal supports is key for creating sturdy, well-balanced sculptures.
Texture and Surface Effects
Adding realistic texture and surface details to a sculpture can transform it from a basic form to a lifelike work of art. There are many techniques clay artists can use to achieve different textures.
One approach is to use actual textures from real-world objects. Pressing items with interesting textures like lace, burlap, or mesh into the surface of the damp clay results in realistic impressions. Cut or tear cloth to create ragged textures like a tattered garment. Use wood grain tools to imprint wood patterns. You can also press molds of textures like brick or concrete into the clay.
Clay tools like loop tools, ribs, rollers, and needles can add or enhance textures. Use loop tools to carve uneven, pebbly textures. Rollers can create smooth, uniform patterns or long wavy lines depending on the pressure and angle. Needle tools make it easy to etch fine details like wrinkles, pores, or hair.
Sgraffito involves carving into leather-hard clay to reveal colored layers underneath. Try carving jagged lines, crosshatching, or shading to make textures like scales, fur, or weathered wood. You can also brush on colored slips or stains before carving to create contrast.
Adding clay slurry or slip can build up rough, uneven textures quickly. Dab or stipple it on areas like rocky terrain or tree bark. Brush broad strokes for mottled, peeling effects. Letting areas dry at different rates creates cracking or peeling. Sponging and brushing on multiple layers creates depth.
Firing techniques like raku add beautiful crackled glazes. Burying sculptures in materials like sawdust or rice during firing creates carbonized, pitted effects. Using slip trailing, sgraffito, or textured stamps after bisque firing can further enhance surface details.
With the wide range of tools and techniques available, sculptors can create limitless textures to bring their works to life. Realistic surface effects engage the eye and make clay sculpture irresistibly tactile.
Proportion and Anatomy
Sculpting the human figure with accurate proportions and realistic anatomy requires careful attention and practice. Artists should study human proportion systems like the Vitruvian Man to understand ideal ratios for the head to the body, and lengths of limbs and torso.
For accurate anatomy, focus on skeletal and muscular structures that define the form. Study anatomical drawings, photos and life models. Pay attention to landmarks like the ribs, pelvis, spine and joints as you build up the figure. Smooth gradients between muscle groups are important for a natural look. According to Anatomy4Sculptors, their proportions calculator is a helpful tool for measuring ideal human dimensions.
When sculpting faces, carefully build up the underlying skull structure before adding superficial muscles and skin textures. Study the complex muscles around the eyes, nose and mouth that enable facial expressions. Always measure distances between features and use plumb lines to check alignments.
With practice and close observation of the human form, sculptors can achieve mastery of proportion and anatomy.
Facial Expressions
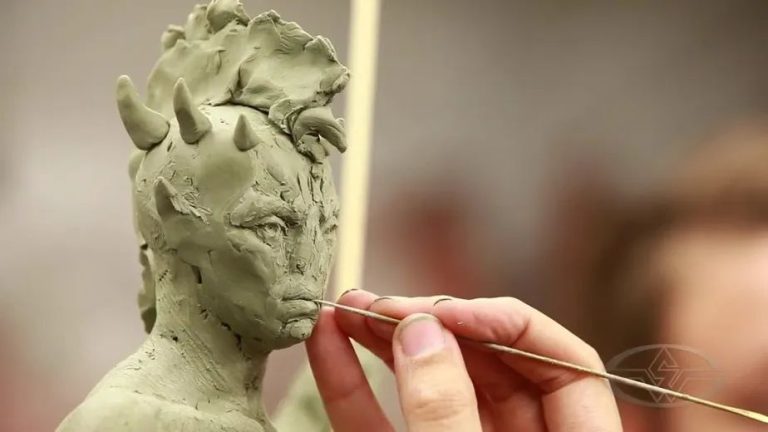
Capturing subtle emotions and expressions in clay portraits requires careful study of human anatomy and practice observing how different muscles move during various facial expressions. The eyes, eyebrows, nose, lips, and overall arrangement of facial features all shift subtly to convey different moods.
According to the Facial Expression and Art article on sophiezadeh.com, “The key to creating a face is to keep moving from one area to another, working on different features for a short time and then revisiting them …” [1] Facial anatomy is complex, so focusing too long in one area can throw off proportions. Continuously evaluating relationships between features helps capture realistic expressions.
For sculpting believable facial expressions, it is essential to understand anatomy and how muscles create various looks. The Sculpting Facial Expressions course on artprof.org recommends learning techniques “for achieving diverse forms and marks in clay that will allow you to convey complex psychological states.” [2] Practicing sculpting a wide range of expressions will build skill in manipulating clay to portray emotions.
Posing the Figure
An important aspect of creating a realistic and compelling sculpture is posing the human figure in a natural, fluid way. Rigid or awkward poses can make a sculpted figure seem lifeless and stiff. When deciding on a pose, consider the narrative or emotion you want to convey, then choose a pose that captures that energetically.
Some tips for posing the figure dynamically include:
- Avoid perfectly straight limbs – allow arms and legs to bend slightly to appear more natural.
- Shift the weight onto one leg rather than evenly distributing between two.
- Twist the body gently to bring a sense of movement.
- Let the arms hang in an easy, relaxed manner rather than stiffly at the sides.
- Lift the chin and engage the neck instead of dropping the head straight down.
- Bring one shoulder slightly higher than the other.
- Bend a knee and shift the hips for a sense of contrapposto.
Study videos or photos of people in motion to observe how the body naturally moves and flows from one position to another. Sculpting a figure with this sense of organic, graceful posture makes it seem to come alive on the stand.
Detailing and Refinement
Taking a sculpture from rough to finely detailed requires patience and precision. At this stage, you’ll want to refine the forms, add texture, and bring out subtle details that bring your sculpture to life.
Begin by carefully reviewing the anatomy and proportions, making adjustments where needed. Pay special attention to important areas like hands, feet, faces and other defining features. Smooth out any unwanted lumps or imperfections in the underlying form using sculpting tools, sandpaper, or very fine grit sanding sponges.
Add musculature, expression lines, wrinkles and other fine details to the face. Use a variety of sculpting tools to indent smile lines, crow’s feet, nasal labial folds and other aging details. Work slowly and carefully to achieve a realistic, nuanced appearance.
Texturize skin and clothing adding pores, wrinkles, stitching, seams, buttons and other fine details. Impress patterns into the wet clay or build up the texture stroke-by-stroke. Work wet-on-wet when possible for seamless blends.
Refine the hair with wispy strands, cowlicks and movement using a variety of tools. Add subtle variations in length and flow for a more natural look. For shorter hair, use the edge of a tool to add grooves simulating strands.
Actions like pressing fingers into clay or holding objects convey personality and realism. Use armatures or props to experiment with hand poses. Refine the nails, knuckles, and other specifics.
Become your own critic, constantly evaluating areas that can be improved. Strive for realism in the fine details. Mastering sculpting means dedicating time to perfecting the tiny elements that bring a piece to life.
Source: https://www.instructables.com/Finishing-and-Detailing-a-Sculpey-Polymer-Clay-Scu/
Finishing and Presentation
Presenting a finished sculpture in an impactful and elegant way is a key aspect of the art. Proper finishing and display can elevate a work and garner more interest from viewers. There are several techniques and principles for finishing and showcasing clay sculptures:
Polishing is an important final step when working with ceramic sculptures. A polished surface adds shine and draws the eye to the details of the work. Using a buffing wheel with a polishing compound yields professional results. Apply the compound and buff in circular motions until achieving the desired sheen (https://www.youtube.com/watch?v=9KxyZojFKcE). Start with a coarser grit and work up to a fine polish for best results.
Mounting considerations are crucial for sculpture display. Securely fasten sculptures to a base or platform to avoid tipping. Many different stand options exist like wood, acrylic, metal and adjustable bases. Select sturdy materials that complement the sculpture design. Some pieces may benefit from special mounting like wall-hung display or suspension.
Experiment with lighting to bring out certain effects. Spotlights can dramatize facial contours or cast intriguing shadows. Natural lighting also beautifully highlights texture and form. Take light color into account and try warm or cool lighting. Lighting direction strongly impacts mood and dimension.
When presenting sculptures, allow plenty of space around each piece so viewers can walk around and appreciate from different angles. On a pedestal, a sculpture has maximum impact. Group related works together in cohesive vignettes. Backdrops like neutral walls or fabric let the art take center stage. At commercial shows, an attractive booth containing tables at various heights to display sculptures draws buyers in (https://messyeverafter.com/self-employed-journey/how-to-professionally-present-your-art-for-sale/).
Finishing and displaying clay creations with care optimizes presentation and viewer experience. So don’t neglect this final, critical step.
Conclusion
Throughout this journey into advanced sculpting techniques, we’ve explored a wide range of approaches and skills to elevate clay artistry. From thoughtful armature design and anatomically accurate proportions, to refined surface textures and emotive facial expressions, each of these techniques serves to bring figures to life in sculptural form. The key is continual practice and passion for your artistic craft. Observe details in the world around you, study artistic masters for inspiration, and keep challenging yourself to bring greater nuance and realism into your sculptures. With dedication to honing your abilities, you will unlock new heights of sculpting mastery.
Sculpting in clay is a rewarding yet demanding artistic pursuit. But for those willing to put in the work and remain open to learning, breathtaking creations are within reach. Keep observing people and anatomy, seek feedback from mentors, and maintain a beginner’s mindset – no matter your experience level. Your sculpting abilities are a lifelong journey. With the techniques and advice presented here, you now have additional tools to continue cultivating your skills. Trust the process, embrace both successes and failures, and your unique artistic voice will emerge. The final triumph is not technical perfection, but fully expressing your vision and perspective through the medium of clay.