Surface Decoration Techniques For Clay Pottery
Surface decoration refers to the techniques used to enhance the visual appeal and aesthetics of clay pottery. Decorating the surface of pottery has been practiced for thousands of years across many cultures. Some of the earliest evidence of surface decoration comes from ancient Mesopotamia and Egypt, where potters used techniques like painting, glazing, and incising clay vessels. By the Neolithic period, potters were impressing cord patterns into the surface for decoration.
Over time, potters developed an increasingly sophisticated array of surface decoration techniques. Major methods that emerged include painting, glazing, slipping, engraving, and molding clay. Different cultures specialized in certain techniques based on the local materials available. For example, ancient Chinese potters perfected colored glazes, while Greek potters focused on black-figure and red-figure painting. The major surface decoration techniques used in historical and contemporary pottery are outlined in this article.
Slip
Slip is a liquefied clay mixture that can be used to decorate the surface of pottery and ceramics. Slips come in a variety of colors and textures depending on their ingredients. Some common ingredients in slip recipes include clay, water, colorants like metal oxides, and additives like paper fiber or sand.
Slips are applied to leather-hard or bone-dry pottery using a variety of techniques like pouring, dipping, painting with brushes, or trailing through pipettes or bottles with fine tips. The viscosity of the slip can be adjusted to create different effects – thinner slips spread and blend more while thicker slips allow for crisp lines and details.
Applying colored slips to pottery enables beautiful visual effects. Contrasting colors can be layered or blended to create patterns, textures, and dimension. Slips can also be used to accent or highlight certain design elements. A light-colored slip trailed over a dark clay body makes the lines really stand out. With slips, pottery artists can achieve anything from subtle antiqued patinas to bold, graphic designs.
Here are some examples of slip decoration techniques and effects:
– Pouring or dripping slips: https://ceramicartsnetwork.org/daily/article/Slip-Trailing-for-Beginners-A-Primer-on-a-Great-Ceramics-Decorating-Technique
– Blending and layering colored slips: https://ceramicartsnetwork.org/daily/article/Slip-Trailing-for-Beginners-A-Primer-on-a-Great-Ceramics-Decorating-Technique
– Using slip to accent carved or incised designs: https://ceramicartsnetwork.org/daily/article/Slip-Trailing-for-Beginners-A-Primer-on-a-Great-Ceramics-Decorating-Technique
Sgraffito
Sgraffito is a decoration technique where surface layers of slip or glaze are scratched or etched to reveal the clay body underneath. It creates interesting textured designs and patterns on pottery.
The most basic sgraffito tool is a pointed metal or wooden stylus that can scratch away the layers (https://mcwdesigns.weebly.com/). Other tools like knives, needles, brushes, sponges, or cornstarch bags can create different effects. Mishima is a variation using thin slip lines that are etched through.
To create sgraffito designs, first apply a slip layer in a light color. Let it dry leather-hard. Then apply a darker colored slip or glaze on top. Once that layer dries, use stylus tools to scratch the design and reveal the light slip underneath. The finished effect has a striking two-tone, textured look.
There are many ways to vary the sgraffito technique. Using different tools creates unique lines, textures, and patterns. Applying multiple layers in various colors produces more complex designs. Mishima involves trailing thin slip lines before scratching to outline intricate patterns. Sgraffito remains an engaging way to hand-decorate clay surfaces.
Stamping
Stamping is a surface decoration technique where various objects are impressed into the wet clay to leave behind patterns and designs. There are many types of stamps that can be used:
- Carved wooden stamps made from basswood or other soft woods – These can be hand carved or commercially made. Simple geometric patterns are common.
- Found objects like leaves, seashells, buttons, etc. – Pressing these into clay leaves interesting natural or manmade imprints.
- Custom rubber stamps – These are often carved from eraser rubber and allow endless design options.
- Leather-hard clay stamps – Strips of stiff but malleable clay can be carved into to make stamps.
To decorate using stamps:
- Prepare stamps and clay. Stamps should have a fairly flat stamping surface. Clay should be soft and wet enough to take an impression.
- Press the stamp firmly into the clay at a 90 degree angle. Do not twist or drag the stamp.
- Lift the stamp straight up to reveal the impression.
- Repeat stamping in a pattern, alternating orientations.
Variations on stamping include:
- Overlapping or alternating multiple stamp designs.
- Stamping in different directions or angles.
- “Kiss” stamping where the stamp only partially imprints the clay.
- Using colored slip or glaze on the stamp to transfer color.
Carving
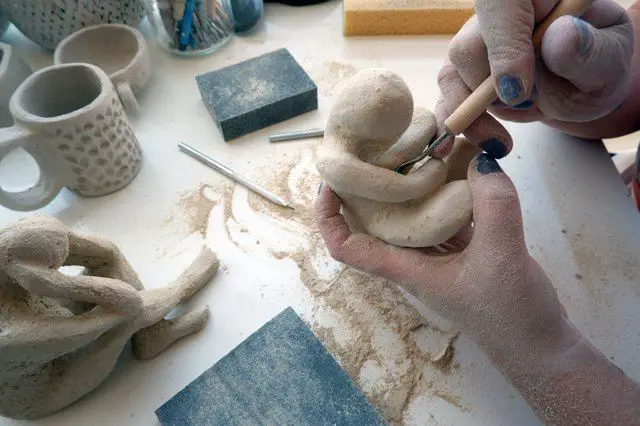
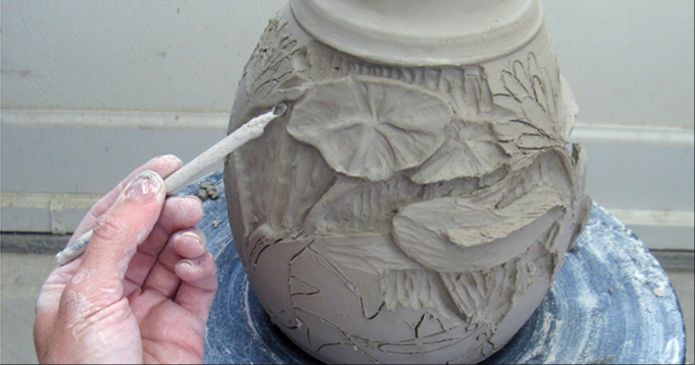
Carving is a surface decoration technique where shapes and patterns are carved into leather-hard clay using various tools. The carved areas remain unglazed, creating a striking visual contrast. Carving allows for great diversity in decorative styles.
Some common tools used for carving clay include loop tools, ribs, fettling knives, wooden tools, and dental tools. The choice depends on the desired carving style and intricacy of the design. Many potters create their own customized carving tools as well.
To carve designs, first decide on the pattern and sketch it onto the clay surface if desired. Wait until the clay is leather-hard before attempting to carve. Hold the carving tool perpendicular to the surface and carve along the sketched lines, removing clay to create the recessed design. Work cautiously to control the depth and cleanly carve the shape. Cleanup and refine details with smaller tools.
Carved designs can range from geometric patterns like circles and zigzags, to natural motifs like feathers and leaves, to ornate decorative elements. The carving can be shallow or deeply recessed. Cross-hatching creates interesting textural effects. Carving lends itself well to both bold, graphic styles as well as delicate detailing.
Piercing
Piercing is a technique where holes are cut or punched into leather-hard clay as a decorative element. It is a type of negative space decoration. Piercing allows the clay body to be exposed where the holes are made, creating a lace-like quality.
Some common tools used for piercing clay include needle tools, craft knives, bamboo skewers, leather punches, and specialized clay piercing tools like an electric piercing saw. The clay needs to be leather-hard to hold the shape of the holes while still being soft enough to pierce cleanly.
To create pierced designs, the desired pattern is marked or drawn on the surface first. Holes can then be punched out following the marks. Geometric patterns like circles, squares, triangles are common but any design can be attempted. The holes can be left open or objects can be inset into them like beads or seeds before firing.
Popular traditional pierced patterns include cutwork, latticework, and lacework. Cutwork involves using a knife to slice out shapes from the clay’s surface. Latticework has a woven look from crossing diagonal lines. Lacework mimics intricate lace designs. Modern interpretations also incorporate meaningful words, messages, or contemporary patterns.
Some examples can be seen at https://www.pinterest.com/hopechella84/clay-pierced/
Combing
Combing is a surface decoration technique where various combs are used to create linear patterns and textures in the clay. The combs have uniformly spaced tines or teeth that form parallel lines when dragged through soft clay. Combing is done when the clay is in its leather-hard state after being shaped but before firing.
Different types of combs create different effects. Fine, closely spaced metal combs make thin, delicate lines. Coarse combs with thicker, widely spaced tines make bolder lines. Potters also use homemade combs cut from wood, bamboo, cardboard, plastic, or stiff leather. The material and spacing of the tines affect the visual result.
To decorate with combs, the shaped pottery is allowed to dry until leather-hard. Using a comb with the desired tine spacing, the comb is pressed into the clay and dragged across to imprint parallel lines. The comb may be dragged straight, at angles, or in curves to form creative patterns. Combing can also be done around the pot to create circular designs.
Visually, combing adds textural interest and contrast to the surface. The shallow parallel grooves catch light and shadow, enhancing the three-dimensional appearance of the ware. Combing brings out the clay’s rich surface qualities. The technique can be used alone or in combination with other decorative methods like incising and slipping.
Incising
Incising is a decorative technique where designs are carved into the surface of leather-hard clay using a variety of tools. This creates grooves and lines that remain visible in the finished piece.
Common tools used for incising include:
- Needle tools – Allow for fine, intricate line work
- Loop tools – Create thicker grooved lines
- Dental tools – Give precision and detail
- Wooden skewers or chopsticks – Offer versatility for wider lines
To create incising designs:
- Make sure clay is leather-hard, not too wet or dry.
- Plan out design.
- Hold tool at an angle and apply light pressure, gently drag tool through clay surface.
- Vary depth and shape of lines to create interest.
- Allow lines to cross over each other for texture.
Well-executed incising has a clean, precise look. The lines and patterns stand out in bas relief on the clay surface. Depth, variation, and crisp edges give visual appeal. Finished pieces showcase the negative spaces between incisions as much as the lines themselves.
Incising lends itself well to geometric patterns or representational designs. Different tools yield diverse effects from uniform straight lines to meandering curved forms.
Sponging
Sponging is a surface decoration technique where a sponge is used to apply underglaze, slips, or glazes to bisqueware or greenware. The sponge soaks up the coloring agent and then transfers it to the clay surface when pressed against it, creating mottled textures and patterns.
Many types of natural and synthetic sponges can be used for sponging on clay, but softer sponges with larger pores tend to work best. Sea sponges, cellulose kitchen sponges, and cosmetic sponges are common choices. The sponge can be cut or torn into different shapes and sizes to create different effects.
To sponge decorate pottery, first bisque fire or partially dry the clay piece. Next, apply a consistent coat of underglaze, slip or glaze to the entire piece using a brush. Then load the sponge with the coloring agent by pressing it into a puddle or running it over a soft roll. Lightly dab the sponge onto the pottery surface in a random pattern. The sponge can be reloaded with color and applied repeatedly to build up designs. Sponging creates soft, irregular effects like Stone Age pottery or faux antiquing.
Varying the sponge type, shape, application pressure and technique can create diverse mottled textures from subtle to bold and painterly. Sponging is an easy decoration method that adds organic, gestural interest to pottery.
Source: https://www.youtube.com/watch?v=4rvjVIlt5A4
Conclusion
Surface decoration techniques allow potters to add creative flair and artistic expression to their ceramic work. The most popular techniques discussed include slip, sgraffito, stamping, carving, piercing, combing, incising, and sponging. Each technique provides unique visual effects and expands the creative possibilities for ceramic artists.
The advantages of surface decoration on pottery are numerous. Decorative techniques allow artists to embellish and enhance the visual appeal of their pieces. Vibrant colors, intricate patterns, and textural elements can be achieved. Decorating the surface also provides the opportunity to convey meaning, symbolism, cultural traditions, and artistic themes. The techniques preserve ancient cultural traditions while allowing for individual creativity and innovation.
Overall, surface decoration gives potters limitless options for unleashing their creativity. The techniques provide visual interest, depth, and aesthetics that engage viewers. With proper execution, surface decoration transforms functional pottery into meaningful works of art. Ceramic artists can continually discover new ways to decorate surfaces and progress their skills over a lifetime of honing their craft.

