What Can You Make With Clay For Beginners?
Clay is an organic material made from minerals found in the earth. The two main types used for arts and crafts are earthenware clay and polymer clay. Earthenware clay is natural clay that has been dried and fired at high temperatures to harden it. Polymer clay is a synthetic clay made from plastic resins that hardens at low temperatures.
Both types of clay are easy to work with for beginners because they don’t require specialized tools or equipment. Clay is an extremely versatile material that can be molded, shaped, carved, and textured in unlimited ways. As a hobby, working with clay is relaxing, rewarding, and a great creative outlet. It develops fine motor skills and spatial reasoning ability. Completed pieces can be decorative items, jewelry, or functional kitchenware. The best part is that mistakes can simply be kneaded back into the clay and reworked until you achieve the desired result.
Gather Your Supplies
Before getting started on your clay projects, you’ll need to gather some basic supplies. The first decision is what type of clay to use. Here are the main options:
- Air-dry clay – This clay dries and hardens at room temperature. It’s easy to work with and doesn’t require baking. Great for beginners and simple projects.
- Polymer clay – Also air-dries at room temperature but becomes durable and long-lasting after baking in a regular oven per package instructions. Allows for more detailed projects.
- Firing clay – Needs to be fired in a high-heat kiln to harden fully. Best for pottery and ceramic creations.
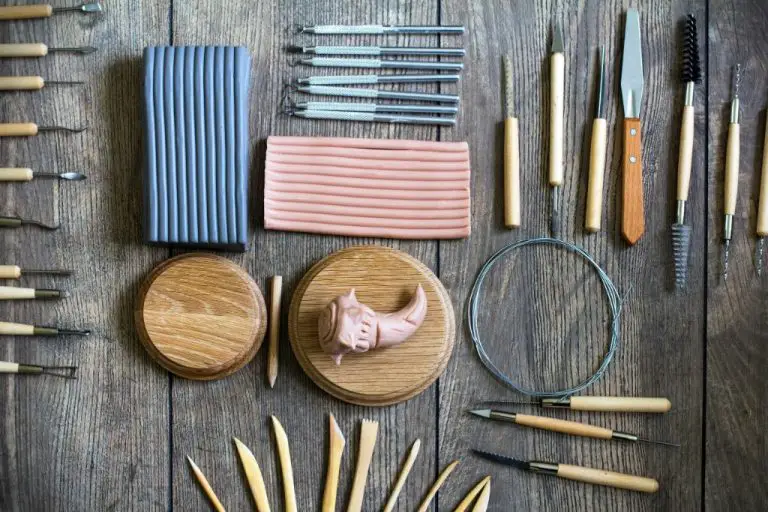
Next, you’ll need some basic sculpting and shaping tools:
- Clay sculpting tools – Metal, wood, or silicone tips for sculpting fine details.
- Rolling pin – For flattening and smoothing clay.
- Cookie cutters or clay cutters – For cutting uniform shapes.
Other helpful materials include: acrylic paints or glazes for decorating, clay shaping stands, varnish or sealer for finishing, and paint brushes.
Start with a basic toolkit and add tools as you advance your skills. The right supplies will help unlock your clay creativity!
Safety Tips
When working with clay, it’s important to keep a few safety precautions in mind.
First, always store clay properly when not in use. Keep it sealed in an airtight container or plastic bag. This prevents the clay from drying out. Don’t leave clay out on a work surface for extended periods.
Second, avoid skin irritation. Clay can dry out your skin, so wear gloves when handling it. Wash hands thoroughly after working with clay. If irritation occurs, apply lotion to hands.
Third, ensure proper ventilation. Working with clay produces dust that can irritate lungs. Work in a well-ventilated area and use a dust mask if needed. Open windows and use a fan to keep fresh air circulating.
Follow these basic safety tips when making clay crafts as a beginner. Stay mindful of proper storage, skin protection, and air quality. This allows you to enjoy the creative process safely.
Easy Clay Jewelry
Making your own clay jewelry is a fun introductory project for beginner clay artists. With simple tools and materials, you can craft beautiful pendants, beads, and rings to wear or gift.
Clay pendants are easy to make by hand or with basic mold shapes like hearts, stars or circles. Roll a small ball of clay and use your fingers to flatten and shape it. Use a toothpick or skewer to pierce a hole for stringing before baking. Impress textures into the clay using household items like buttons, leaf veins, or lace. The options are endless!
To make beads, roll pea-sized balls of clay and pierce with a toothpick. Consider alternating colors for a striped effect. Or, press the balls onto a textured surface like mesh for an interesting pattern. Let your imagination run wild with different shapes and designs.
For rings, roll a thick coil of clay and cut to size with a blade or kitchen knife. Seal the ends together to form a ring band. Twist together two colors for a striking two-tone ring. Rings can also be made using ring blanks from a craft store, with clay added on top for embellishment.
When finished sculpting, bake the clay according to package directions to harden. Allow it to cool fully before handling. Finish off your clay jewelry by applying a sealant glaze or liquid polymer clay for shine and durability.
Mini Clay Figures
Making tiny clay figures is a fun and easy project for beginners. You can sculpt miniature versions of your favorite animals, foods or vehicles with just a lump of clay, modeling tools and some paint. Keeping the figures small allows you to focus on simple shapes and details.
Cute animals like dogs, cats, bunnies, turtles and pigs make for adorable mini clay figures. Use basic oval or spherical shapes for the body and add smaller balls of clay for ears, tails, etc. Insert toothpicks or wooden skewers before baking to make legs that will support the figure. Tiny details like eyes, noses and collars bring these animals to life.
Give your clay creations personality by making miniature foods out of clay. Sculpt tiny donuts, cookies, slices of pizza, stacks of pancakes and more. Use clay cutting tools to add textures like sprinkles or chocolate chips. You can create tiny clay hamburgers or tacos and customize them with clay lettuce, cheese, mushrooms and other toppings.
Kids will love crafting small clay versions of their favorite vehicles. Model trucks, cars, buses, trains, planes and boats in miniature. Add details like windows, wheels, sails, propellers or wings. Creating a series of miniature transportation vehicles is an easy way to practice shaping clay into different forms.
Decorative Bowls
Making decorative bowls is a fun beginner clay project that allows you to practice coil building and sculpting techniques. Start by rolling clay coils that are approximately 1/4-1/2 inch thick. Coil build the bowl by laying coils on top of each other, smoothing the seams together as you go.
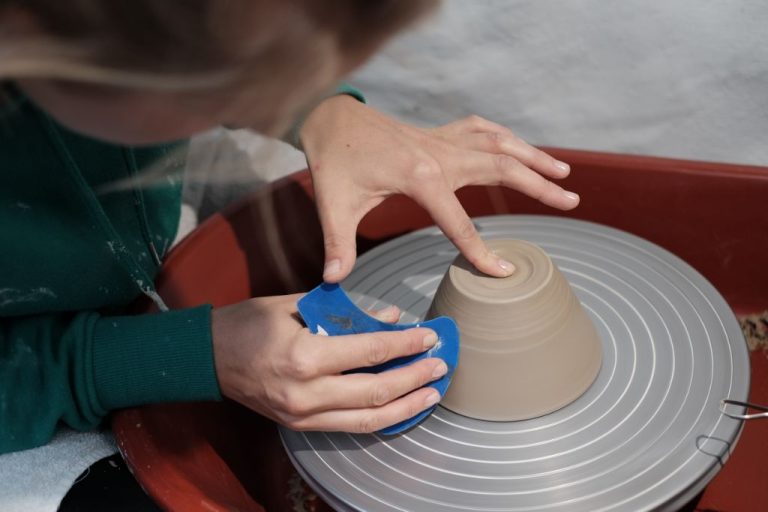
Once you’ve built up the bowl to your desired size and shape, use sculpting tools to refine the shape and smooth the walls. Carefully smooth over any cracks or seams using a clay shaper or your fingers dipped in water. Let the clay bowl firm up slightly before smoothing, or it may become misshapen.
When the bowl has dried to a leather hard stage, use fine grit sandpaper or a sanding sponge to further smooth and even out the surface. Apply a clay sealant like polyurethane or acrylic to seal the porous clay before painting or glazing.
You can leave the bowls natural or add color and decoration. Acrylic paints work well on clay as do ceramic glazes. Allow paint or glaze to fully dry before use. Apply a sealant over paint if needed for functional pieces. Have fun being creative with bowls in different shapes, sizes, and decorative styles.
Magnets and Ornaments
Clay is a fun, versatile material for creating decorative magnets and ornaments. Here are some beginner-friendly projects to try:
Sculpt miniature magnets by rolling clay into balls, teardrops, hearts, or custom shapes. Add texture by pressing in designs with rubber stamps, toothpicks, or modeling tools. Use acrylic paints to add color before baking the magnets according to package directions. Glue magnet backs onto the cooled pieces.
For mini ornaments, sculpt balls of clay into wreaths, trees, stars, and more. Make a wreath by rolling a ball into a snake, shaping it into a ring, and sealing the ends together. For a tree, roll a cone shape and add balls of clay for decoration. Stars can be made by sculpting five balls into pointy teardrops and attaching them into a star shape.
Add interest to magnets and ornaments by attaching beads, glitter, ribbons, and other embellishments with glue after baking. Create hangers for ornaments using ribbon, string, or jewelry wire and hooks. The sculpted clay pieces make wonderful gifts and tree decorations for any holiday or season.
Household Items
Creating simple clay household items is a great way to start working with clay as a beginner. Items like coasters, pencil holders, and vases allow you to practice basic slab building and sculpting techniques.
To make clay coasters, roll out a slab of clay about 1/4 inch thick. Use a circular cutter, cup rim, or other object to cut out round shapes. Decorate the clay circles with stamps, texture mats, or carving tools. Add a cork or felt bottom after baking.
For a clay pencil holder, roll coils and attach them into a cup shape. Smooth the coils together and sculpt details like faux stitching. Make sure the opening is wide enough for pencils.
Handbuilt vases are a classic beginner clay project. Drape soft slabs over objects to create rounded shapes. Join slabs using the score and slip method. Make vertical cuts for a fluted effect. Add decorative elements like beads, flowers, or strips of clay.
The great thing about household items is you can customize them with personal designs. And they make wonderful handmade gifts full of creativity and meaning.
Clay Planters
Creating your own clay planters and pots is a satisfying project for any beginner potter. The process allows you to shape functional vessels from a lump of clay using only your hands, simple tools, and your creativity. Handbuilding techniques like coiling and slab construction give you total control over the size and design.
Start with a sturdy clay base made by pounding and smoothing clay into a flat slab for the bottom. Then form the sides by rolling clay coils and stacking them on top of each other. Blend the coils together and smooth the interior and exterior with a ribs tool. Make a drainage hole before letting the planter dry completely.
You can leave your planter’s surface plain or add decorative details. Imprint patterns using rubber stamps or found objects. Brush on colorful glazes or use acrylic paints before firing. The possibilities for personalization are endless.
After bisque firing, seal the interior with a food-safe glaze before using your planter for live plants. Always double check that any decorative glazes on the exterior are non-toxic. Your handmade clay pot will be both beautiful and functional for years to come.
Next Steps
Once you’ve tried your hand at some beginner clay projects, you may be ready to take your skills to the next level. Here are some ideas for continuing your clay craft journey:
Joining local classes and workshops – Look for opportunities to learn from experienced clay artists in your community. Many local art centers, craft stores, and colleges offer evening or weekend clay workshops. These provide great hands-on practice and coaching from experts.
Recommended books and online resources – Expand your knowledge by reading books and websites focused on clay art. Look for guides on sculpture, pottery, jewelry making, and more. YouTube videos can provide step-by-step tutorials on specific techniques.
Entering local art shows and competitions – Consider submitting your creations to juried art shows in your area. This allows you to showcase your work and potentially win awards. It’s also motivating to have a goal to work towards.
With a combination of practice, expert guidance, and persistence, you can continue improving your clay skills. Allow yourself to make mistakes, take artistic risks, and find your own creative style. The world of clay crafts offers endless rewarding possibilities.


