What Is Hand Building In Ceramics?
What is Hand Building in Ceramics?
Hand building is a method of creating ceramics without the use of a potter’s wheel. It is one of the oldest and most accessible forms of working with clay. Hand building involves shaping clay by hand using techniques like pinch pots, coil building, slab construction, and sculpting (Source 1).
The definition of hand building is using hands and simple tools to form clay into functional or decorative objects. Clay can be molded into virtually any shape using hands and fingers. Compared to throwing on the wheel, hand building allows more freedom of form and expression. It is an intuitive and direct way to create one-of-a-kind ceramics (Source 2).
The most common hand building techniques are pinch pots, coil pots, slab construction, and sculpting. Pinch pots are made by pinching and pulling the clay into shape. Coil building involves rolling out ropes of clay and stacking them to build up vessel forms. Slab construction uses flat slabs of clay that are joined together. Sculpting uses the clay like a modeling material to create free-standing sculpture. Each technique allows for unique possibilities in ceramic design.
History of Hand Building
Hand building pottery is considered one of the oldest ceramic techniques, with evidence of hand-formed clay vessels dating as far back as 28,000 BCE according to Wheel & Clay. The earliest known handbuilt ceramic artifact is from Dolni Vestonice in the Czech Republic.
Hand building techniques likely developed out of the need for portable vessels and containers. Early civilizations shaped clay by hand to create objects for storing food and water. Finger-shaped pots found at Jomon sites in Japan date back to 10,000 BCE or earlier The Crucible.
As civilizations advanced, hand building techniques became more refined. Coil building and slab construction emerged as methods for making larger, uniform vessels. Decorative techniques like incising surface designs also developed across many cultures. Traditional hand building methods persisted even after the invention of the pottery wheel in Mesopotamia around 6,000 BCE.
While wheel throwing dominated industrial ceramic production, hand building remained an important technique. Studio potters in the 20th century returned to hand building for its creative flexibility. Contemporary ceramic artists combine hand building methods with wheel throwing to create innovative forms not possible with either technique alone.
Benefits of Hand Building
Hand building offers several advantages over wheel throwing and other ceramic techniques. Some key benefits of hand building include:
More direct contact with the clay – With hand building, you are literally hands-on with the clay from start to finish. This allows for a more intimate connection with the medium rather than using tools like a pottery wheel.
Versatility – Hand building allows for creating unique shapes and forms that may be difficult on the wheel, like sculptural and conceptual pieces. There is more creative freedom.
Creativity – Related to versatility, hand building provides the ability to craft pieces exactly as imagined without constraints of other techniques. Anything envisioned can be created from the clay.
Therapeutic – The tactile nature of hand building with clay is calming and therapeutic. Working directly with the clay can relieve stress and anxiety.https://stylemagazines.com.au/lifestyle/carys-martin-ceramics-planting-trees/
With more control and creative possibilities, many ceramists find hand building to be an extremely rewarding process.
Hand Building Techniques

There are several fundamental hand building techniques used in ceramics:
Pinch Pots
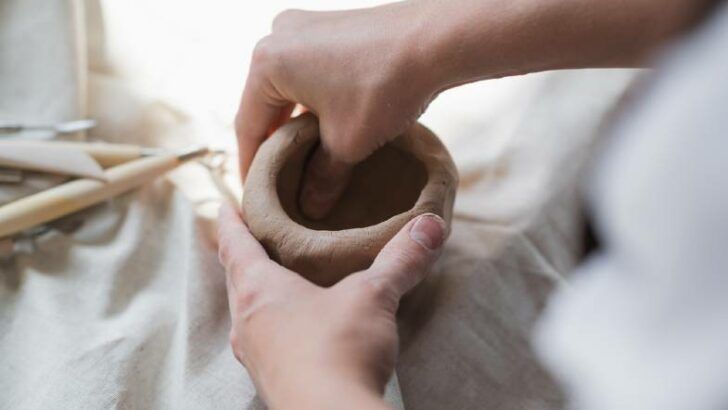
Pinch pots are one of the most basic hand building techniques. To make a pinch pot, start with a ball of clay and use your fingers and thumbs to pinch and pull the clay upwards from the bottom to form the pot shape. Pinch pots are useful for making simple bowls, cups, and vases. According to the Academy of Everywhere, pinch pots help beginners start to understand the plasticity of clay.
Coil Building
Coil building involves rolling out clay coils then stacking and blending the coils together to build vertical forms. This technique is great for making vases, bottles, and cylindrical shapes. Long thin coils are best for uniform cylindrical shapes, while thicker uneven coils create more organic forms. Coils can be stacked then smoothed by blending and smoothing the joints.1
Slab Construction
Slab construction involves rolling out flat slabs of clay then cutting and assembling them to create forms. Square slabs cut with straight edges lend themselves to geometric forms like boxes. Organic freeform shapes can be created by cutting curved contours into the slabs. Slabs are useful for making flat surfaces like tiles, plates, and plaques. Slabs can be stacked, cut, folded, and joined to create hollow forms.
Modeling
Modeling is a freeform technique that involves manipulating solid masses of clay into forms using your hands, fingers, and simple tools. Pinching, pulling, smoothing, incising, and shaping the clay while supporting it from underneath creates sculptural forms like figures, animals, and abstract shapes. Modeling is a direct and intuitive way of working with clay.
Combining Techniques
Hand building techniques can also be combined to create more complex forms. For example, constructing parts with slabs, coils, or pinch pots, then assembling them into a composite sculpture. Textures and patterns can be applied across techniques for visual interest. With practice and creativity, hand building allows for diverse possibilities.
Tools for Hand Building
Hand building requires a basic set of tools in order to sculpt, shape, refine, and decorate clay. Some essential tools for hand building include:
Ribs – Ribs are thin slats of wood, metal, or plastic used to smooth clay and compress slabs. Ribs can be straight or curved. Wood ribs are flexible and tend to cause less sticking to clay. Ribs help remove air pockets and create smooth surfaces.https://s.click.aliexpress.com/deep_link.htm?aff_short_key=UneMJZVf&dl_target_url=https%3A%2F%2Fwww.aliexpress.com%2Fitem%2F1005006153388540.html%3F_randl_currency%3DAUD%26_randl_shipto%3DAU%26src%3Dgoogle
Loop tools – These are wires bent into different shaped loops used to refine details and textures in clay. The loops allow reaching into concave areas. Metal loop tools can leave marks in soft clay.
Sponges – Sponges help absorb excess water from clay and smooth surfaces. A damp sponge can also meld slabs together. Textured sponges can create patterned effects.
Cutting wire – Sturdy wire is used to cut slabs and blocks of clay cleanly and precisely. A tight wire creates clean edges.
Clay Bodies for Hand Building
The properties and composition of the clay body are key considerations when hand building. Clay can be earthenware or stoneware, providing different levels of porosity and fired strength. Earthenware clays have higher porosity, absorb water, and are fired at lower temperatures. Stoneware clays are less porous, water-resistant, and stronger when fired at higher temperatures.
Clay bodies can also contain grog, which is ground up fired clay added to the raw material. Grog gives the clay more tooth and structure, which is helpful for hand building. It also reduces shrinkage and warping. However, too much grog can make the clay body weak. Smooth clays without grog are also an option, providing more plasticity and flexibility when working by hand.
In general, stoneware clays with moderate grog content are recommended for most hand building applications. For sculpture, a grogged stoneware provides strength to support weight. Smooth stonewares or earthenwares work well for hand built tiles, plates and other functional wares where flexibility is needed for shaping and draping. Testing different clay bodies is key to finding one with the right blend of workability, strength and fired characteristics for your hand building projects.
Textures and Surface Design
There are many techniques to add visual interest and texture to hand built ceramics. Incising into the surface with various tools like needles, knives, or skewers can create delicate line work. Sgraffito involves scratching through a layer of slip or underglaze to reveal the clay color underneath. Pressing objects like leaves, lace, or texture mats into the soft clay results in their imprinted pattern on the surface. Using wood, rubber or clay stamps can also decorate the clay by imprinting repeating imagery. Slip trailing involves drizzling liquid clay slip onto the surface to draw fine lines and details.
Adding visual textures not only enhances the aesthetic quality of hand built ceramics, but also provides opportunities for creative expression. The textures applied can complement the form, draw inspiration from the natural world, or add an unexpected element of visual interest. With thoughtful incorporation of incising, sgraffito, pressings, stamps, and slip trailing, hand builders can create custom surfaces that showcase their artistic vision.
Some examples of beautifully textured hand built ceramics can be seen at the references below:
[1]
[2]
Drying and Firing Hand Built Work
Proper drying and firing are critical steps when working with hand built ceramics. Rushing the drying process can lead to cracks and explosions in the kiln. Slow drying allows moisture to evaporate evenly without creating stresses. Pieces should be dried for several days to a week or more depending on their size, density, and climate conditions. It’s best to allow drying to occur naturally without applying additional heat.
Once bone dry, the clay objects go through an initial bisque firing to around 1600-1800°F. Bisque firing further hardens the clay and prepares it for applying glazes if desired. The bisque ware can then be glazed and fired to a final temperature between 2000-2400°F depending on the glaze being used. Raku and pit firing are other options that involve removing ware from the kiln at different points to create unique effects through rapid cooling. Always follow the manufacturer’s instructions for recommended temperatures and hold times.
No matter the firing technique, patience is required at each stage. Slow drying, proper bisque firing, and correct glaze firing help ensure hand built ceramics have their best chance of surviving the process intact. Pieces with cracks, air pockets, or thickness variation may require extra drying time or benefit from being fired on stilts.
For more on drying and firing techniques, see this overview from Ceramic Arts Network and these tips from Soul Ceramics.
Tips for Successful Hand Building
When getting started with hand building, it’s best to begin with simple forms and objects. This allows you to get comfortable with the techniques without taking on overly complex projects right away. Here are some tips for hand building success:
Start with basic shapes like balls, coils, slabs. Practice making pinch pots, cups, bowls, and vases by combining these elemental forms. As your skills progress, you can attempt more intricate hand built ceramics.
Always properly support parts of your hand built work while constructing. Use foam, soft clay, or your hands to support sections like handles and spouts as you build to prevent cracking or collapse.
Aim to achieve consistent thickness in your hand built pieces. Rolling out clay slabs to an even, uniform thickness will help prevent issues like thin spots or cracking when drying and firing. Target 1/4″ thickness for general hand building.
Let your hand built creations slowly air dry on a flat, stable surface before bisque firing. Covering with plastic wrap can help retain moisture. Avoid drying too quickly to prevent cracking and warping.
Smooth joints between coils, slabs, and parts using various tools and plenty of water. Well blended and smoothed seams will be firmer and look more cohesive when completed.
Consider the overall form and weight distribution when hand building. Heavier sections like the base should be proportional to prevent toppling. Plan ahead.
Learn techniques like using armatures, hump molds, and resist methods to expand what’s possible to create by hand. Collaborate with other hand builders to pick up tips.
Be patient with yourself while learning hand building skills. Allow time to practice fundamental techniques through simple projects first before attempting more complex ceramic artworks.
Inspiring Hand Built Ceramics
Hand building techniques allow for a wide range of creative expression in ceramic art. Many artists utilize hand building to produce unique sculptural forms, whimsical characters, and elegantly simple vessels.
Coil pots are one of the most ancient hand building techniques, dating back thousands of years. Modern coil pots showcase the technique’s versatility, from rounded organic forms to geometric patterns. Artists like Elizabeth Kendall expertly stack and meld coils to form vessels with flowing, lyrical shapes. Jennifer McCurdy’s vessels have bold graphic faceting created by the triangular clay coils.
Slab construction opens up sculptural possibilities. Claire Curneen constructs imaginative animal and humanoid figures from carefully cut and joined slabs. Slab surfaces can be textured, incised, or imprinted prior to assembly, as in the compelling masks of ceramicist Jonathan Keep. Sheila Elias forms her signature undulating ceramic vessels by slumping and joining thin clay slabs.
Combining hand building methods allows further innovation. Lucy Fagella sculpts haunting busts with expressive faces using pinched, coiled, and slab elements. Chris Antemann’s food-inspired human figures incorporate coils, slabs, cutouts, and modeling. Billie Zangewa’s silk tapestry portraits are first sculpted in clay using a variety of hand building techniques.
Hand building enables ceramic artists to put their personal vision directly into the clay, handcrafting pieces with an intimacy and care not possible with other methods. The imaginative possibilities are endless.


