What Small Things Can I Make With Clay?
Clay is a fun, versatile material that’s perfect for making small crafts and creations. It’s moldable, allowing you to shape it into any form you desire. Clay holds its shape once molded but stays workable until you bake it, making it easy to sculpt intricate designs. The finished pieces also retain fine detail once hardened through baking. Clay comes in many colors and finishes, providing endless options for your miniature designs.
Sculpting with clay offers satisfaction from using your hands to create something unique. It provides an enjoyable, relaxing creative outlet to make decorative, practical, or whimsical objects. The material is also affordable and accessible. Basic clay, tools, and baking equipment are inexpensive and easy to find. You can make small clay crafts anywhere without a lot of space.
This article covers different small items you can create with clay as a beginner. It provides an overview of basic supplies needed and includes sections on sculpting miniature figures, jewelry, food charms, magnets, buttons, and more. Each section contains insights and tips for working with clay on a small scale.
Basic Supplies Needed
When working with clay, having the right supplies on hand will make the process easier and help you achieve better results. Here are some of the basic items you’ll want to have:
Types of Clay – Polymer clay, air-dry clay, and oven-bake clay are common types used for small clay projects. Polymer clays like Sculpey do not require baking and air-dry overnight. Oven-bake clays like SuperSculpey require baking at low temperatures to harden.
Clay Sculpting Tools – Clay shaping tools allow you to manipulate and mold the clay. Basic tools include loop tools, rubber shapers, silicone tipped tools, ribs, rollers, dotting tools, and clay cutters.
Work Surface – Cover your work area with wax paper, parchment paper, or a silicone mat to prevent the clay from sticking as you work. A smooth tile or glass work surface also helps.
Paints and Finishes – Acrylic paints work well for adding color and details. Consider finishes like varnish, glaze, or polyurethane to seal and protect completed pieces.
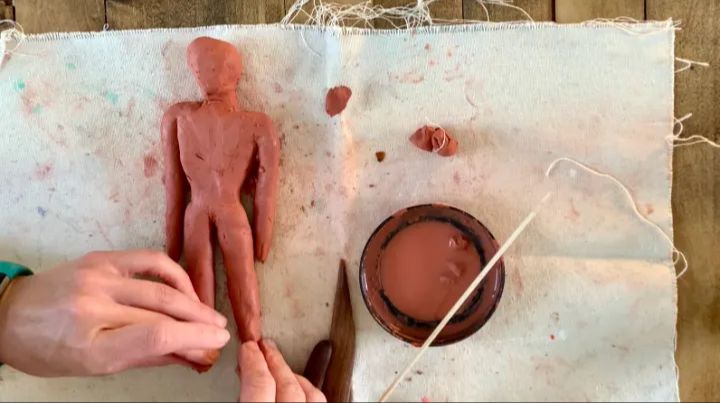
Miniature Figures
Clay is an excellent material for crafting miniature sculptures of people, animals, or other objects. The malleable texture enables you to mold intricate details and achieve a realistic, lifelike appearance. With practice and the right tools, clay miniatures can resemble small porcelain dolls or statues.
Certain clay tools like loop tools, clay shapers, and rubber-tipped sculpting tools are ideal for adding fine details to miniatures. Loop tools with various shaped wire ends can create lines and folds in clothing or etch delicate patterns in hair or fur. Clay shapers have rounded silicone tips that smooth and blend softer portions. Sculpting tools with rubber tips are useful for shaping features without leaving fingerprints or marks.
When sculpting miniatures, start by shaping the basic form from a small lump of clay. Add proportional limbs or other appendages. Then begin using your clay sculpting tools to etch finer details like facial features, fingers, toes, scales, feathers, etc. Work carefully and patiently to capture realistic qualities. Allow your clay sculpture to firm slightly between steps for better results. With practice, you can create remarkably intricate clay miniatures to decorate your home or give as gifts.
Jewelry
Clay is a fun and creative material for making jewelry pieces like beads, pendants, earrings, rings, and more. Here are some techniques and project ideas for making jewelry with clay:
Clay beads are one of the simplest clay jewelry projects. Roll balls or tubes of clay, pierce a hole through them before baking, and string them onto cords once hardened. Try different shapes, sizes, and colors for lots of variety. Clay beads can be painted or glazed after baking for extra decoration.
Pendants and charms are easy to make by shaping clay into rounds, hearts, stars, or any other design, punching a hole, and baking. Get creative with caning techniques to make patterned pendants – this involves slicing thin sheets of colored clay, layering and manipulating them to create designs like stars or zigzags, then encasing the caned clay in an outer layer before baking.
For clay earrings, cut or roll balls/tubes of clay into earring shapes, punch holes, and bake. Simple studs can be made by rolling a small ball of clay for the front and attaching a finding. Make dangle earrings by shaping clay into drops, discs, geometric shapes or adding beaded elements. Ensure earrings are lightweight to prevent stretching lobes.
Clay rings are fun to create by rolling out thin coils and attaching the ends together, or use thicker coils shaped and molded into bands. Rings can also be made from shaped and molded balls of clay. Size clay rings carefully before baking so they slide on properly after hardening.
Clay is an affordable, accessible material for making customized, creative jewelry pieces from scratch. Let your imagination run wild dreaming up colorful, whimsical jewelry creations.
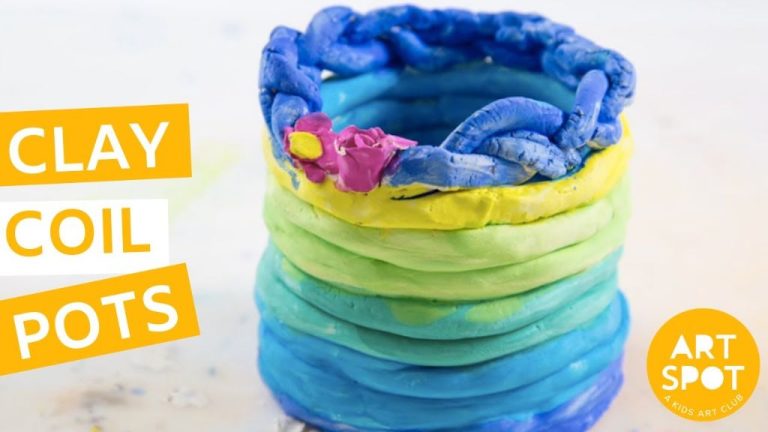
Mini Pots and Vases
One of the most popular and fun projects to make with clay are tiny decorative pots, vases, and bowls. These mini containers are great for holding small trinkets, flowers, candy, and more. They also make wonderful gifts and decorations.
Start by sculpting basic pot or vase shapes. Roll balls or coils of clay and attach them together, hollowing out the center. Add indentations with your fingers or clay tools to shape spouts and handles. Refine the rims and smooth over attachment points.
Next, impress textures like stripes, dots, and geometric patterns into the clay using clay tools, your fingers, or household objects. Try pressing in seashells, leaves, or other natural items to transfer their texture. Incising lines with skewers or poking dots with a pen cap are other easy ways to add decorative designs.
Make sure the walls are an even thickness so they hold their shape during baking. Let the clay dry completely before firing it in a kiln. Finally, paint or glaze your finished clay pots and vases for added color and shine.
Mini Food Charms
Sculpting miniature versions of your favorite foods is a fun clay project that also makes delightful charms and decorations. With polymer or air-dry clay, you can recreate miniature cakes, pies, donuts, fruit, vegetables, and more in remarkable realistic detail.
Start by gathering image references of the foods you want to sculpt. Look for high-resolution photos that show textures and colors clearly. Use these as a guide while sculpting the basic shapes out of clay. Form a small ball of clay for berries, a teardrop for lemons, a round disc for pizza, etc.
Next, use clay tools like toothpicks, skewers, and silicone tipped shapers to add detailing to replicate textures. Markings like seeds on strawberries, ridges on oranges, or lattice crust on pies bring realism. Use a rubber stamp or knife to get texture like leaf veins on kale or seeds on cucumbers.
Bake polymer clay food charms according to package directions. For air-dry clay, allow several days to fully cure before painting. Acrylic craft paints in appropriate food shades work well. You can also blend colors to get just the right carrot orange or blueberry purple. Finish with a glow varnish or satin sealant spray.
Add an eye pin before baking so you can turn your clay food charms into pendants, earrings, ornaments, bag charms, greeting card embellishments, and more. Display them in a realistic mini picnic scene or food truck set up. Your polymer clay food creations will look incredibly lifelike and whimsical.
Magnets
Magnets are one of the most versatile and fun small clay projects you can make. With just a bit of clay, you can sculpt miniature magnets in any shape imaginable to decorate fridges, lockers, and magnetic boards.
Start by conditioning a small ball of clay until smooth and soft. Sculpt simple shapes like hearts, stars, animals, or abstract designs. Add details with toothpicks or clay tools.
You can also press small items like beads, sequins, or confetti into the clay to create embedded magnets. Let your creativity run wild and make magnets inspired by your hobbies, favorite places, or cherished memories.
Allow the clay magnets to fully dry and cure. Then apply several coats of acrylic paint in any color. Finish with a clear acrylic sealer. Glue magnet strips or magnetic sheets onto the back of each magnet before displaying them.
Handmade clay magnets make great gifts, party favors, or a fun way to decorate personal spaces with a unique DIY flair.
Decorative Buttons
One of the simplest items to sculpt out of clay are decorative buttons. The clay can be shaped and molded by hand or shaped into discs and textures or designs added using simple household tools. Decorative clay buttons can make great additions to clothing, bags, hats and more. They can also be standalone art pieces.
When sculpting decorative clay buttons, start by shaping the clay into discs using your fingers, clay shaping tools, or circular cookie cutters. Impress designs into the buttons by pressing textures into the clay using household objects like bottle caps, kitchen utensils, coins, shells, or textured fabrics. Use clay shaping tools to carve lines or add further details.
To add extra visual interest, clay buttons can be painted or glazed before firing. Try using acrylic paints, liquid clay, or mica powders to add color. The buttons can also be embellished with beads, feathers, or other small objects pressed into the clay before baking.
Clay buttons make for quick and satisfying mini clay projects. They can be created in different shapes, sizes and designs. And they have many creative uses from wearable art to display pieces.
Mini Planters
One fun and functional way to use up extra clay is to create miniature planters for small plants like succulents or air plants. With just a ball of clay, you can pinch and shape tiny planters in any design you like. Coil pots are another easy option – simply roll ropes of clay into coils then stack them on top of each other to form the pot shape. For a more geometric look, cut out clay slabs and join them to form cubic or pyramid shaped planters.
The benefit of small clay planters is you can make them to perfectly fit diminutive plants. Custom sizes and shapes allow you to highlight different plants. To finish, allow the mini planters to fully dry before firing according to the clay instructions. Once fired, seal the inside with a non-toxic sealant designed for clay. Add a drainage hole, then your mini planters are ready for tiny plants!
Finishing and Sealing
After creating your clay masterpieces, it’s crucial to properly finish and seal them to preserve your hard work. Allowing adequate drying time enables the clay to solidify correctly and reduces the chances of cracking or breakage. With polymer and air-dry clays, drying can take 1-7 days depending on the size and thickness of the item. Oven-bake clay will be dry once cooled after baking.
Applying a sealer or finish is also highly recommended with any clay creation, both for aesthetic purposes and to protect the surface. Clear acrylic sprays work for all clay types to seal and add shine. Polyurethane or epoxy resin can also be brushed on for a glossy coating. Baking polymer clay a second time after rubbing a liquid finish into the surface helps seal it. Wax finishes like beeswax add soft luster. Paints and glazes specifically formulated for clay application add color and design options.
With proper sealing and finishing, clay art can last for years to come. The right products and techniques preserve detail, provide protection, and enhance the natural beauty of clay.