Clay Art Projects To Spark Your Creativity
Clay art has seen a major resurgence in popularity over the past few years. From polymer clay jewelry and figurines to hand-built pottery and ceramic sculptures, working with clay allows limitless creative expression. The tactile, sensory experience of crafting with clay is satisfying and therapeutic for many. As a versatile, abundant, and forgiving medium, clay enables beginners to get started easily while still offering endless room for mastery and refinement of technique. Both the process-focused slow craft aspect and the charming imperfections of handmade clay creations have fueled a revival of interest in this ancient artform. As digital life increasingly dominates our time, clay crafting provides a grounding hands-on hobby to balance screen time. The worldwide enthusiasm is evident in booming museum exhibits, robust online communities, and classes teaching both traditional and innovative clay techniques.
Beginner Clay Projects
One of the easiest clay projects for beginners is making coil pots. Coil pots are made by rolling out “snakes” or coils of clay and stacking them on top of each other to build the pot shape. Start with a clay base and coil up the sides, blending and smoothing as you go. Add texture by making patterns with the coils or leave smooth. Once the coils are attached, blend the seams and smooth out the inside and outside of the pot. Let it dry completely before baking according to package instructions. Coil pots are a great way to learn clay handbuilding skills and make functional pieces like vases, bowls, and cups (Source: https://wheelandclay.com/blog/pottery-ideas-for-beginners/).
Intermediate Clay Projects
Once you have mastered the basics of working with clay, you can move on to more complex intermediate projects to further develop your skills. One great intermediate technique to try is slab construction for bowls or boxes. This involves rolling out slabs of clay to a consistent thickness and joining them together to create a hollow form (cited from https://www.pinterest.com/schmude99/clay-intermediate/).
When working on slab built vessels, pay close attention to smoothing the seams and joints between your clay slabs. Consider adding decorative elements like carvings, textures, or cut-outs to make your piece more unique. You can create lids for your slab bowls and boxes by cutting a circle from another flattened slab (cited from https://ceramicartsnetwork.org/clayflicks/technique-levels/intermediate-pottery-techniques).
Some other intermediate clay project ideas include making mugs or vases on the wheel, sculpting animal figurines, creating ceramic jewelry pendants, and handbuilding masks or decorative wall plaques. The possibilities are endless once you move past basic clay fundamentals. Be patient with yourself as you attempt more difficult projects and don’t be afraid to experiment.
Advanced Clay Projects
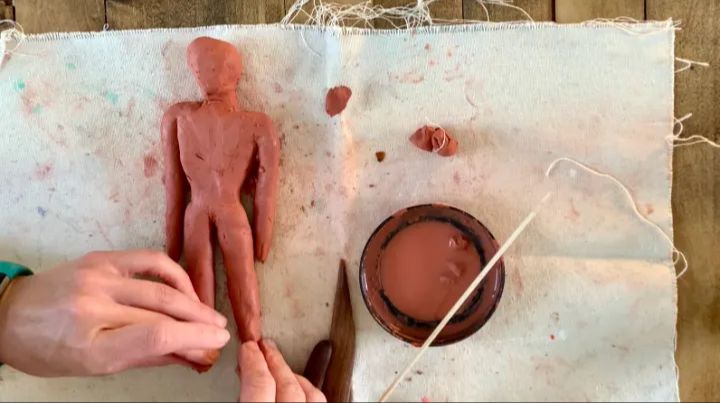
Experienced clay artists looking to take their skills to the next level may enjoy sculpting intricate figures or busts. This requires careful planning and expert technique to craft the details that bring a sculpture to life.
First, consider the subject matter and overall vision for the piece. Gather reference images to inform the work. For a figure sculpture, take the time to sketch the pose from multiple angles first. Pay close attention to anatomy and proportion.
For a bust, focus on capturing a likeness. Carefully sculpt the unique facial features, hair texture, and any other distinguishing details of your subject. Refine areas like the eyes, nose, mouth, and ears until you achieve a good resemblance.
Use an armature or wire frame to support the weight of the clay while sculpting. Add clay gradually and use calipers or a ruler to maintain accuracy. To add realistic skin texture, utilize a variety of sculpting tools and techniques like stippling, smoothing, carving, or scraping.
Allow your sculpture ample time to dry thoroughly before firing. Clean up any imperfections and sharpen details using clay sculpting tools. Apply a sealant if desired. With patience and practice, you can create exquisite figural sculptures from clay.
For more advanced clay sculpting techniques, see this helpful guide from United Now.
Clay Jewelry
Handmade clay jewelry is a fun and popular craft for both beginners and advanced artists. Polymer clay, in particular, is a versatile medium that allows for creative self-expression and DIY fashion design. Jewelry makers appreciate how polymer clay is waterproof, durable, lightweight, and easy to shape and sculpt. With just some clay and basic tools, you can create stylish necklaces, pendants, earrings, rings, beads, and more using just your imagination.
Polymer clay earrings are one of the most accessible beginner projects. Simple earring designs, like geometric shapes, floral motifs, and abstract textures, are a great starting point. Many polymer clay jewelry tutorials focus on earrings since they require only small amounts of clay and basic hand-sculpting talents. You can create unique one-of-a-kind earrings by adding colors, patterns, charms, and found objects to your base clay shapes. The possibilities for polymer clay earring designs are endless! Let your creativity shine.
Pendants and beads are also easy to make even for novice clay artisans. Roll balls or teardrops of clay and then press designs like swirls, stripes, and shapes into the surface. Use cookie cutters, stamps, or stencils as extra embellishments. String your finished clay beads and pendants on cords or chains to complete necklaces and bracelets. You can also combine polymer clay beads with other materials like glass beads or gems for more texture and visual interest.
Check out these step-by-step clay jewelry tutorials for inspiration on everything from geometric earrings to floral pendants. With some practice and patience, you can soon be selling and gifting your own unique handmade polymer clay jewelry creations.
Clay Home Decor
Clay is a versatile material that can be used to create beautiful home decor pieces like wall plaques, vases, bowls, and more. Handcrafted clay decor adds a creative, artistic touch to any space.
Wall plaques made from clay are an easy DIY project. You can press objects like leaves, seashells, or cookie cutters into clay to make imprinted designs. Let the clay air dry, then paint it with acrylics. Finish with a sealant spray. Hang your custom plaque on a wall or mount it on wood or canvas for a rustic look. (Source)
Sculpt clay into unique vase shapes like waves, spirals, or geometric patterns. Make sure the walls are 1/4 to 1/2 inch thick so the piece can stand securely. Decorate with paints or leave unfinished for an earthy vibe. Fill your handmade vase with flowers or display it solo.
Handbuilt clay bowls also make thoughtful gifts or keepsakes. Roll clay into a slab using a rolling pin then cut a circle using a bowl as a template. Drape the clay circle over an inverted bowl to form the bowl shape. Crimp and smooth the seams. Add texture by pressing in designs using your fingers, tools, or stamps. Let dry fully before using.
With some creativity, clay can transform into beautiful platters, candle holders, plant pots, and more to personalize your home.
Clay for Kids
Clay is a wonderful art material for kids of all ages. It’s fun to mold and shape, and it allows kids to express their creativity. Here are some simple clay crafts that are perfect for kids!
Simple Animals
Kids love making animals out of clay. Help them roll balls of clay for the bodies and add simple details like tails or ears. Let them use toothpicks to add textures and designs. Bake the clay animals according to package directions. This guide has cute ideas like clay dogs, rabbits, turtles and more.
Shapes
Encourage fine motor skills and shape recognition by having kids make clay shapes like circles, squares, triangles, rectangles and diamonds. Flatten balls of clay into pancakes for round shapes. Roll snakes and bend them into squares or triangles. Use cookie cutters to make shaped cut-outs.
Handprints
Capture your child’s hands in clay for a keepsake craft. Press their hands gently into a flattened slab of clay to leave an impression. You can write their name and age on the clay handprint before baking.
Seasonal Clay Crafts
Clay is a fun, creative material to use for seasonal crafts and decorations. Making your own ornaments, wreaths, and other items out of clay allows you to customize them exactly how you want. Air dry clay is an especially easy type to use for beginner crafters. You don’t need any special tools, just your imagination.
Some popular seasonal clay crafts include:
- Ornaments – Make personalized Christmas ornaments by imprinting names, dates, or designs into clay shapes like balls, stars, bells, etc. Let harden before decorating with paint, glitter, and other embellishments. Loop ribbon through a hole at the top for hanging.
- Wreaths – Roll snakes of clay and arrange into the shape of a wreath. Allow to dry fully, then decorate with faux berries, pinecones, bells, etc. Hang on doors or walls.
- Pumpkins – Clay is perfect for making miniature pumpkin decorations for fall. Use cookie cutters or hand shape clay, then make indentations with tools to create ridges.
- Snowflakes – Get creative with different snowflake cut-out designs. Layer and connect multiple snowflakes while the clay is still soft. Add glitter for extra wintery sparkle.
For inspiration, check out these air dry clay craft ideas: https://www.pinterest.com/candiecooper/air-dry-clay-crafts/. With just a little clay, you can make beautiful customized decorations for any season!
Clay Tools and Supplies
Having the right tools can make working with clay a much smoother and more enjoyable process. Here are some of the essential tools every clay artist needs:
Metal loop and ribbon tools are used to score, cut, join, and shape clay. The variety of different shaped loops lets you create different effects. Source
Pottery ribs can smooth and shape wet clay. Ribs come in a range of materials like wood, rubber, metal, and plexiglass. Ribs with serrated edges can also be used for scraping and texturing. Source
Needle tools help pierce holes in leather hard clay and reach hard to access areas. The sharp, sturdy metal needles won’t bend or break. Source
Sponges can create interesting textures by pressing into clay. Sea sponges work best as they are naturally porous. Pounce sponges on sticks help smooth seams and blend clay surfaces.
There are many types of modeling clay to choose from. Oil-based polymer clay that cures in a regular oven is very popular for jewelry and crafts. Natural clay that requires firing in a kiln allows you to make pottery and fully vitrified sculptures.
Tips for Clay Crafting
Here are some helpful tips for working with clay to create beautiful crafts and artwork:
Proper Storage
It’s important to store unused clay properly between crafting sessions. Wrap clay tightly in plastic wrap or store in an airtight container to prevent it from drying out. Keep clay in a cool, dry place away from direct sunlight. According to Gathering Beauty, you can freeze clay to extend its shelf life.
Finishing Techniques
There are various ways to finish clay pieces for added durability and decorative effects. Maria Louise Design recommends applying a sealant like polyurethane or glaze. You can also paint pieces with acrylics or use chalk pastels for color. Some options for textured finishes are sanding, sponging, or stamping.
Troubleshooting Issues
If you run into problems with cracking, sticking, or other clay difficulties, there are some troubleshooting tips that can help. Make sure to condition clay properly and avoid overworking it. Use corn starch or rubbing alcohol to reduce stickiness. Cracking can be minimized by drying clay slowly and evenly. Adding a liquid clay like diluted PVA glue to mend cracks is another useful trick.