
Wheel-Throwing Basics: A Guide To Clay Pottery Techniques
Wheel-throwing is the most popular method to shape pottery in present day. It involves using a potter’s wheel to create round ceramic ware by forming clay into the desired shapes. A round wheel rotates as the potter molds the clay into various shapes and forms by using their hands.
The origins of wheel-throwing can be traced back to ancient Mesopotamia. The earliest known potter’s wheels date back to around 3500 BCE and were simple wheeled devices that allowed the rotational momentum to aid in shaping clay vessels (https://en.wikipedia.org/wiki/Potter%27s_wheel). Over time, potter’s wheels evolved with the addition of the turntable, then kick wheel, and eventually the electric or pedal powered wheels used today.
Wheel-throwing revolutionized pottery production through efficiency and consistency. It enabled potters to quickly produce uniform vessels and develop new techniques. Today, it remains an essential skill in ceramic arts and allows for creative expression through clay.
Wheel-Throwing Tools
The potter’s wheel is essential for wheel throwing. There are electric, kick, and treadle wheels. Electric wheels have a motor that spins the wheel head, while kick and treadle wheels rely on leg power. Wheel heads, also called bats, hold the clay while throwing. Consider different wheel head materials like plaster or wood based on preferences for traction and ease of lifting finished pieces.
Rib tools are important for compressing and smoothing clay. Metal ribs provide rigidity while rubber ribs offer flexibility. Loop tools help shape details like lips and handles. Trimming tools like kidney shaped scrapers refine foot rings. Sponges add texture and absorb excess water from clay. Having a range of rib tools, loop tools, trimming tools, and sponges enables both utilitarian and artistic forming techniques.
Proper preparation and organization of wheel throwing tools makes the process more efficient. Keeping rib tools, loop tools, trimming tools, and sponges within easy reach allows potters to fluidly transition between steps while the clay is still soft and workable.
Sources:
https://www.pinterest.com/gomeze4/pottery-tools/
Preparing the Clay
Properly preparing the clay is an essential first step in wheel throwing. The clay must be wedged and kneaded to remove air bubbles and achieve the ideal plasticity and consistency.
Wedging involves cutting the clay into quarters, stacking it back together, and pushing it down. This process removes air pockets and blends the clay. Kneading is done by slamming a clay ball against the wedging table repeatedly. Both techniques distribute moisture evenly throughout the clay and make it more plastic and malleable.
The prepared clay should feel smooth, firm yet Yielding between your fingers. Too soft, and it will be difficult to center on the wheel. Too stiff, and it will resist shaping. Test a piece off the wedged clay to ensure it is not sticky or cracking.[1]
Keep wedged clay wrapped in plastic to prevent drying out. Only wedge as much clay as you will use in that session. The proper consistency will make the clay much easier to throw on the wheel.
Centering the Clay
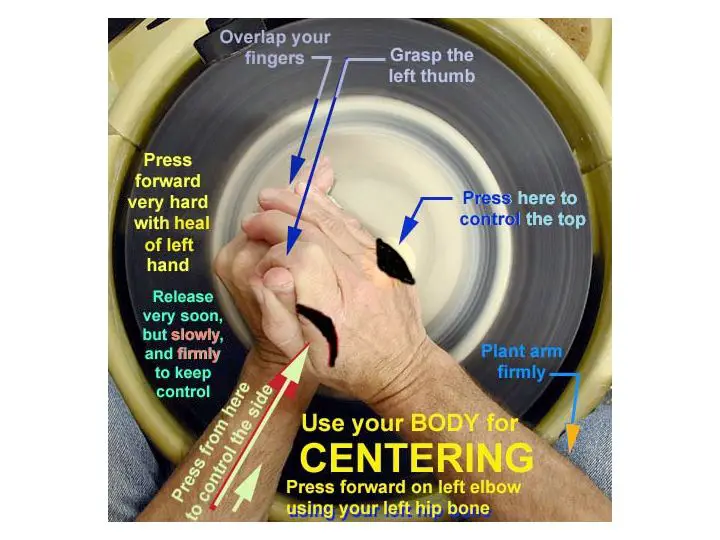
Centering the clay properly on the wheel head is one of the most important steps in throwing pottery. Being able to center the clay takes practice and getting the right body positioning and techniques.
To begin centering, stand facing the wheel with legs hip width apart, knees soft and feet planted firmly on the ground. Lean forward slightly and brace your elbows on your hips for stability. Place the clay mound on the wheel head and apply downward pressure while kicking the wheel to start it spinning slowly. Keep your elbows tucked and wrists bent, and avoid locking them. Press down gently but firmly near the bottom of the clay mound using the palms of both hands.
Continue applying even pressure as you move up the clay mound. The goal is to center the clay into a cone shape with an even, symmetrical base. As the clay begins to center, cup your hands around the base and apply a firm but gentle pressure. Avoid squeezing too tightly or digging your fingers in which can trap air bubbles. Keep the bottom thicker than the walls to provide stability. The fingers can also brace against the outside of the clay to refine the centering.
Common problems like off-center lumps or a thicker bottom edge can be corrected by pinching and gently pushing the clay into place. Pay attention to keeping wrists loose. Adding water to dry clay can also help with centering. With practice, you’ll learn the right amount of pressure and develop a feel for when the clay is properly centered on the wheel head.
Source: https://www.youtube.com/watch?v=xOEZQRkJeag
Opening the Clay
Once you have centered your clay on the pottery wheel, the next step is to open up the solid lump into a hollow form. This process is known as “coning up” the clay. To cone up the clay, place both hands around the sides of the centered clay and apply gentle outward pressure. As you slowly pull up with even pressure, the clay will begin rising into a cone shape.
Keep your fingers tight against the clay and use the leverage of your hands to pull the clay upward. Move your hands up the walls of the cone shape as it rises. Apply enough pressure so the clay keeps rising but not so much that the walls become too thin. Most pottery walls should be approximately 1/4 inch thick.
Once you have cone shaped the clay into the desired height, it’s time to open the hole. Place one hand inside the cone shape near the bottom and push down gently while continuing to support the outside walls with your other hand. This will create an opening into the interior cavity. Use your fingers to enlarge this hole steadily, working around the inside to open up space within the clay. Be sure not to drag or scrape too quickly, as this can cause thinning or tearing of the interior walls.
For very wide pieces like bowls, you may need to stop coning up the clay at a shorter height than with vases and then open the hole. Strive to keep interior walls even for stability. Use a rounded rib tool to refine the opening if needed. Once open, you are ready to begin raising the walls to their full height.
Raising the Walls
After you have centered and opened the clay on the wheel, the next step is raising the walls to build up the basic shape of your piece. This takes coordination and practice to raise the walls evenly. As you add height, use one hand on the outside and one hand on the inside of the emerging walls to support the shape.
Apply even, gentle pressure as you pull up the clay gradually. Work slowly and methodically. Rushing this stage can lead to thin spots or uneven wall thickness. Focus on maintaining an even wall thickness throughout the entire piece. Thin spots will be prone to cracking or tearing.
Keep your hands lubricated with water and resist the urge to dig your fingers into the clay, which can cause ripples. Use the flat pads of your fingers to gently support and shape the wall as it grows taller. Lift from both the inside and outside simultaneously, feeling for any thicker or thinner areas to even them out.
Continue gradually pulling the clay upwards until you reach the desired height for your piece. Remember that the walls will condense slightly as you shape and refine the form. Erring on the taller side initially allows room for trimming later.
Shaping the Clay
Once the basic form has been established by raising the walls, potters can begin to shape the clay into more refined forms using various techniques. To create rounded or bellied shapes, place one hand inside the form while shaping the outside with the other hand. Apply gentle pressure and smooth the clay slowly. Letting the clay’s weight settle can allow gravity to pull the clay into a pleasing shape. Avoid overworking the clay as this can lead to slumping or deformation[1].
Potters use a process called “collaring” to refine the rim and give definition to the top opening of wheel-thrown pieces. To collar in clay, grip the rim between the thumb and fingers while gently pressing inward and smoothing the edge. Rotate the wheel with the other hand while collaring to get an even, finished lip. Use various tools for further detailing like loop tools, ribs, and wooden modeling sticks. Wait for the right leather hard stage before collaring clay. Doing it too soon may warp the rim; too late can lead to cracking[2].
Trimming and Refining
After the initial throwing and shaping of the clay on the pottery wheel, the piece will likely have uneven edges, excess clay, and imperfections in its form. This is where the process of trimming and refining comes in. Trimming involves taking specialized tools to refine the shape and form of the ceramic piece.
Trimming is done with the clay in a leather-hard state, where it is dry enough to maintain its shape but still soft enough for tools to cut into it. The common tools used are loop tools, ribs, and metal scrapes. Loop tools can refine curves and smooth out uneven areas in the clay’s surface. Ribs are used to compress the clay walls and refine the shape. Metal scrapes can trim away excess clay to refine the foot of the piece or sharpen lines.
During trimming, the ceramist carefully rotates the clay piece on the wheel, using the tools to methodically trim away imperfect areas and define the form. It takes practice to trim evenly and avoid overcutting the clay. The ceramist must frequently stop to examine the piece from all angles to ensure symmetry is maintained. The trimming process refines the final look of the thrown pottery and helps prepare it for the next stages of drying and firing.
Trimming and refining transforms the initial thrown form into a more precise, finished piece. It is an important step that gives pottery its characteristic smooth surfaces, refined lines and perfectly shaped silhouettes. With practice, ceramists can master the specialized tools and techniques needed to expertly trim their wheel-thrown pieces.
Common Problems
Some of the most common issues that can arise when throwing pots on the wheel include:
Lopsided Pieces
If your clay is not properly centered on the wheel, this can result in lopsided pieces. Make sure to take your time when initially centering the clay and get it as centered as possible before opening up the walls. You can also try using your hands to gently nudge the clay back into center as you shape it if it starts to lean.
Thin Spots
Overworking certain areas of the clay or uneven pressure when raising the walls can lead to thin spots. Try to keep your movements smooth and your hands spaced evenly apart when shaping the clay. Go slowly and check the thickness frequently. If thinner areas do develop, you may be able to gently push the clay into the thin areas before the piece dries.
Collapsing Walls
If your clay walls are too wet or you don’t have enough interior support, the walls can collapse, especially when making taller pieces. Let the clay firm up more before raising the walls higher and be sure to maintain an even thickness. Slowing down as you approach the top rim can help. You can also try placing a folded piece of batting inside tall pieces to offer more structural support.
Other common issues like cracks, tearing, and warping often come down to the wetness of the clay. Keeping the clay at the ideal consistency and moisture level as you throw can help avoid these problems. Don’t be afraid to stop and re-wedge drier clay or add small amounts of water to clay that is too wet.
If issues do come up when throwing your pieces, stay patient and try again. The more you practice wheel throwing, the better you will get at recognizing and preventing common problems.
Source: https://potterycrafters.com/pottery-wheel-mistakes-and-how-to-fix-them/
Final Drying and Firing
Before pottery can be fired in a kiln, it is important that the clay is fully dried to prevent cracking. When clay is drying, water molecules are evaporating which can create internal stresses. If the water evaporates too quickly from the surface, the outer layer will shrink faster than the inner moist clay and cracks can form.[1] To dry pottery properly, let it air dry for several days then place it in a controlled, even environment away from direct sunlight or drafts. Use a dehumidifier or fan to circulate air and prevent moisture accumulation. Covering the clay with plastic wrap, a damp cloth, or an upside down box while it air dries will slow the surface drying. Always dry pottery slowly and evenly.[2]
Once bone dry, the pottery is ready for its first firing called a bisque firing. Bisque firing pottery brings the clay to a permanent, stable physical state and prepares it for glazing. The bisque firing happens at a lower temperature around cone 04-06 (1945-2165°F). This initial bisque firing strengthens the physical structure of the clay through sintering, removes water and organic matter, and converts minerals in the clay body.
After the bisque firing, the pottery is glazed and then fired again at a higher temperature around cone 5-6 (2165-2232°F) in the glaze firing. This melts the glaze into a glassy coating over the surface of the clay. The glaze fills in pores making the pottery water-tight. The higher temperature of the glaze firing also further strengthens the physical structure of the clay body through vitrification. Firing in two steps is beneficial because the raw pottery is much more fragile before bisque firing. Doing a bisque firing first protects the piece from thermal shocks and physical handling when it is glazed.
