Beginner-Friendly Clay Projects To Try Today
Clay is an incredibly fun and accessible art material for beginners of all ages to start sculpting and getting creative. With clay, you can make all kinds of objects from scratch using your hands. The tactile experience of shaping and molding the clay into something new is extremely satisfying. There is something special about making tangible artwork and sculptures out of this malleable medium. When you look at the finished clay piece that you put time and care into making with your own two hands, it can give you a true sense of pride and accomplishment. Clay is perfect for unleashing your creativity in 3D and bringing your imagination to life.
Gather Your Supplies
To begin your clay sculpting journey, you’ll need to gather some basic supplies. Two of the main types of clay that work well for beginner projects are air-dry clay and polymer/oven-bake clay. Air-dry clays like Crayola Model Magic are easy to find and don’t require any special tools for hardening. Polymer clays like Sculpey require baking in the oven to harden, but allow more versatility and detailed sculpting. Other options include natural clays like potter’s clay that must be fired in a kiln.
For sculpting tools, having an assortment of wooden and silicone clay tools will help shape and mold the clay. An acrylic roller is great for flattening slabs and smoothing surfaces. A cutting wire tool allows you to slice through thick sections of clay cleanly. You can also use everyday items like toothpicks, chopsticks, plastic knives, and even playing cards for sculpting, shaping and imprinting textures.
Other basic supplies include a work surface like a ceramic tile or glass cutting board, water for smoothing, and sandpaper, files or buffers for finishing surfaces. Once you have gathered some clay and a starter set of tools, you’ll be ready to start creating!
Safety Tips
When working with clay, there are some important safety precautions to keep in mind. Clay dust can be hazardous if inhaled, so be sure to work in a well-ventilated area and wear a dust mask (Source). Keep windows open and use a fan to circulate air. Children should have close adult supervision since sculpting tools like loop tools can be sharp and cause injury if used improperly (Source). Wash hands after working with clay and do not eat or drink in the work area. Follow basic studio hygiene and cleanup habits to minimize risks. Taking a few simple precautions will allow you to enjoy sculpting clay safely.
Make Simple Pinch Pots
Pinch pots are an easy, beginner-friendly project that introduces the fun of shaping clay. To make a basic pinch pot, start with a ball of clay about the size of a golf ball. Use your fingers and thumbs to pinch and pull the clay upwards, gradually opening up the form. Pinch the clay into the shape you desire, rotating it in your hands as you work. You can shape it into a simple round pot, or get creative with oval, square, or freeform shapes.
The tactile process of pinching clay is relaxing and meditative. Don’t worry about perfection – embrace the imperfections as you manipulate the clay. Add interesting textures by pressing your fingers, knuckles, or tools into the soft surface. Try making dots, lines, circles, or geometric patterns.
Pinch pots have many uses around the home. Once baked or air-dried, they make charming planters, pencil holders, jewelry dishes, tea light holders, or small vases. The possibilities are endless, so pinch away!
Try coil pots
Making coil pots is a fun and rewarding beginner clay project. Coil building involves rolling out “snakes” of clay into coils, then stacking them on top of each other to build up the walls of your pot (Source: https://www.lakesidepottery.com/Pages/Pottery-tips/Making-a-clay-coiled-pot-Lakeside-Pottery-Tutorial.htm).
To start, roll clay into long coils approximately 1/4″ thick. Smooth any cracks or bumps with your fingers as you roll. Make coils uniform in size. Then attach the coils by gently pressing and smoothing the seams together. Build coils upwards, gradually turning the form as you go. Blend coils into each other for a seamless look.
Coil building is one of the strongest handbuilding techniques since the vertical coils structurally support each other. The clay coils bond together as the excess moisture evaporates. Be sure to let your coil pots dry completely before firing.
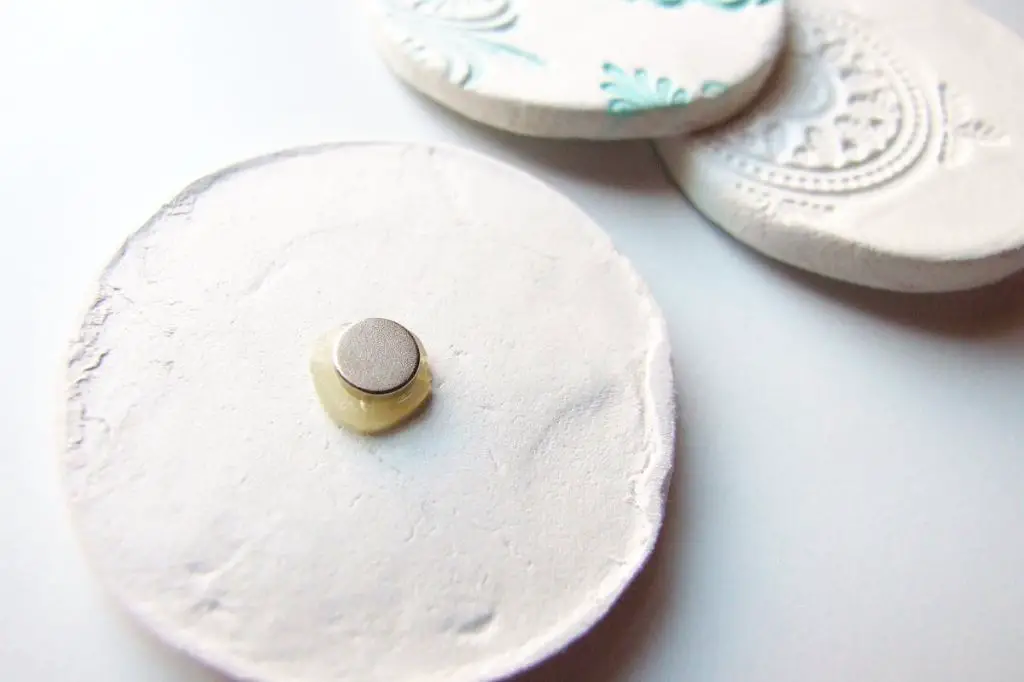
Make Clay Magnets
Making clay magnets is a fun creative project that allows you to customize magnets for your fridge or other metal surfaces. Start by rolling flat slabs of clay about 1/4-inch thick and cut them into fun shapes like circles, squares, hearts, stars etc. Make sure your clay slab is large enough to attach a magnet on the back.
Before baking, you can imprint the clay with textures using items like rubber stamps, cookie cutters, even coins. Get creative pressing objects into the clay to leave behind an imprint. You can also attach decorative elements like beads, sequins or tiny rocks. Just press them gently into the clay.
To finish, bake the clay pieces according to the package directions. Let them cool completely before gluing magnets onto the back. Use strong glue like Gorilla Glue or E6000. Place the magnet in the center and press down firmly for 30 seconds to adhere. Allow the glue several hours to fully cure before using your new customized clay magnets! They make great gifts or a fun craft activity with kids.
For more inspiration, check out: [How to make clay fridge magnets – easy DIY tutorial](https://www.merrimentdesign.com/diy-clay-magnets-fridge-clay-crafts.php)
Make Stamped Tiles
One fun and easy clay project is to make stamped tiles. Here’s how:
First, roll out flat, even slabs of clay to use as the base for your tiles. The thickness will depend on the project, but 1/4-1/2 inch is a good starting point. Use an acrylic roller or your hands to flatten the clay.
Next, use found objects around the house to stamp into the clay. You can use anything from actual rubber stamps to cardboard, bubble wrap, vegetables, or bottle caps. Press firmly so the pattern is transferred into the clay.
Stamp different textures and designs for a mosaic look. You can also use clay cutters to create additional shapes and accents.
These stamped tiles make great coasters, wall hangings, trivets, or even jewelry. Get creative with how you display or use them! Let the clay fully dry before painting or sealing for long-lasting finished pieces.
For inspiration, check out this video on making clay tiles using rubber stamps: Using rubber stamps to make clay tiles
Model Cute Animals
Modeling cute animals out of clay is a fun project for beginners. Start by making simple rounded forms like balls or eggs for the animal’s body. These basic shapes make a great starting point. According to the YouTube channel Easy Clay Animals for Beginners, “Hi everyone! I’ll be showing you how to make easy animals for beginners. For someone wanting to start small, these are perfect.” (source)
After you have the body, add details like tails, ears, legs, and faces to bring your animal creations to life. Look at pictures of real animals for inspiration on shaping these parts. Adding textures with clay tools can also make your animals more realistic. With practice and imagination, you can create a whole clay zoo of adorable creatures!
Make Clay Jewelry
Jewelry making is one of the most popular uses for polymer clay. It’s easy to shape into beads, pendants, and other components for necklaces, bracelets, and earrings. Start by conditioning your clay by kneading and rolling until smooth and elastic (source). Then use simple cutters or even your hands to cut out basic shapes like beads, discs, hearts, etc. Use a skewer or toothpick to pierce holes for stringing before baking. Bake according to package instructions. After baking and cooling, you can buff and polish pieces with fine grit sandpaper and polishing cloths to achieve a lovely glossy sheen (source). The possibilities are endless for making fun, customized, handmade polymer clay jewelry!
Finish With Paints
After baking your polymer clay pieces, you’ll want to seal any unglazed areas before painting to help the paint adhere properly. Acrylic paints are commonly used on polymer clay and work well. Be sure to use acrylics labeled as non-toxic and specified for use with oven-baked clay (Sculpey and Premo brand acrylic paints are safe options). Water-based acrylics are recommended over oil-based paints for ease of use and clean up.
After painting, you can finish your clay pieces with a clear sealant like Sculpey Glaze or Varathane to help protect the paint and give the surface an even glossy or matte look. Multiple thin coats are better than one thick coat when sealing. Let each coat dry fully before adding the next layer. And be sure to test sealants on an inconspicuous area first to ensure compatibility with the clay and paint.
With the right clay, paint, and sealants, you can bring your clay creations to life with color while keeping them looking great for years to come. Just be sure to check manufacturer recommendations and test first before painting your clay.